

Install the current RedMatic generation, validate your Node-RED environment, and enable controlled remote access
RedMatic 9 packages Node-RED 5 and Node.js 24 as add-on software for supported Homematic CCU3, piVCCU3, and current OpenCCU systems. This guide explains the prerequisites, architecture-aware release selection, checksum verification, clean installation, and the additional backup and flow-export precautions required when migrating from RedMatic 7 or 8. It then shows how current controller-session validation protects the editor and settings interface, why flow-created HTTP endpoints remain a separate security surface, and how to publish the locally verified service through a Localtonet HTTP tunnel without inbound router port forwarding.
📋 What's in this guide
How RedMatic and Localtonet fit together
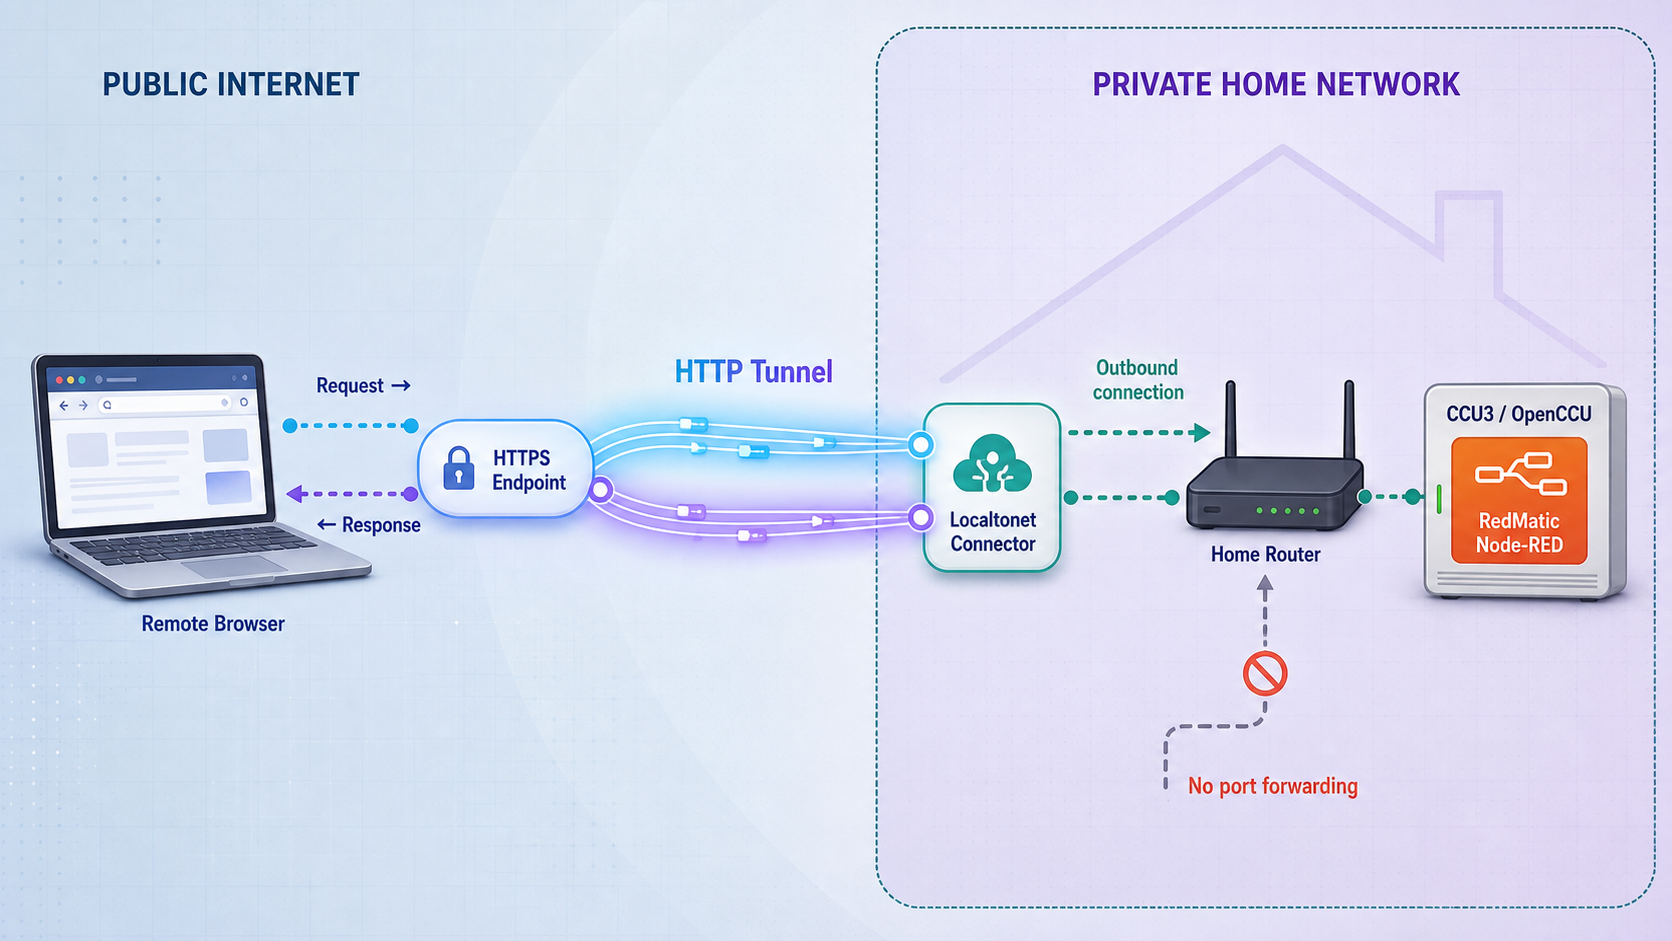
RedMatic runs Node-RED directly as add-on software on a compatible Homematic controller. Node-RED provides a visual, flow-based environment for connecting events, devices, services, and automation logic. RedMatic supplies the CCU integration needed to use that environment with Homematic.
Installation and remote connectivity are separate parts of the workflow. RedMatic must first be installed, started, and tested on the local network. Its documented local editor path is:
http://<ccu-address>/addons/red
Replace <ccu-address> with the hostname or LAN address used to reach the controller. This URL does not contain a separate Node-RED port. For a plain HTTP URL without an explicit port, clients ordinarily use port 80. If your controller sits behind a local reverse proxy, performs redirects, or uses a customized listener, use the address and port that actually work from the device that will run the Localtonet client.
After the local endpoint works, the Localtonet client establishes an outbound connection to one of our currently available relay servers. A Localtonet HTTP tunnel provides a public URL and forwards requests to the configured local IP address and port. This avoids inbound router port forwarding, inbound firewall changes, VPN setup, and the need for a public IP address.
A Localtonet HTTP tunnel targets an IP address and port, not a single URL path. If Homematic WebUI, RedMatic, and other controller routes share that listener, paths beyond /addons/red may be reachable through the public hostname. The RedMatic path is not a network-level access restriction. Test the full exposed listener and stop the tunnel if it makes unintended controller routes available.
RedMatic 9 compatibility and prerequisites
RedMatic 9 is released software, not a prospective development line. Its current release guidance requires either a CCU3 running firmware version 3.61.5 or later, or a current OpenCCU installation. piVCCU3 is also listed among the current release download targets. Older CCU firmware is no longer supported because RedMatic 9 no longer patches firmware files.
The project supports release variants for armv7l, aarch64, and x86_64. The exact asset must match the controller environment. A board name alone is not always enough because OpenCCU can run on physical hardware, virtual appliances, and container variants with different architectures.
| Environment | Current requirement | Release-selection check |
|---|---|---|
| Homematic CCU3 | Firmware 3.61.5 or later | Use the CCU3 download identified by the current release notes. |
| piVCCU3 | Current supported piVCCU3 environment | Match the host architecture to the download mapping shown for the release. |
| OpenCCU on armv7l | Current OpenCCU | Use the asset associated with armv7l variants such as supported rpi2, tinkerboard, or oci_arm systems. |
| OpenCCU on aarch64 | Current OpenCCU | Use the asset associated with supported 64-bit ARM variants such as rpi3, rpi4, rpi5, or oci_arm64. |
| OpenCCU on x86_64 | Current OpenCCU | Use the x86_64 asset for the listed ova, intelnuc, or oci_amd64 variants. |
| CCU1 or CCU2 | Unsupported | Do not use this installation workflow on these controller generations. |
| armv6l hardware | Unsupported | Raspberry Pi 1 and Raspberry Pi Zero systems are outside the supported architecture list. |
Items to prepare
- Administrative access to Homematic WebUI.
- A CCU3 with firmware 3.61.5 or later, a supported piVCCU3 environment, or current OpenCCU.
- Knowledge of the controller architecture and release variant.
- The matching RedMatic 9 release archive and its corresponding SHA-256 checksum file.
- Enough time for package installation and the required controller reboot.
- The hostname or LAN address used to reach the controller.
- A current CCU or OpenCCU backup.
- For a RedMatic 7 or 8 migration, a separately exported copy of all important Node-RED flows.
- For remote access, a compatible device that can run the Localtonet client and reach the CCU over the LAN.
RedMatic is installed through Homematic WebUI under Systemsteuerung > Zusatzsoftware. The exact text may differ with the WebUI language, but the relevant page is the controller’s add-on software management interface. The normal installation does not require editing Linux configuration files.
What changed in RedMatic 9
RedMatic 9 is a substantial modernization rather than a small update to RedMatic 7 or 8. The runtime moved from the earlier Node.js 14 and Node-RED 1 generation to Node.js 24 and Node-RED 5. This matters for flow behavior, third-party node compatibility, administration, and upgrades.
| Area | RedMatic 9 behavior | Practical impact |
|---|---|---|
| Runtime | Node.js 24 and Node-RED 5 | Review custom nodes and flows for compatibility with the newer runtime before relying on them. |
| Preinstalled nodes | Only node-red-contrib-ccu is preinstalled |
Do not expect Dashboard, HomeKit, E-mail, Sun-Position, Combine, RedMatic-LED, or other former bundled packages to appear in a clean installation. |
| Node installation | Additional nodes are installed through the Node-RED palette manager | The old RedMatic package manager is no longer used. |
| Legacy interfaces | The RedMatic package manager and RedMatic WebApp were removed without direct replacements | Workflows that depended on those components must be redesigned around the current Node-RED interface and available alternatives. |
| Native modules | Nodes with binary dependencies cannot be installed on the CCU | The controller has no compiler toolchain, and RedMatic no longer supplies precompiled binaries for these dependencies. |
| Existing nodes during migration | Already installed nodes remain in the user directory | They can be updated or removed through the Node-RED palette manager, subject to compatibility. |
| Example flows | No example flows are bundled | A clean installation should not be expected to contain historical sample content. |
| Logging migration | logging.ain is migrated to logging.syslog |
Existing installations receive the current logging setting during migration. |
The node-red-node-rbe functionality is now included in Node-RED. If an older copy remains after migration, it can generate a warning and may be removed through the palette manager. Do not remove other migrated nodes merely because they were once bundled. First confirm whether active flows still depend on them.
A node can be listed in the Node-RED ecosystem and still be unsuitable for a CCU-hosted RedMatic installation. If it requires native compilation or binary dependencies, it cannot be installed in the current RedMatic 9 CCU environment. Check compatibility before designing a production flow around an additional package.
Choose between a clean installation and migration
Clean RedMatic 9 installation
A clean installation is appropriate when RedMatic is not already installed or when you are rebuilding through a platform-supported recovery process. Confirm the firmware or OpenCCU prerequisite, identify the architecture, create a controller backup, select the matching current release asset, and install it through Homematic WebUI.
A clean RedMatic 9 installation includes node-red-contrib-ccu but does not restore the broad collection of modules bundled with older releases. Add only the nodes you actually need through the palette manager, and check every package for Node.js 24, Node-RED 5, and architecture compatibility.
Migration from RedMatic 7 or 8
Before upgrading from RedMatic 7.x or 8.x, complete two independent safeguards:
- Create a full CCU or OpenCCU backup using the backup facility provided by the installed controller platform.
- Export all important Node-RED flows and store the export separately from the controller.
Both are required precautions. The controller backup is the recovery path if the upgrade must be reversed. The flow export provides a separate, inspectable copy of the automation logic. Do not treat one as a substitute for the other.
RedMatic 9 allows Node-RED to take over flows from RedMatic 7 or 8 during the first start. Existing user-installed nodes remain in the user directory and can then be updated or removed with the palette manager. That preservation does not guarantee that every old node will run correctly under Node.js 24 and Node-RED 5. Review the editor, runtime log, missing-node notices, and each important automation before returning the system to normal operation.
The RedMatic release guidance states that the route back from a RedMatic 7 or 8 migration is through the backup. Create and retain the backup before uploading RedMatic 9, export the flows separately, and read the release notes for the version being installed.
Select an architecture-aware release asset
Do not construct a filename from a generic pattern and assume it is correct. Open the current RedMatic releases page, choose the intended stable release, and read its Downloads mapping. That mapping associates CCU3, piVCCU3, and OpenCCU variants with the available archives.
Current releases can include a general CCU3 archive as well as explicitly architecture-named archives for armv7l, aarch64, and x86_64. Release pages can also contain source-code archives, software bill of materials files, checksum files, and other attachments. The source-code download generated by GitHub is not a substitute for the packaged Homematic add-on.
Use this selection process each time rather than hardcoding a version as permanently current:
- Open the latest appropriate release and read its prerequisites and migration notes.
- Find your controller or OpenCCU variant in the release’s Downloads list.
- Download the packaged
.tar.gzasset mapped to that variant. - Download the adjacent
.sha256file for that exact archive. - Calculate the archive’s SHA-256 digest with a trusted tool on your computer.
- Compare the calculated digest with the value in the matching checksum file.
- Proceed only when the values match exactly.
A matching checksum detects an incomplete or altered download. It does not replace architecture selection or the release prerequisites. Do not unpack or rename the add-on archive unless the selected release explicitly instructs you to do so.
Install RedMatic 9 through Homematic WebUI
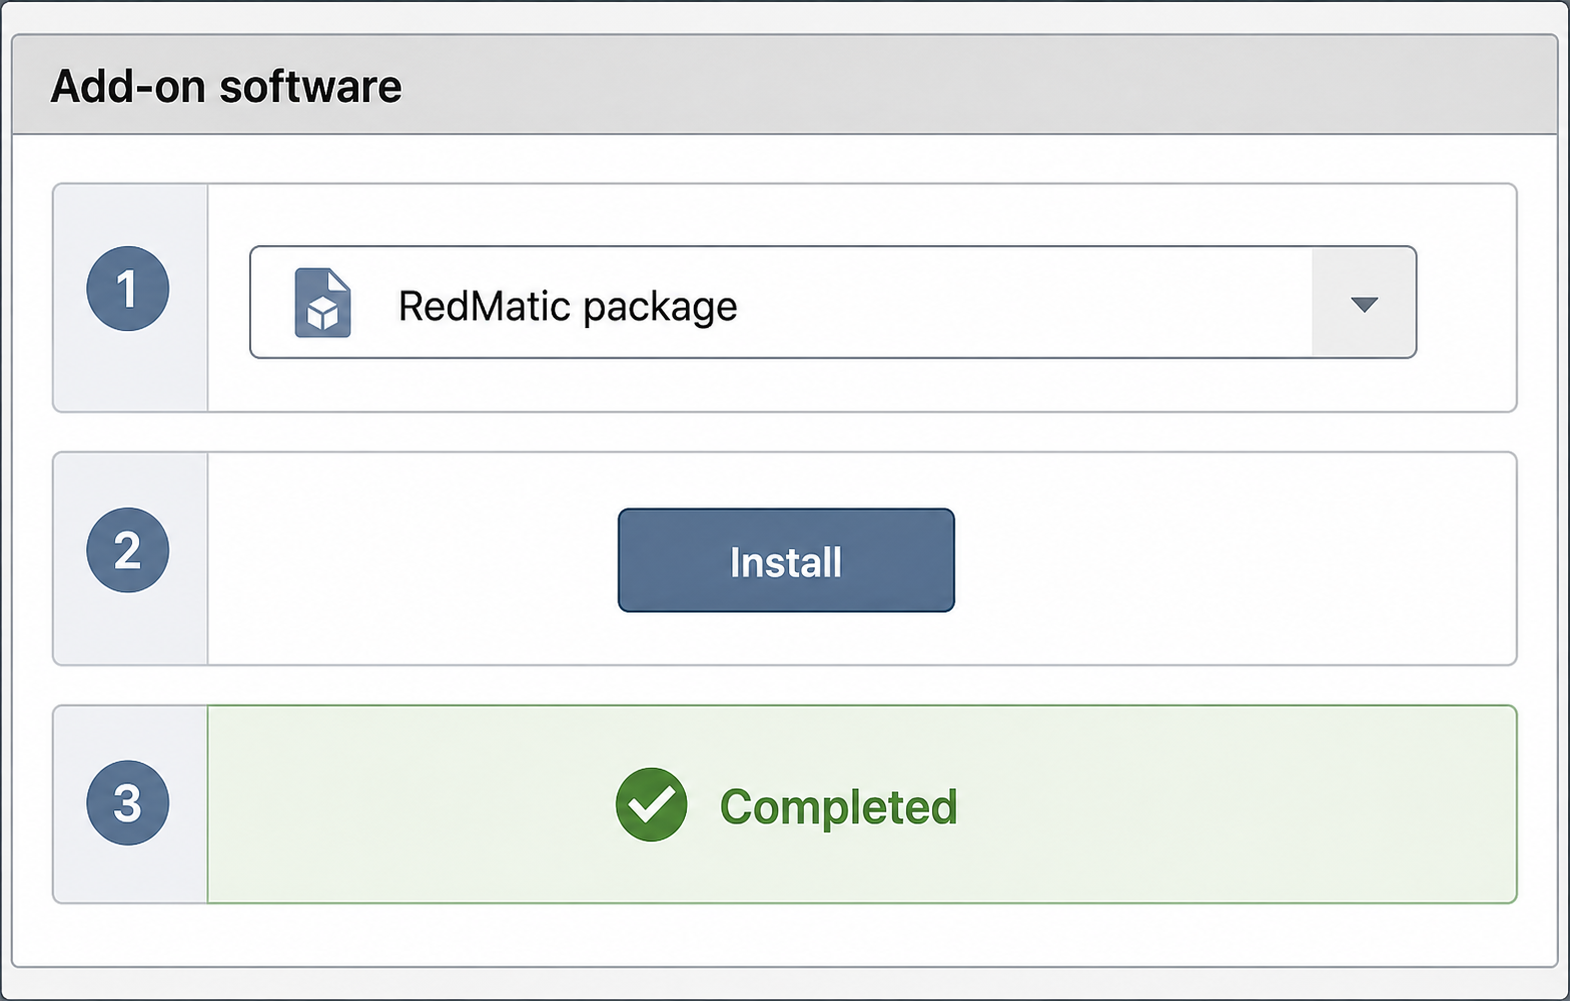
The installation workflow consists of downloading the correct release archive, uploading it through the add-on management page, rebooting the controller, and opening RedMatic at its documented local path. Installation can take several minutes. Avoid interrupting power merely because the WebUI is temporarily unavailable.
Download and verify the matching RedMatic 9 archive
Use the current release’s Downloads mapping to select the packaged archive for your CCU3, piVCCU3, or OpenCCU variant. Download its matching SHA-256 file and confirm that the calculated archive digest matches before continuing.
Upload the archive as add-on software
Sign in to Homematic WebUI and open Systemsteuerung > Zusatzsoftware. Use the add-on installation function to select and upload the verified archive. Allow the controller several minutes to process the package and do not power it off during installation.
Reboot the controller
Reboot after installation finishes. This is part of the installation process. Wait for the controller and its normal Homematic WebUI services to become available again before testing RedMatic.
Open the local Node-RED editor
From the local network, open http://<ccu-address>/addons/red. Confirm that the Node-RED editor loads and that the controller-session checks behave as expected before configuring remote access.
What to expect after a clean installation
The editor should contain the current CCU integration, but older optional packages may be absent. This is expected. RedMatic 9 preinstalls only node-red-contrib-ccu. Install additional compatible nodes through the Node-RED palette manager when they are genuinely required.
What to expect after an upgrade
On first start after migrating from RedMatic 7 or 8, Node-RED takes over the existing flows. Previously installed nodes remain in the user directory. Inspect the palette and runtime messages before deploying changes. A retained package may require an update, may no longer be compatible, or may rely on a native dependency that the CCU cannot build.
Verify RedMatic locally before exposing it
Local testing separates RedMatic failures from tunnel failures. A tunnel cannot repair an incompatible package, an incomplete reboot, an unavailable HTTP listener, or a LAN route that the Localtonet client device cannot reach.
Test from a normal LAN device
http://<ccu-address>/addons/redConfirm that the editor loads completely rather than merely returning an HTML page. Check that the expected CCU nodes are present, the browser maintains its connection, and the runtime does not continuously report missing or failed nodes. If you test a flow, use one that cannot unlock doors, disable alarms, operate safety-critical equipment, or disrupt production automation.
Test migrated automations
For an upgrade, review each important flow after the first RedMatic 9 start. Look for unknown node types, palette warnings, changed behavior, and dependencies on removed components. Confirm that nodes previously supplied by older RedMatic releases are still installed and compatible.
Do not assume that a successful editor load proves every automation is healthy. Node.js and Node-RED both changed by several major generations. Validate inputs, outputs, schedules, CCU communication, and integrations in a controlled sequence.
Test from the future Localtonet client device
Open the same local URL from the computer or device that will run our client. Network segmentation, VLAN rules, guest Wi-Fi isolation, container networking, local DNS, and host firewall policy can make the CCU reachable from one device but not another.
Record the exact IP address, hostname, and effective port that work from that device. If the browser redirects to another scheme, hostname, or port, investigate the actual local listener before creating the tunnel.
RedMatic and Localtonet interfaces can evolve independently of this article. Use the screenshots as topology and workflow aids, but confirm labels, available options, release assets, and field order against the current RedMatic 9 release page and Localtonet dashboard.
Understand the current RedMatic security boundary
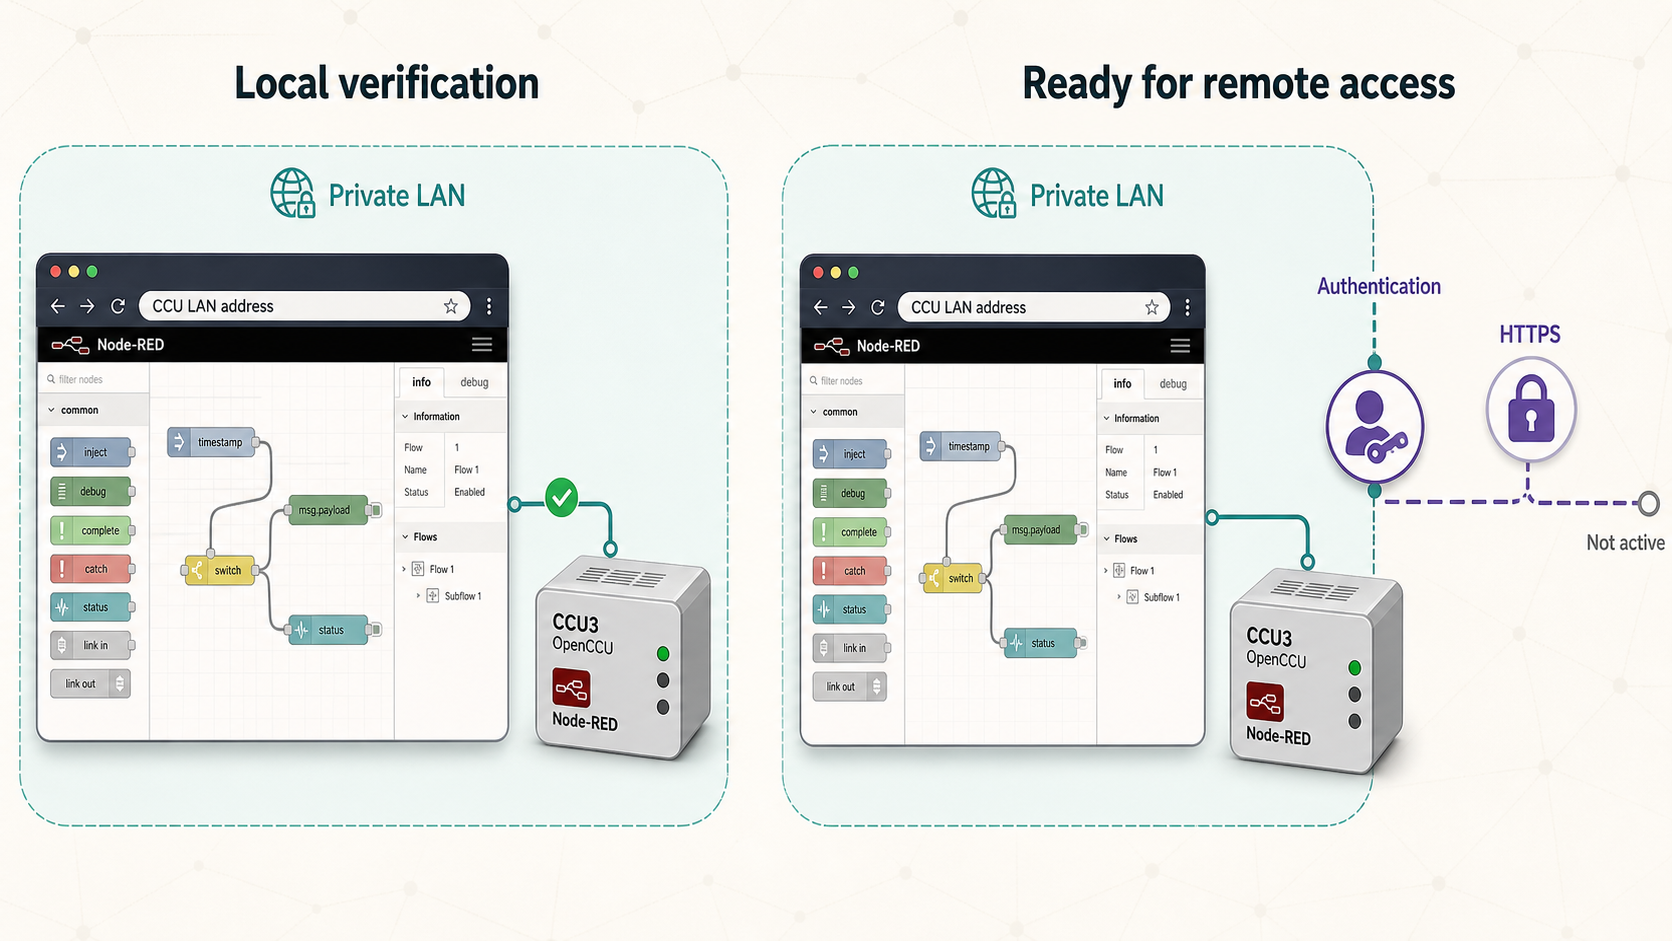
Node-RED is an administrative automation environment. Depending on the installed flows and nodes, editor access may allow someone to inspect automation logic, deploy changes, communicate with Homematic devices, call external services, and view configuration details. Remote access therefore needs a precise understanding of what RedMatic protects and what it does not.
Editor and settings access use controller-session validation
Current RedMatic 9 releases integrate access to the Node-RED editor with the controller’s authenticated session. Recent releases also apply this behavior to RedMatic settings and settings actions, including configuration, start and stop, update, log, and backup functions.
On CCU3 and OpenCCU, ReGa continues to validate the controller session. A header supplied directly by the browser is not accepted as a substitute for that validation. Users should access RedMatic through a legitimately authenticated controller session rather than attempting to fabricate session data.
On current openccu-lite, the gateway forwards the validated session in the X-Occulite-Session header, and the session is checked by openccu-lite through its authentication state mechanism. Current editor and settings pages can use this forwarded session without requiring a session identifier in the page URL. Older openccu-lite images that do not provide the header retain the earlier ?sid= compatibility behavior.
Localtonet forwards requests to the configured HTTP service. RedMatic then applies its controller-session rules to the editor and settings interface. The tunnel does not create, bypass, or replace the controller session.
Flow-created HTTP endpoints are separate
A Node-RED flow can create HTTP routes for APIs, dashboards, webhooks, controls, or test handlers. Those endpoints do not automatically become protected merely because the RedMatic editor and settings require a valid controller session. Their security depends on the flow design, the nodes involved, and any authentication or authorization explicitly implemented for those routes.
Before starting the tunnel, inspect the workspace for HTTP input nodes and other components that serve content. Remove unused test routes, debug endpoints, default credentials, hard-coded secrets, and unauthenticated controls. Test important routes in a private browser session that has no existing controller login.
The shared listener may serve controller routes
The tunnel’s target is the CCU’s HTTP listener. Appending /addons/red selects the RedMatic route in the request, but it does not prevent visitors from requesting another path on the same host. If the listener also serves Homematic WebUI or other add-ons, those routes may be reachable too.
Do not rely on the assigned public hostname or the /addons/red path remaining secret. Validate controller-session enforcement, secure every flow-created endpoint, inspect other routes on the listener, and keep the Localtonet device AuthToken private.
Create a Localtonet HTTP tunnel for RedMatic
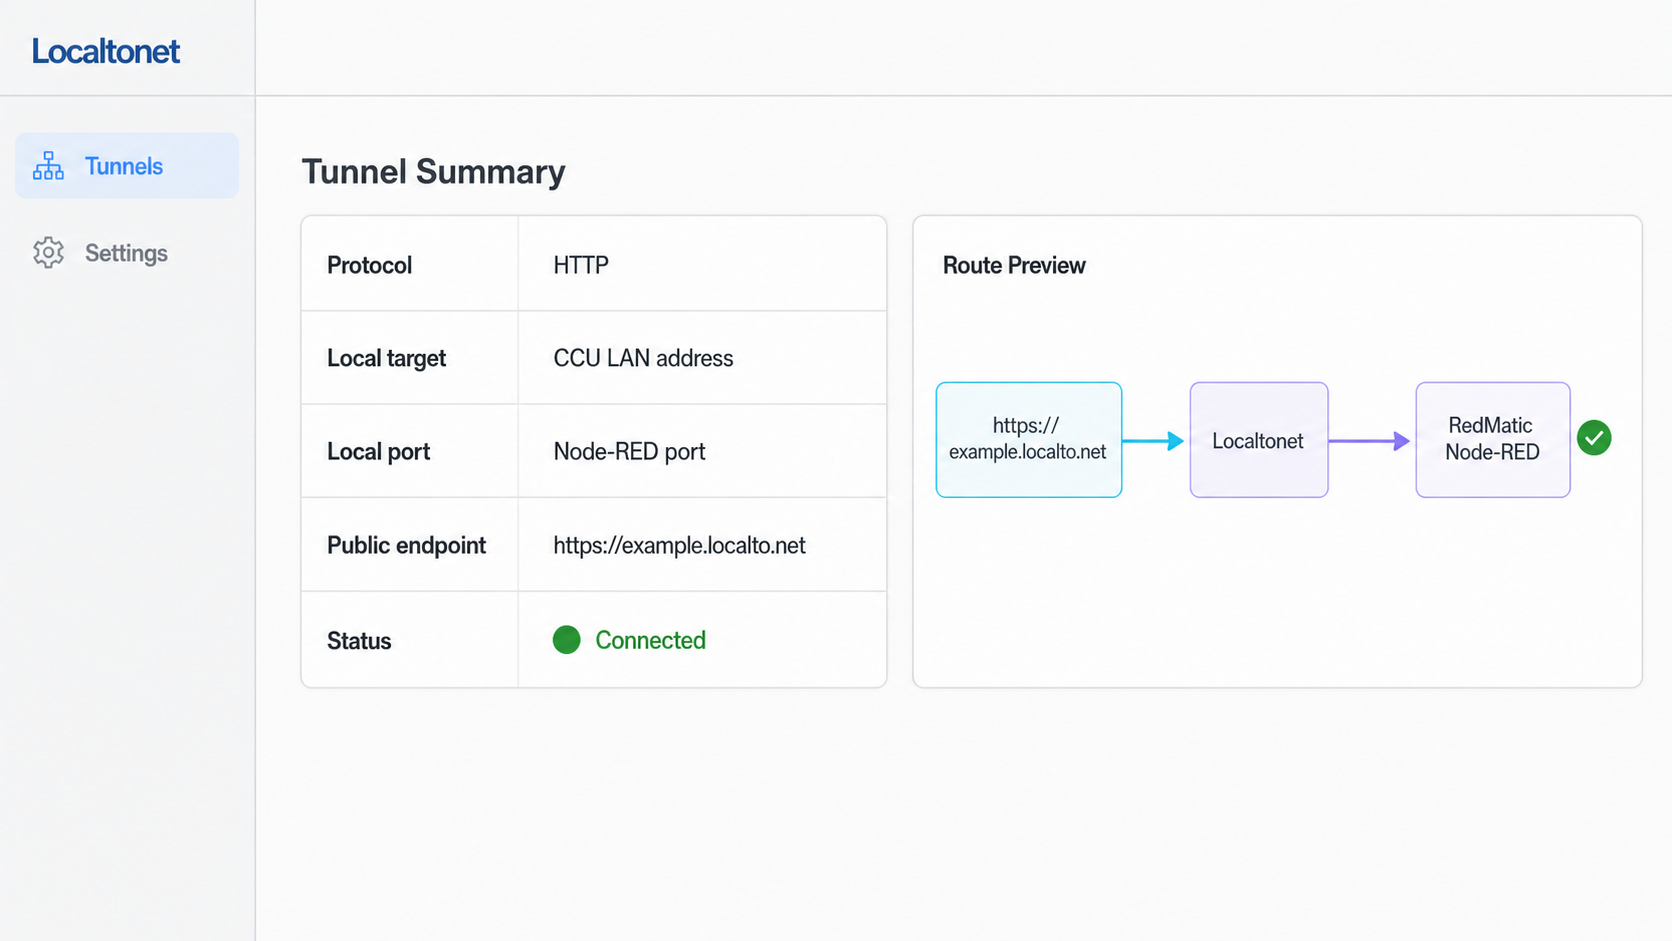
Begin only after RedMatic works from the intended Localtonet client device and its security behavior has been tested. The Localtonet client creates the outbound relay connection, so no inbound router port-forwarding rule or public IP address is required.
Do not assume that the Localtonet client can run directly on the constrained CCU platform. The available evidence does not establish direct CCU client support. A practical arrangement is to run our client on a compatible, always-on computer, home server, or other supported device on the same LAN. That device must be able to reach the CCU’s verified HTTP address and port.
Configure the tunnel for the CCU’s local IP address and effective HTTP port. After Localtonet assigns the public HTTPS base address, append /addons/red. If the verified local URL uses ordinary HTTP without an explicit port, the effective port is ordinarily 80. Use a different value only when your local test confirms a customized listener.
Install and run the Localtonet client
Install our client on a compatible device that can open the working RedMatic URL over the LAN. Keep the client device powered on and connected whenever the tunnel must remain available. Use the current Localtonet installer for that operating system rather than an unverified command from an older tutorial.
Select the HTTP Process Type
Open the HTTP tunnel configuration and select the required Process Type. HTTP tunnels can use Random Sub Domain, Custom Sub Domain, or Custom Domain, subject to current dashboard availability. All three serve the target at a public HTTPS address. Follow current dashboard guidance for any custom-domain DNS requirements.
Select the device AuthToken
Select the device-specific AuthToken for the client that can reach RedMatic. The token identifies that device and must remain private. Never place it in a Node-RED flow, flow export, screenshot, public issue, or shared documentation.
Select a currently available relay server
Choose an available server or region from the current Localtonet dashboard. Do not reuse a server code copied from an older guide because available values can vary by plan, region, client version, or deployment.
Enter the local IP address and port
Enter the CCU address and effective HTTP port that worked from the selected client device. The target is the listener, not the /addons/red path. Recheck the values before enabling public connectivity.
Start the tunnel
Use the Start control after reviewing the configuration. Creating the tunnel does not make it active. The selected client must remain connected and the tunnel must remain running for the public URL to work.
For current field definitions and dashboard behavior, see our Localtonet HTTP tunnel documentation. The required sequence is to select the HTTP Process Type, device AuthToken, currently available relay server, local IP address and port, and then start the tunnel.
Open the public RedMatic path
Append the application path to the HTTPS address assigned by Localtonet:
https://<assigned-public-host>/addons/redThis is a structural example, not a real endpoint. Do not publish your actual administrative hostname. The address remains available only while the selected client is connected and the tunnel is running.
Test from outside the local network
Use a device on another network, such as a phone with Wi-Fi disabled. Test with a new private browser session so an existing controller cookie does not hide the authentication boundary.
- Confirm that the public HTTPS hostname opens while the tunnel is running.
- Open
/addons/redand confirm that current controller-session validation is enforced. - Authenticate through the supported controller flow and verify that authorized editor access works.
- Test flow-created HTTP endpoints independently and confirm that each has the intended controls.
- Request other relevant CCU paths and determine whether the shared listener creates unacceptable exposure.
- Stop the tunnel and confirm that the public address no longer forwards to the controller.
Operate and maintain the setup safely
Know what controls availability
Remote access depends on the CCU, RedMatic, the local network, the Localtonet client device, its outbound internet connection, and the running tunnel. A failure in any layer can interrupt access.
A saved tunnel is only a configuration. It must be started. If the tunnel is stopped, the client exits, or the selected device loses connectivity, the public endpoint stops forwarding even though RedMatic may remain available locally.
Use a stable local target
If the CCU’s LAN address changes, the tunnel can continue trying to contact an obsolete address. Use a stable local hostname that resolves from the client device or manage the address through the facilities provided by your router or network. Verify resolution from the Localtonet client itself rather than assuming that a hostname working on another computer will work everywhere.
Use a controlled upgrade sequence
- Stop the Localtonet tunnel.
- Create a current CCU or OpenCCU backup.
- Export important Node-RED flows separately.
- Read the target RedMatic release notes and select the correct architecture asset.
- Verify the archive against its matching SHA-256 checksum.
- Install the update and reboot the controller.
- Verify RedMatic locally, including migrated flows and palette nodes.
- Retest controller-session validation and all exposed flow routes.
- Restart the tunnel only after the local installation is healthy.
Keep tokens, credentials, and exports private
Flow exports can contain hostnames, usernames, service configuration, and sensitive values depending on the nodes involved. Review exports before sharing them. Never include the Localtonet device AuthToken in RedMatic, Node-RED flows, screenshots, issue reports, or public examples.
If a device token is disclosed, treat it as a credential incident and revoke or replace it using the current Localtonet account controls. Removing a screenshot or post does not undo prior disclosure.
Stop or delete remote access when it is no longer required
Stop the tunnel when you expect to reuse its configuration but do not currently need remote connectivity. Delete it when the target has been retired or the configuration is obsolete. Stopping or deleting a tunnel does not uninstall RedMatic and does not affect local Node-RED access.
Troubleshoot RedMatic 9 and Localtonet problems
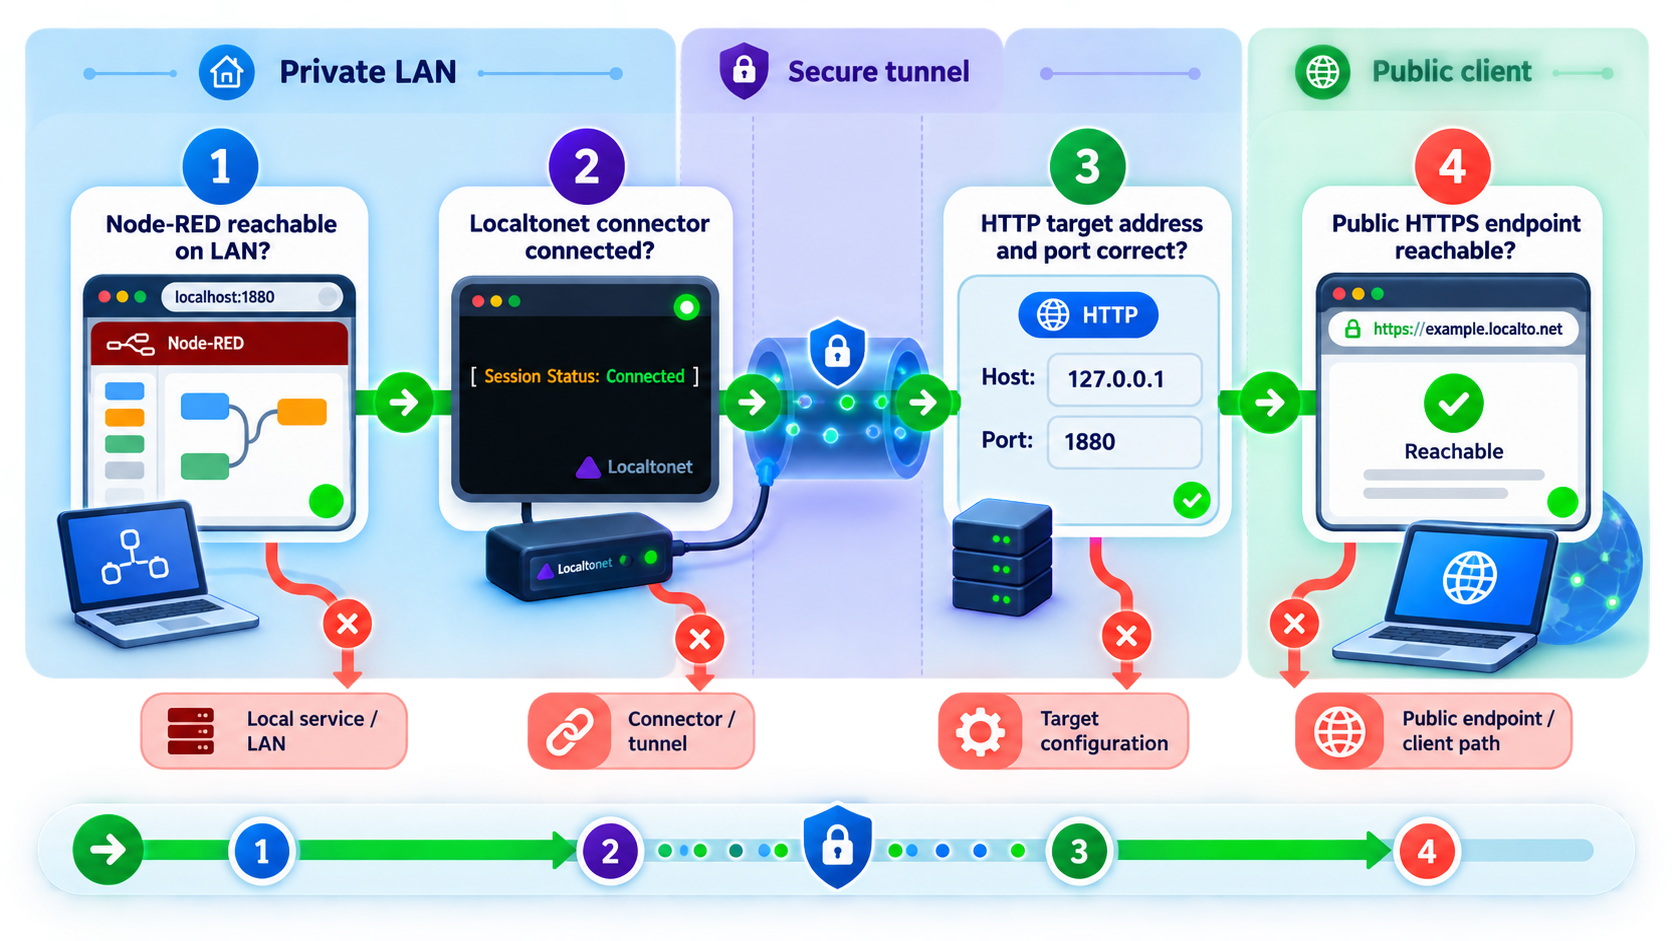
| Symptom | Likely area | Checks and corrective action |
|---|---|---|
| Homematic WebUI does not return after installation | Controller installation or reboot | Allow several minutes. Check the controller locally and avoid repeated power interruption. |
| CCU3 rejects or cannot run RedMatic 9 | Firmware prerequisite | Confirm that CCU3 firmware is version 3.61.5 or later. Older firmware is not supported by RedMatic 9. |
| OpenCCU installation fails | Platform currency or asset selection | Confirm that OpenCCU is current and that the archive matches its listed architecture variant. |
Homematic WebUI works, but /addons/red does not |
Package, architecture, or reboot | Confirm the release mapping, checksum, completed upload, and required reboot. Verify that the platform is supported. |
| Migrated flows contain missing nodes | RedMatic 9 package changes | Review the palette manager. RedMatic 9 preinstalls only node-red-contrib-ccu, although user-installed nodes from RedMatic 7 or 8 should remain in the user directory. |
| An additional node will not install | Native dependency or runtime compatibility | Check support for Node.js 24 and Node-RED 5. Nodes requiring native compilation cannot be installed on the CCU. |
| RedMatic works from one LAN device but not the tunnel device | Local networking | Test the exact URL from the Localtonet client device. Check VLAN rules, guest isolation, local DNS, routing, and firewalls. |
| The tunnel exists but the public URL is unavailable | Tunnel lifecycle | Confirm that the selected AuthToken belongs to the connected client and that the tunnel was explicitly started. |
| The public host opens but RedMatic does not | Application path | Append /addons/red to the assigned public base URL and verify that the same path works locally. |
| The tunnel reports a connection or gateway error | Local IP address or port | Recheck the local listener from the client device. Use the verified target instead of assuming port 80 in a customized environment. |
| The editor is protected but a flow URL is public | Flow security | Stop the tunnel if necessary. Add appropriate security to the flow-created endpoint or remove the route. Editor session validation does not automatically cover it. |
| The public hostname exposes other CCU pages | Shared HTTP listener | Stop the tunnel and reassess the target. Forwarding the listener is not limited to /addons/red. |
| RedMatic will not start on openccu-lite | Permissions or startup lock | Review the RedMatic log for the actual permission error. Recent releases distinguish inability to create the start lock from a genuine second running start. |
Use this diagnostic order
- Confirm that the controller is powered on and Homematic WebUI works locally.
- Confirm the CCU3 firmware or current OpenCCU prerequisite.
- Open the local RedMatic path from a normal LAN device.
- Check migrated flows, missing nodes, and RedMatic logs.
- Open the same URL from the Localtonet client device.
- Confirm that the intended Localtonet device is connected.
- Confirm the selected HTTP Process Type, AuthToken, relay server, local IP address, and port.
- Confirm that the tunnel was started.
- Test the public base hostname and then
/addons/red. - Use a private browser session to test controller-session enforcement and flow-created endpoints separately.
Record the first failing layer. “Remote access is broken” is less actionable than “RedMatic opens from my laptop, but the Localtonet client device cannot resolve the CCU hostname.” The second description identifies a local network problem before public forwarding is involved.
Frequently asked questions
Is RedMatic 9 officially released?
Yes. RedMatic 9 is the released, modernized series based on Node.js 24 and Node-RED 5. Use the current release page to select a version and matching architecture asset rather than treating RedMatic 9 as a future development branch.
What firmware does RedMatic 9 require on a CCU3?
A CCU3 requires firmware version 3.61.5 or later. For OpenCCU, use a current release. RedMatic 9 no longer supports older firmware by patching controller firmware files.
Can I install RedMatic on a CCU2?
No. CCU1, CCU2, and armv6l systems such as Raspberry Pi 1 and Raspberry Pi Zero are unsupported. Current targets include CCU3, piVCCU3, and supported current OpenCCU variants.
What must I back up before upgrading from RedMatic 7 or 8?
Create a full CCU or OpenCCU backup and separately export all important Node-RED flows before uploading RedMatic 9. The controller backup is the rollback route, while the flow export gives you an independent copy of the automation logic.
Which RedMatic archive should I download?
Use the Downloads mapping on the current release page. Match your CCU3, piVCCU3, or OpenCCU variant to the listed packaged archive, then verify that archive with its corresponding .sha256 file. Do not choose a source-code archive or guess a generic filename.
What is the local RedMatic URL?
The documented local endpoint is http://<ccu-address>/addons/red. Replace the placeholder with the hostname or LAN address used for your controller and verify it from the future Localtonet client device.
Are Dashboard, HomeKit, and other nodes preinstalled in RedMatic 9?
No. A clean RedMatic 9 installation preinstalls only node-red-contrib-ccu. Additional compatible nodes are installed through the Node-RED palette manager. Nodes retained during an upgrade still need compatibility review.
Will every Node-RED node install on RedMatic 9?
No. Nodes must be compatible with Node.js 24, Node-RED 5, and the controller environment. Packages with native binary dependencies cannot be installed on the CCU because there is no compiler toolchain and RedMatic no longer supplies precompiled binaries.
Is the RedMatic editor protected by the controller session?
Current RedMatic releases validate controller sessions for editor access, and recent releases apply the same model to settings and settings actions. CCU3 and OpenCCU use ReGa session validation. Current openccu-lite forwards its validated session through X-Occulite-Session, with compatibility behavior for older images.
Does editor session protection secure HTTP endpoints created by flows?
Not automatically. Flow-created APIs, dashboards, webhooks, and other HTTP routes form a separate security surface. Review and protect each endpoint according to its function before exposing the shared HTTP listener.
Can the Localtonet client run directly on the CCU?
This guide does not claim direct CCU support because the available evidence does not establish it. Run our client on a compatible device on the same LAN when necessary. That device must be able to reach the CCU’s verified HTTP listener.
Does Localtonet require router port forwarding or a public IP address?
No. Our client establishes an outbound connection to a Localtonet relay server. The tunnel provides a public URL without an inbound router port-forwarding rule, inbound firewall changes, VPN setup, or a public IP address.
Does creating a Localtonet tunnel start it automatically?
No. Creating and running a tunnel are separate lifecycle states. Select the configuration, use Start when ready, and keep the selected client connected. You can later stop the tunnel without deleting it or delete it when it is no longer needed.
Connect to your verified RedMatic 9 installation with Localtonet
Confirm the controller prerequisites, back up before migration, verify the correct RedMatic archive, test Node-RED locally, review every HTTP security boundary, and then create a Localtonet HTTP tunnel without opening an inbound router port.
Get Started Free →