

Install the Muximux static binary, secure the dashboard, verify local operation, and publish its HTTP listener safely
Muximux is a self-hosted workspace that opens homelab applications inside one browser interface. Version 3 combines a Go backend, an embedded frontend, and YAML configuration in a single executable, without requiring a separate database or web server for the basic deployment. This tutorial covers the static-binary path for Linux, macOS, and Windows, including release selection, artifact verification, first startup, configuration, Linux service management, backup, and post-reboot testing. After Muximux works locally, we will expose its HTTP listener with Localtonet without inbound router port forwarding, firewall changes, VPN setup, or a public IP address.
📋 What's in this guide
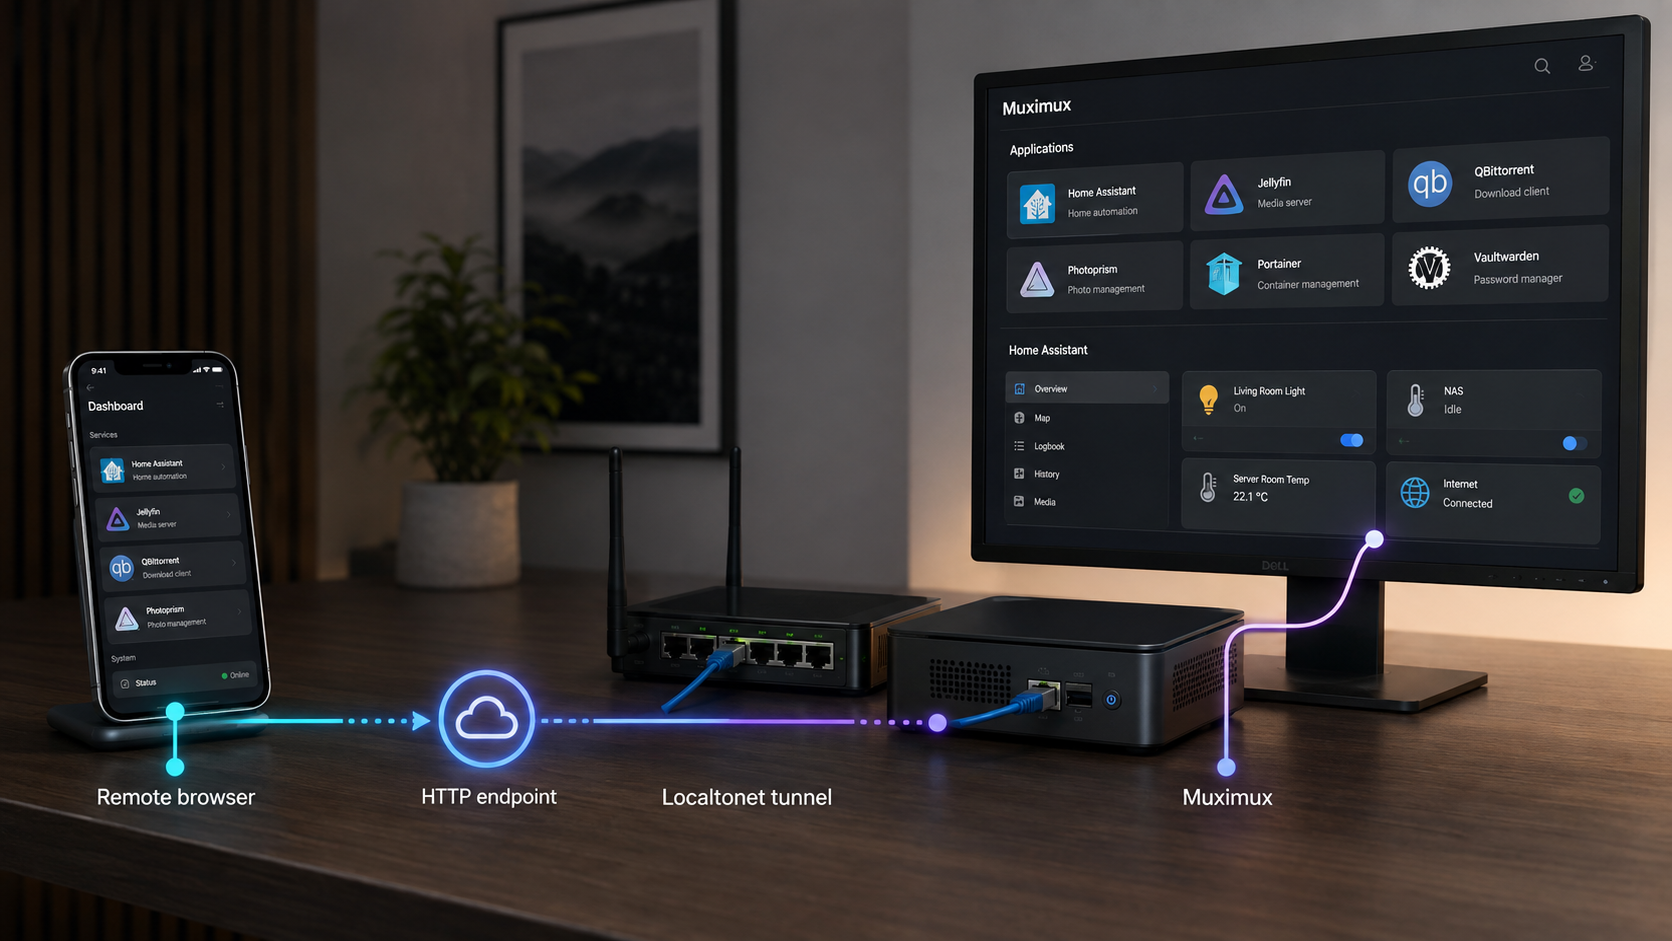
What Muximux does in a homelab
Muximux is a self-hosted dashboard for people who work inside several homelab applications. Instead of functioning only as a page of bookmarks, it can display applications inside dashboard panes. That makes it possible to move between media tools, monitoring interfaces, download managers, and other internal web applications without repeatedly opening separate tabs.
Muximux v3 is a ground-up rewrite of the original PHP application. According to the current Muximux README, the Go backend and frontend are packaged together as one binary. The basic deployment uses one port and one YAML configuration file, with no external database or separate runtime required. Settings can be managed through the built-in interface, so manually editing YAML is optional for normal administration.
This guide deliberately covers only the official static-binary workflow. Muximux also documents Docker, Docker Compose, and more advanced gateway capabilities in its README, but mixing those deployment models into one installation path makes ownership of ports, volumes, upgrades, and startup behavior less clear. If you prefer containers, follow the Docker section in the official README rather than translating the binary commands below into an improvised container configuration.
Embedding proxy versus remote-access tunnel
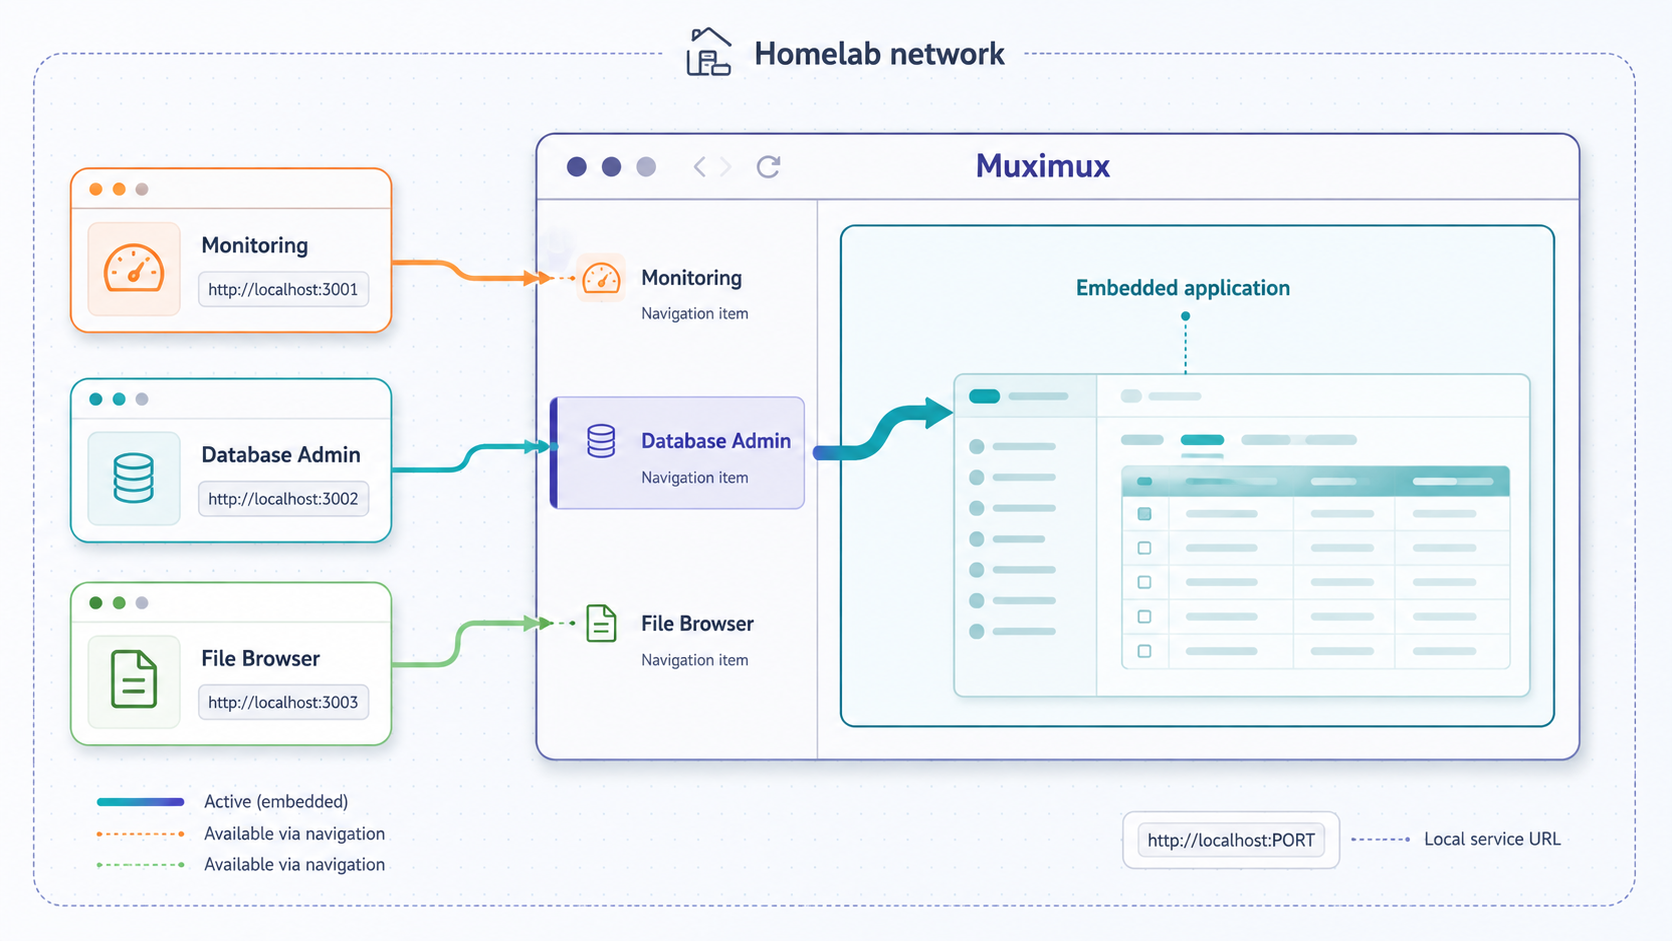
Muximux's embedding proxy and a Localtonet HTTP tunnel perform different jobs. The embedding proxy helps another web application render inside a Muximux pane. The current README describes it as stripping iframe-blocking headers, rewriting paths in HTML, CSS, and JavaScript, and intercepting browser requests such as fetch(), XMLHttpRequest, and WebSocket connections.
A Localtonet HTTP tunnel provides a public route to the Muximux listener. Our client establishes an outbound connection from the device running the tunnel to a Localtonet relay server. Requests sent to the assigned public HTTPS address are forwarded to the local IP address and port configured in the tunnel.
Enabling the Muximux embedding proxy does not make Muximux reachable from the internet. Creating a Localtonet tunnel does not make every backend application iframe-compatible. Configure and test each layer for its own purpose.
Platform, architecture, and release decisions
Choose a machine that can remain online whenever you need the dashboard. Muximux must be able to reach any backend applications it monitors or proxies. The Localtonet client must be able to reach the Muximux listener, either on the same device or across your trusted local network.
The binary release path publishes operating-system and processor-specific artifacts. The current release family provides binary choices for Linux, macOS, and Windows, with AMD64 and ARM64 variants where shown on the release page. Treat the assets attached to the selected release as the final compatibility list. Do not use a Linux binary on macOS, an AMD64 binary on an ARM64 host, or an asset from an unofficial mirror.
| Host | Common architecture label | What to select |
|---|---|---|
| 64-bit Intel or AMD Linux | amd64 or x86_64 |
The official Linux AMD64 release asset |
| 64-bit ARM Linux | arm64 or aarch64 |
The official Linux ARM64 release asset |
| Intel Mac | amd64 or x86_64 |
The official macOS or Darwin AMD64 asset |
| Apple silicon Mac | arm64 |
The official macOS or Darwin ARM64 asset |
| 64-bit Windows on Intel or AMD | amd64 or x86_64 |
The official Windows AMD64 executable |
| Windows on ARM | arm64 |
The Windows ARM64 asset only when it is listed for the selected release |
Identify your architecture
On Linux, display the kernel architecture with:
uname -s
uname -m
A result such as x86_64 maps to AMD64. A result such as aarch64 maps to ARM64.
On macOS, use:
uname -m
x86_64 indicates an Intel Mac, while arm64 indicates Apple silicon.
On Windows PowerShell, use:
$env:PROCESSOR_ARCHITECTURE
Typical results include AMD64 and ARM64. Confirm the operating system architecture rather than assuming it from the computer's marketing name.
Select the current supported release
Open the current Muximux release and read its notes before downloading. At the 2026 editorial review for this guide, the supplied current release evidence identified v3.4.0 as the release under review. Release status is time-sensitive, so use the newer supported release if the project's latest-release page has advanced.
The v3.4.0 notes describe it as a security release and a drop-in update. They state that binaries and images from 3.3.0 through 3.3.3 were compiled with a Go standard library affected by CVE-2026-56860 and CVE-2026-56858. Version 3.4.0 moved to a patched toolchain and restored govulncheck as a blocking CI gate. Do not install a 3.3.x binary merely because an older tutorial links to it.
Asset names and available platform combinations can change between releases. Select an asset displayed on the actual release page, verify that asset, and retain its release notes with your deployment record.
Install Muximux using the static binary
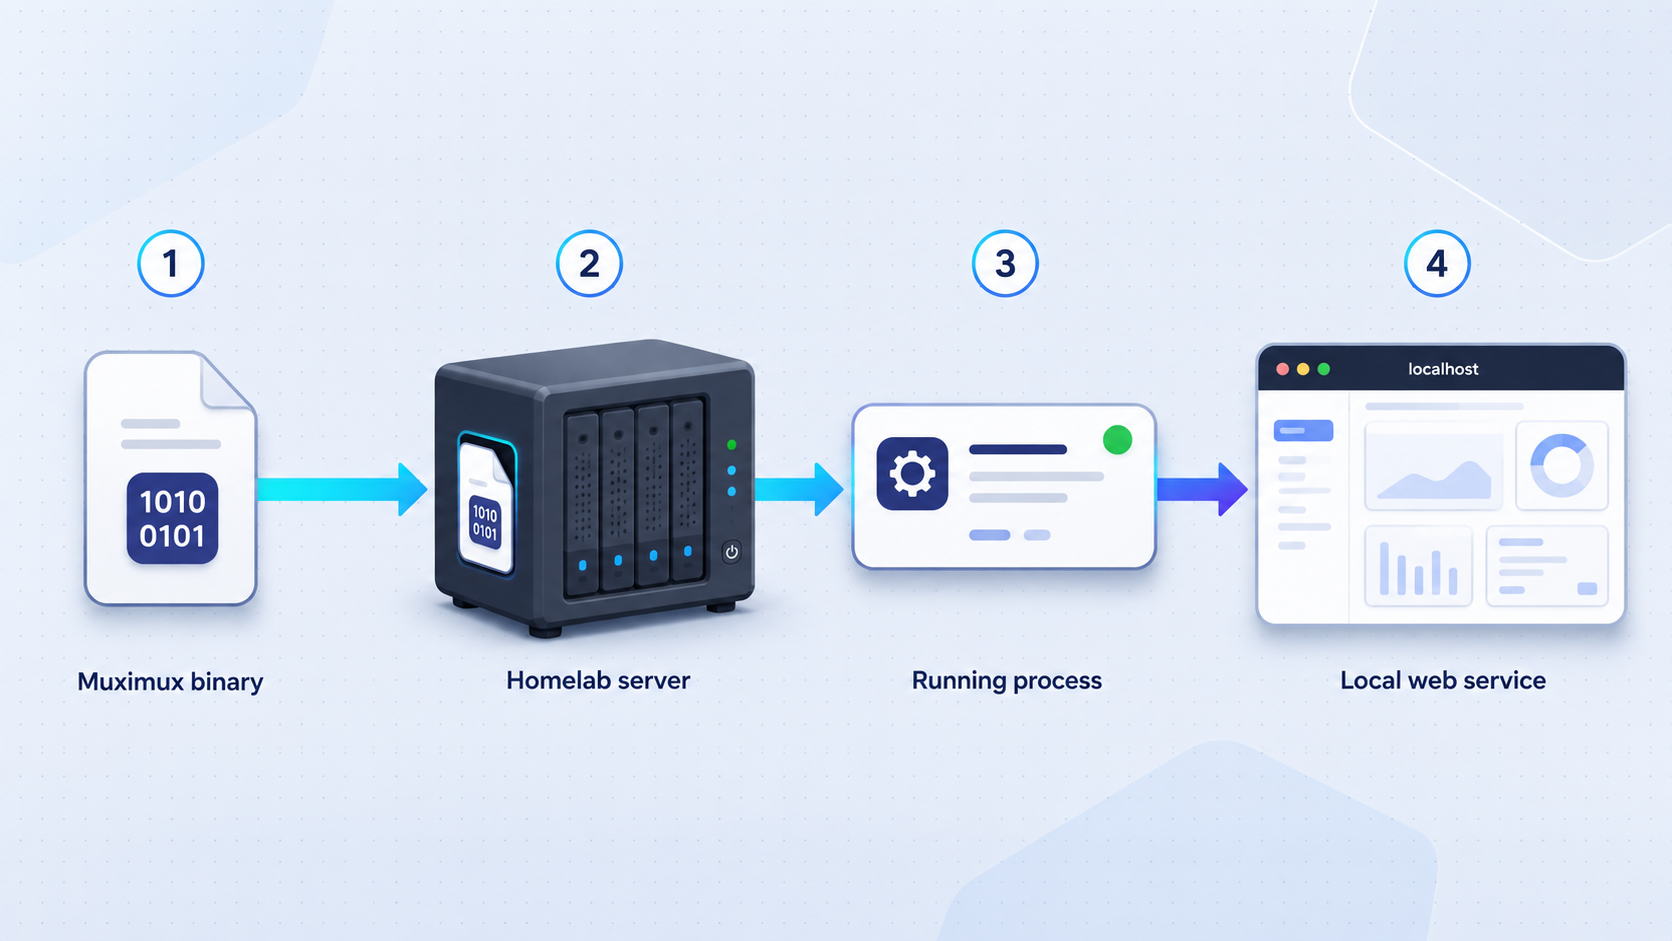
The commands below establish a stable executable name and working directory. The examples use v3.4.0 because that is the reviewed release identified by the supplied primary evidence. If the latest supported release has changed, download its corresponding asset and retain the same local name, muximux on Unix-like systems or muximux.exe on Windows.
Download and verify the release artifact
Muximux's
security policy
covers supported versions, vulnerability reporting, and artifact verification. The release workflow publishes build provenance, so the preferred verification path is GitHub CLI attestation verification against the mescon/Muximux repository.
Download the correct file from the release page into an empty staging directory. Keep its original filename for verification. Then run:
gh attestation verify ./DOWNLOADED_ASSET_NAME --repo mescon/MuximuxOn Windows PowerShell, the equivalent form is:
gh attestation verify ".\DOWNLOADED_ASSET_NAME.exe" --repo mescon/Muximux
Replace the placeholder with the exact filename downloaded from the official release. Verification must identify mescon/Muximux as the source repository and complete successfully. If the selected release also provides checksums, compare the artifact with the checksum file attached to that same release. Do not use a checksum copied from a blog, a different version, or a third-party mirror.
A failed verification can indicate a damaged file, the wrong asset, an unsupported historical release, or a file not produced by the project's release workflow. Delete it and download the asset again from the official release. Do not work around a failure by disabling operating-system protections.
Linux installation
After verifying the Linux asset, install it into a persistent application directory. Substitute the exact verified download filename in the first command:
sudo useradd --system --home-dir /opt/muximux --shell /usr/sbin/nologin muximux
sudo install -d -o muximux -g muximux -m 750 /opt/muximux
sudo install -o root -g root -m 755 ./DOWNLOADED_LINUX_ASSET /opt/muximux/muximux
cd /opt/muximux
sudo -u muximux ./muximux
If the muximux/sbin/nologin rather than /usr/sbin/nologin. Use the valid path for your operating system.
Keep the first run attached to the terminal. Muximux uses config.yaml as its configuration file and serves the initial interface on port 8080 in the standard binary setup. With the working directory above, the expected local URL is:
http://127.0.0.1:8080Confirm the startup output before relying on that address. If your selected release, existing configuration, or command-line options report another listener, the reported listener takes precedence.
macOS installation
After attestation verification, create an application directory under your user account and give the verified asset a stable executable name:
mkdir -p "$HOME/.local/opt/muximux"
install -m 755 ./DOWNLOADED_MACOS_ASSET "$HOME/.local/opt/muximux/muximux"
cd "$HOME/.local/opt/muximux"
./muximux
Keep this terminal open during onboarding. Open http://127.0.0.1:8080 unless startup output identifies a different listener. The configuration file will be associated with the working directory used to launch the binary, so continue using the same directory rather than starting it from arbitrary folders.
If macOS blocks execution, first confirm that the attestation succeeded and that you selected the correct architecture. Use the operating system's normal security review workflow for the verified file. Do not disable Gatekeeper globally.
Windows installation
Create a persistent folder such as C:\ProgramData\Muximux. In an elevated PowerShell session, copy the already verified Windows asset and start it from that directory:
New-Item -ItemType Directory -Force "C:\ProgramData\Muximux" | Out-Null
Copy-Item ".\DOWNLOADED_WINDOWS_ASSET.exe" "C:\ProgramData\Muximux\muximux.exe"
Set-Location "C:\ProgramData\Muximux"
.\muximux.exe
Keep PowerShell open while completing the first run. Open http://127.0.0.1:8080 unless the process reports a different listener. Windows Defender or another endpoint-security product may inspect a newly downloaded executable. Verify provenance before approving it and do not create a broad antivirus exclusion for the entire download directory.
Muximux uses one YAML configuration file. Starting the binary from a consistent working directory makes the configuration location, service behavior, backup path, and future upgrades predictable. Avoid running the production instance directly from Downloads or a temporary directory.
Complete onboarding and configure the dashboard
Open the local Muximux URL and complete the guided onboarding wizard. The current project screenshots and README show stages for welcome, security, application selection, layout, themes, and completion. Do not create the Localtonet tunnel until onboarding and authentication are finished.
Configure authentication first
Muximux documents built-in username and password authentication, forward authentication through an existing identity layer, and OIDC. Built-in authentication is the most direct starting point for a standalone binary deployment. Forward authentication or OIDC may be appropriate when your homelab already has a carefully configured identity provider.
If Muximux is placed behind another trusted authentication proxy, the README describes an auth: none mode for allowing that proxy to perform authentication. Do not use that mode merely because Localtonet provides the public route. A tunnel is a connectivity layer and does not automatically replace application authentication.
An unauthenticated dashboard can reveal application names, internal service structure, health information, and navigation paths. It can also place embedded applications within reach according to their own session and authorization behavior. A difficult-to-guess public URL is not a substitute for authentication.
Understand and protect config.yaml
The project's
example configuration
documents the available YAML structure. Use the GUI for the initial setup, then inspect the generated config.yaml so you know where the production state lives. Treat it as sensitive because its contents can describe internal URLs, users, authentication choices, and other deployment details.
On Linux, restrict access after the file has been created:
sudo chown muximux:muximux /opt/muximux/config.yaml
sudo chmod 600 /opt/muximux/config.yaml
Back up a stopped or otherwise stable configuration with:
sudo install -d -o root -g root -m 700 /var/backups/muximux
sudo cp --preserve=mode,ownership /opt/muximux/config.yaml \
  "/var/backups/muximux/config-$(date +%Y%m%d-%H%M%S).yaml"
On macOS, use a private backup directory:
chmod 600 "$HOME/.local/opt/muximux/config.yaml"
mkdir -p "$HOME/.local/share/muximux-backups"
chmod 700 "$HOME/.local/share/muximux-backups"
cp "$HOME/.local/opt/muximux/config.yaml" \
  "$HOME/.local/share/muximux-backups/config-$(date +%Y%m%d-%H%M%S).yaml"
On Windows PowerShell, create a timestamped copy:
$stamp = Get-Date -Format "yyyyMMdd-HHmmss"
New-Item -ItemType Directory -Force "C:\ProgramData\Muximux\Backups" | Out-Null
Copy-Item "C:\ProgramData\Muximux\config.yaml" `
  "C:\ProgramData\Muximux\Backups\config-$stamp.yaml"
Restrict the Windows application and backup directories to the account that runs Muximux and the administrators who maintain it. Do not commit the live configuration to a public repository.
Add applications and test ordinary iframe behavior
Add one backend at a time. Test its login flow, static resources, API requests, navigation, and live updates. A visible login screen does not prove complete compatibility. Perform a representative task before considering an application ready.
In direct iframe mode, the user's browser must be able to resolve and reach the configured application URL. This can work on the LAN but fail remotely when the URL contains a private hostname or address. The backend must also permit framing.
Enable the embedding proxy only where needed
If a managed application rejects iframe rendering or depends on root-relative paths, Muximux can enable its embedding proxy for that application. The official README documents the per-application YAML setting:
proxy: true
Proxied applications are served through a path based on the application's slug, under /proxy/{slug}/. The Muximux host reaches the backend and Muximux rewrites relevant content for the browser. This can also solve the remote-routing problem when the remote browser cannot reach a private backend URL directly.
| Application mode | Who must reach the backend | Remote-access implication |
|---|---|---|
| Link opens separately | The user's browser | A private URL remains unavailable off site unless it has its own access path |
| Direct iframe | The user's browser | Private DNS, private addressing, or iframe headers can prevent remote use |
| Muximux embedding proxy | The Muximux host | The browser uses the Muximux origin, subject to backend compatibility and authentication |
| Muximux through Localtonet | The Localtonet client must reach Muximux | The tunnel publishes the selected Muximux listener, not every private URL automatically |
The embedding proxy makes server-side requests and transforms content so a backend can operate through the dashboard. Keep backend authentication enabled where practical, apply least privilege, and test sensitive functions before relying on an embedded view.
Configure persistent startup and verify it after reboot
A foreground terminal is appropriate for onboarding and diagnostics, but an always-available Linux dashboard needs process supervision. The Muximux repository includes an official systemd service definition. Use that file as the source for the unit rather than copying an unrelated service template.
Install the official Linux systemd unit
The binary workflow above places Muximux at /opt/muximux/muximux and runs it as the dedicated muximux account. Before installing the unit, download and inspect the current definition:
curl -fsSLo /tmp/muximux.service \
  https://raw.githubusercontent.com/mescon/Muximux/main/muximux.service

grep -E '^(User|Group|WorkingDirectory|ExecStart)=' /tmp/muximux.service
Confirm that its user, group, working directory, executable path, and configuration behavior match your installation. If the repository unit uses different paths, either place the binary and configuration at those official paths or make a local copy with only the required path adjustments. Do not edit a unit without understanding which account will own and update config.yaml.
After confirming the paths, install and enable the unit:
sudo install -o root -g root -m 644 \
  /tmp/muximux.service /etc/systemd/system/muximux.service

sudo systemctl daemon-reload
sudo systemctl enable --now muximux.service
sudo systemctl status muximux.service
Review startup logs without exposing configuration contents:
sudo journalctl -u muximux.service -n 100 --no-pagerThe repository supplies a systemd definition for Linux. It does not supply an equivalent Windows service definition or macOS LaunchAgent in the evidence reviewed for this tutorial. On those platforms, complete onboarding in the foreground and use an operating-system-native supervisor only after verifying its executable path, working directory, account, and restart behavior. Do not present an improvised third-party wrapper as an official Muximux service method.
Perform the reboot test
A service is not proven persistent until the host has restarted. Schedule a maintenance window, reboot the machine, and then run:
systemctl is-enabled muximux.service
systemctl is-active muximux.service
sudo journalctl -u muximux.service -b --no-pager
Confirm that the service is enabled, active, and free of configuration or permission errors in the current boot. Open the local dashboard, sign in, and test at least one direct application and one proxied application if you use both modes.
Verify Muximux locally before publishing it
Remote troubleshooting is much easier when the local application has already passed a structured test. Verify the host process first, then authentication, backend applications, and access from the device that will run Localtonet.
Confirm the process and listener
Check the terminal or service manager. Confirm that Muximux remains running and that its effective listener uses the expected address and port. Investigate configuration, permission, or port-conflict errors before continuing.
Load the complete dashboard locally
Open the local URL from the Muximux host. Confirm that the interface, icons, navigation, and settings load completely, not merely that the TCP port accepts a connection.
Test authentication in a private window
Use a private browsing session to prove that an unauthenticated visitor receives the intended login flow. Sign in, sign out, and confirm that protected content does not remain available after logout.
Test each application mode
Open direct iframe, link-out, and embedding-proxy applications separately. Look for missing assets, failed API calls, redirect loops, browser-console errors, or broken WebSocket connections.
Test from the Localtonet client device
If Localtonet will run on another machine, open Muximux from that device using the exact local IP address and port you plan to save in the tunnel. Resolve routing, bind-address, or local firewall failures before creating the public route.
A listener bound to 127.0.0.1 can be targeted by Localtonet when both processes run on the same host. If the Localtonet client runs on another device, Muximux must listen on an internal address reachable from that device, and local network policy must permit the connection. Avoid binding to every interface unless that is necessary and understood.
Expose the verified dashboard with Localtonet
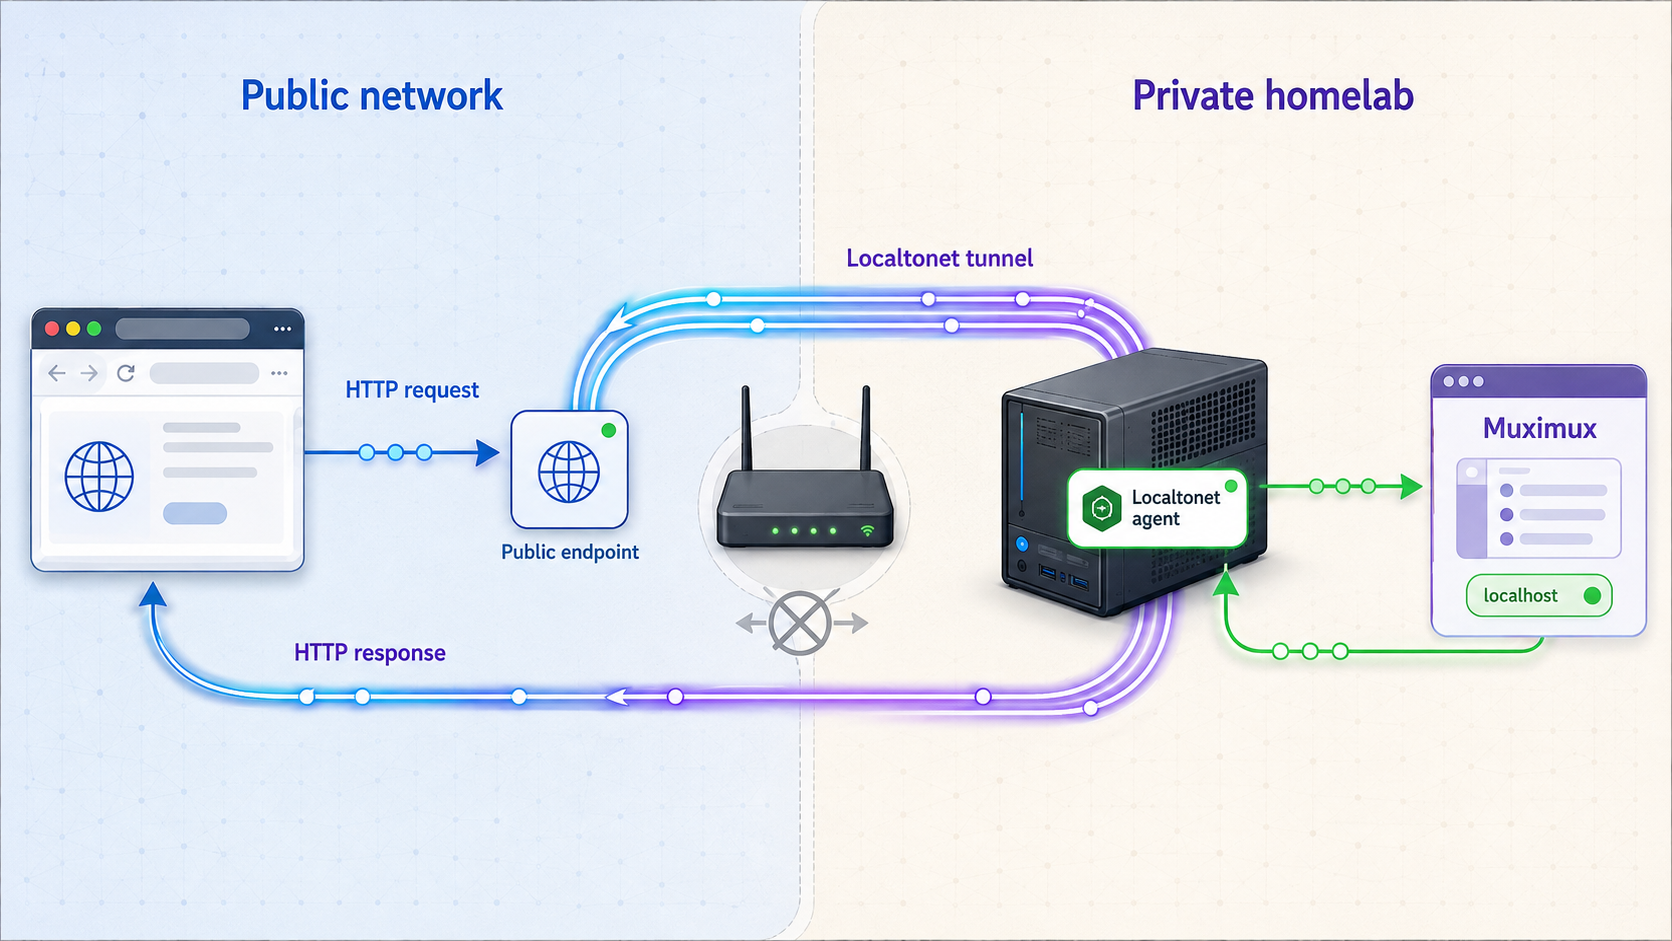
Once Muximux works locally, use an HTTP tunnel to publish its listener. The Localtonet client creates an outbound connection to one of our relay servers, so this workflow does not require inbound router port forwarding, firewall changes, VPN setup, or a public IP address.
Follow the current Localtonet HTTP tunnel documentation for the dashboard workflow. Relay availability, regions, process types, and account capabilities can vary, so select values currently available in your dashboard rather than copying a hardcoded server code.
Install and run the Localtonet client
Install the current Localtonet application on a device that can reach the tested Muximux listener. Keep this client running whenever remote access is required.
Select the intended device token
Use the device-specific authentication token assigned through Localtonet. Treat it as a credential and never place it in screenshots, articles, source control, or the Muximux configuration.
Select an available relay server
Choose a server or region currently available in the dashboard. Do not assume that every location is available to every account or plan.
Create an HTTP tunnel
Select the HTTP tunnel type and enter the exact local IP address and TCP port verified from the Localtonet client device. HTTP is appropriate because Muximux presents a web interface.
Choose the public address process type
Choose Random Sub Domain, Custom Sub Domain, or Custom Domain as available. Each process type serves the target at a public HTTPS address. Check current documentation before making custom-domain DNS changes.
Start and test the tunnel
Creating a tunnel does not start it. Press Start, wait for the selected client and tunnel to be connected, then open the assigned public URL from an external network in a private browser session.
The public address works only while Muximux is available locally, the selected Localtonet client is connected, and the tunnel is running. A saved tunnel configuration alone does not make the dashboard reachable.
Perform a real off-site test
Use a mobile connection or another external network. Confirm that the login screen appears before dashboard content, authentication succeeds, logout works, and important application panes load. Do not rely only on a test performed from the same LAN.
Pay particular attention to direct iframes. A private URL may work for a browser on your LAN but remain unreachable from an off-site browser. For compatible applications, the Muximux embedding proxy lets the Muximux host reach the backend on behalf of the browser. Alternatively, provide that backend with its own deliberately secured access method. Do not expose additional services merely to hide an iframe error.
Security, upgrades, and routine operations
Keep authentication at every relevant layer
Enable a supported Muximux authentication method before starting the public tunnel. Use unique credentials and least-privilege roles. Keep authentication enabled on sensitive backend applications where practical. A Muximux login should not automatically be treated as authorization for every embedded service.
If you use forward authentication or OIDC, verify the complete redirect and callback flow through the final public HTTPS address. Provider-specific callback paths, claims, headers, and client settings vary. Use the exact requirements for your Muximux release and identity provider instead of guessing.
Apply the v3.4.0 security guidance
The
v3.4.0 release notes
state that 3.3.0 through 3.3.3 were built using Go 1.26.1, which was affected by CVE-2026-56860 and CVE-2026-56858. The first issue concerned quadratic path resolution in net/url and was reachable through the embedding proxy. Version 3.4.0 moved release builds to the patched toolchain strategy and restored vulnerability scanning as a blocking CI check.
That status was verified against the supplied release evidence during the 2026 review of this article. It does not mean v3.4.0 will remain the newest release indefinitely. Check the latest release and the project's security policy before every installation or upgrade.
Upgrade the binary safely
- Read every release note between the installed and target versions.
- Back up
config.yamland record its file ownership and permissions. - Download the matching replacement binary from the official release.
- Verify its GitHub build attestation before execution.
- Stop Muximux cleanly.
- Replace the executable while retaining the stable local filename and configuration directory.
- Restart Muximux and inspect its logs.
- Repeat the local, authentication, application, reboot, and public tunnel tests.
Keep the previous verified executable and configuration backup until the new version passes testing, unless a security notice specifically advises against rollback. Do not overwrite the only recoverable copy of a working configuration.
Control the Localtonet tunnel lifecycle
Start the tunnel only when remote access is needed if your workflow does not require continuous availability. Stop it before sensitive maintenance or whenever public access should be suspended. Delete obsolete tunnels so old configurations do not cause operational confusion. Stopping Muximux and stopping the Localtonet tunnel are separate actions.
Troubleshooting installation and remote access
The binary does not start
Confirm that the asset matches the operating system and architecture. Verify the artifact again, check executable permissions, and make sure the process account can enter the working directory. Review terminal or service logs for malformed YAML, an unavailable file, or an occupied port.
On Linux, also inspect the unit's User, Group, WorkingDirectory, and ExecStart values. A service can fail even when a manual command succeeds if it uses a different account or directory.
The page does not open at localhost:8080
Read the current startup output or logs to identify the effective listener. Another configuration may have changed the port, or another process may already be using it. On Linux, inspect listening TCP sockets with:
ss -ltnpDo not create a Localtonet tunnel until a browser on the host can load the complete Muximux interface.
Muximux starts manually but fails as a service
Compare the manual working directory with the systemd unit. Confirm that the service account owns or can update config.yaml, while the executable remains protected from unintended modification. Review current-boot logs:
sudo journalctl -u muximux.service -b --no-pager
If you changed the unit, run sudo systemctl daemon-reload before restarting it.
The dashboard loads, but an embedded application is blank
Determine whether the application uses a direct iframe or the embedding proxy. A direct iframe can fail because the remote browser cannot resolve a private hostname, cannot route to a private address, or receives iframe-blocking headers. Test the configured URL directly from the affected browser.
For an application you administer, enable the Muximux embedding proxy and test again. Inspect browser diagnostics and Muximux logs for missing resources, redirects, login failures, or WebSocket problems. Compatibility can change when either Muximux or the backend application is upgraded.
The Localtonet tunnel is connected, but the URL fails
From the selected Localtonet client device, open the exact local target saved in the tunnel. If it fails locally from that device, fix the Muximux bind address, host firewall, routing, or target address first. A tunnel cannot repair unreachable local networking.
If both processes run on the same host, loopback can be appropriate. If they run on separate hosts, do not target 127.0.0.1, because loopback on the Localtonet device refers to that device rather than the Muximux host.
Login redirects loop or return to the wrong address
This usually indicates an external-address, callback, forwarded-header, or secure-cookie expectation that does not match the public URL. Compare the final Localtonet HTTPS address with the identity provider's registered callback and the authentication settings documented for the installed Muximux release.
Access disappears after a reboot
Check both services independently. Confirm that Muximux started through its supervisor and works locally. Then confirm that the Localtonet client is connected and the HTTP tunnel is running. Also check whether the machine entered sleep mode, received a different internal address, or lost network connectivity.
Frequently asked questions
Does Muximux require Docker?
No. Muximux supports a single static binary as well as Docker. This tutorial uses only the binary path. The executable includes the frontend and does not require PHP, an external database, or a separate web server for the basic deployment.
Where does Muximux store its configuration?
Muximux uses one YAML configuration file named config.yaml. Run the binary from a stable working directory so the file has a predictable location. Protect it with restrictive permissions and include it in your backup procedure.
What local port should I test?
The standard binary setup serves Muximux on port 8080, so the initial host-local address is normally http://127.0.0.1:8080. Startup output and your effective configuration remain authoritative if the listener has been changed.
How do I verify a downloaded Muximux binary?
Download it from the official GitHub release and run gh attestation verify against the mescon/Muximux repository. Also use any checksum file attached to that same release. Do not install a file when provenance verification fails.
Does Localtonet expose every application listed in Muximux?
The HTTP tunnel exposes the selected Muximux listener. Direct links and iframes may still require the remote browser to reach their original URLs. Compatible applications using the Muximux embedding proxy are fetched by the Muximux host and presented through its origin.
Is the Muximux embedding proxy the same as a Localtonet tunnel?
No. The embedding proxy helps backend applications render inside Muximux. A Localtonet tunnel creates the public route to the Muximux HTTP listener through an outbound client connection.
Do I need router port forwarding or a public IP address?
No. The Localtonet client establishes an outbound connection to our relay server, so this workflow does not require inbound router port forwarding, firewall changes, VPN setup, or a public IP address.
Does creating a Localtonet tunnel start it automatically?
No. After creating the tunnel, press Start. The public address remains available only while the selected Localtonet client is connected and the tunnel is running. You can later stop or delete it.
Can the Localtonet client run on another machine?
Yes. The client can forward to a service on or reachable from its device. Muximux must listen on an internal address reachable from that client, and local routing and firewall policy must allow the connection.
Access your verified Muximux dashboard with Localtonet
Verify the official Muximux binary, complete onboarding, enable authentication, establish persistent startup, and prove the dashboard locally. You can then create a Localtonet HTTP tunnel that targets the confirmed listener and use the assigned public HTTPS address without opening an inbound router port.
Get Started Free →