

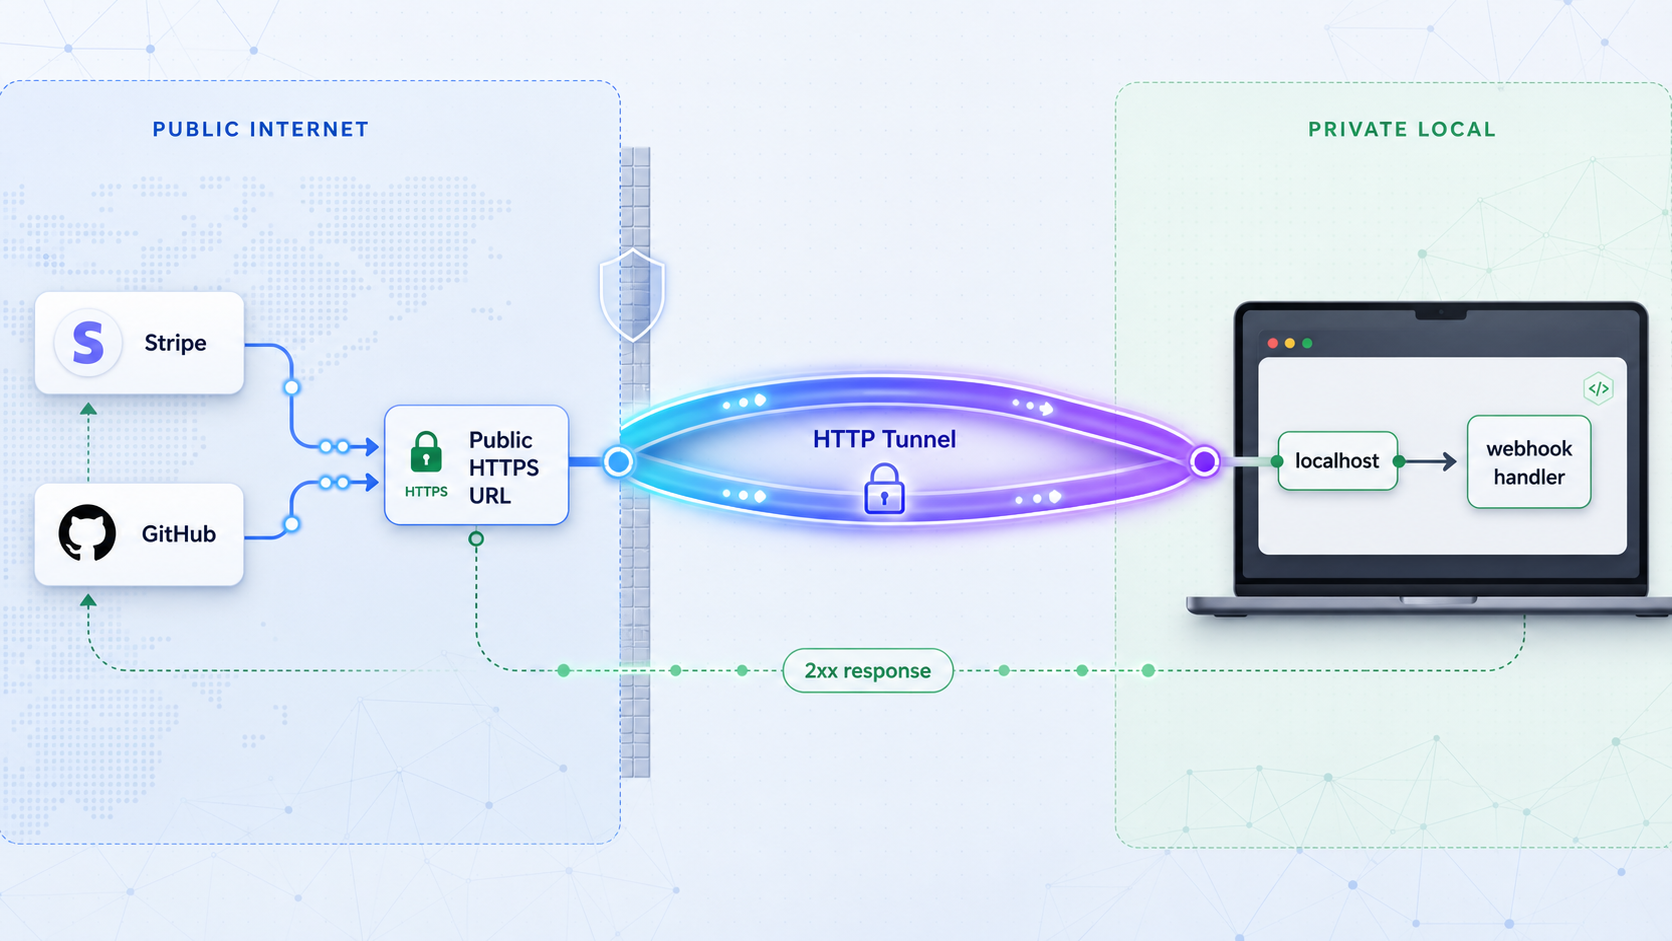
Build a safe, reproducible webhook testing loop from public HTTPS to localhost
Webhook providers cannot deliver events directly to a server bound to localhost. This guide explains the networking and trust boundaries involved, builds a signature-verifying Node.js receiver, exposes it through a Localtonet HTTP tunnel, and verifies the complete request path. It also covers durable event intake, duplicate delivery, retries, secret handling, test versus live modes, troubleshooting, and safe cleanup.
📋 What's in this guide
How local webhook testing works
A webhook is an HTTP callback sent when an event occurs in another system. Although many webhook integrations use POST with a JSON body, that is not a universal rule. The provider defines the HTTP method, content type, authentication mechanism, expected response, timeout behavior, and retry policy. Your implementation must follow the current documentation for the provider you are integrating.
A development server commonly listens on an address such as http://127.0.0.1:3000. The loopback address belongs only to the machine running the server. A payment platform, source control system, or other external service cannot route a request to your laptop's loopback interface. Home and office networks also usually place devices behind network address translation and inbound firewall rules.
Localtonet solves the reachability part of this problem without inbound router port forwarding, firewall changes, VPN setup, or a public IP address. The Localtonet client on your development machine establishes an outbound connection to a Localtonet relay. An HTTP tunnel then provides a public HTTPS address and forwards requests through that connection to the local IP address and port you configured.
Reachability is not authenticity
A tunnel makes the endpoint reachable, but it does not prove who sent a request. Source IP addresses, reverse DNS, geolocation, country labels, and autonomous system information are not substitutes for webhook signature verification. Network metadata can be useful during diagnosis, but authenticity should be established using the provider's documented cryptographic verification procedure.
The public route should treat every request as untrusted until verification succeeds. Verify the signature using the endpoint's signing secret, enforce any provider-defined timestamp tolerance, validate the event schema, and accept only event types required by the integration. Do not perform fulfillment, account changes, deployments, or other privileged actions before those checks pass.
Expose only the route and port required for the test. Do not expose an administrative dashboard, database, debugger, or unrestricted development environment. Keep test and production traffic separate, use least-privilege test credentials, and stop the tunnel as soon as the testing session ends.
Localtonet webhooks are a separate feature
This tutorial forwards third-party webhook requests through an HTTP tunnel to your application. That is different from Localtonet's platform-wide Token/Tunnel webhook system. Localtonet platform webhooks report when a token or tunnel in a selected Token Group changes to Connected or Disconnected. Their JSON body identifies the token or tunnel and includes its type, status, and action date.
Do not configure a platform Token/Tunnel webhook when your goal is to receive Stripe, GitHub, or another provider's application events. For this tutorial, create an HTTP tunnel and register its public HTTPS route with the external provider.
Prerequisites and security preparation
This tutorial uses Node.js 20 or later, npm, a Localtonet account, and a development device capable of running both the sample server and the Localtonet client. The sample supports signed Stripe and GitHub webhook intake. It uses SQLite as a small durable inbox so accepted events survive an application restart on one development machine.
SQLite is appropriate for demonstrating durable intake locally. A production system should use infrastructure designed for its workload, availability requirements, concurrency, retention policy, and recovery objectives. Production webhook traffic should terminate in production infrastructure, not on a developer laptop.
| Requirement | Purpose | How to verify it |
|---|---|---|
| Node.js 20 or later | Runs the Express receiver and background worker | node --version |
| npm | Installs the project dependencies | npm --version |
| Localtonet account and client | Creates the outbound connection and public HTTPS endpoint | Confirm the intended development device appears in your Localtonet dashboard after the client is installed and connected |
| Stripe test endpoint, optional | Supplies signed Stripe test deliveries | Use Stripe's test or sandbox context and obtain the endpoint-specific signing secret |
| GitHub test repository, optional | Supplies signed GitHub deliveries | Use a repository where you are permitted to configure webhooks |
Separate test and live data
Use provider test or sandbox modes wherever available. Signing secrets are commonly endpoint-specific, and test and live endpoints may not share a secret. Retry schedules and delivery tools can also differ between test and live modes. Check the provider's current dashboard and documentation rather than assuming a test delivery behaves exactly like a live delivery.
Create a dedicated route for each provider, such as /webhooks/stripe and /webhooks/github. This isolates middleware, signing secrets, event allowlists, metrics, and incident response. It also prevents one provider's body parser or authentication logic from silently affecting another provider.
Webhook bodies can contain names, email addresses, transaction details, repository metadata, customer identifiers, or other personal and confidential data. Headers can contain signatures, bearer credentials, correlation identifiers, and reusable secrets. Do not paste complete requests into public tickets or chat systems. Redact logs, limit retention, restrict access, and never log signing secrets or Localtonet device tokens.
Build a signature-verifying local webhook handler
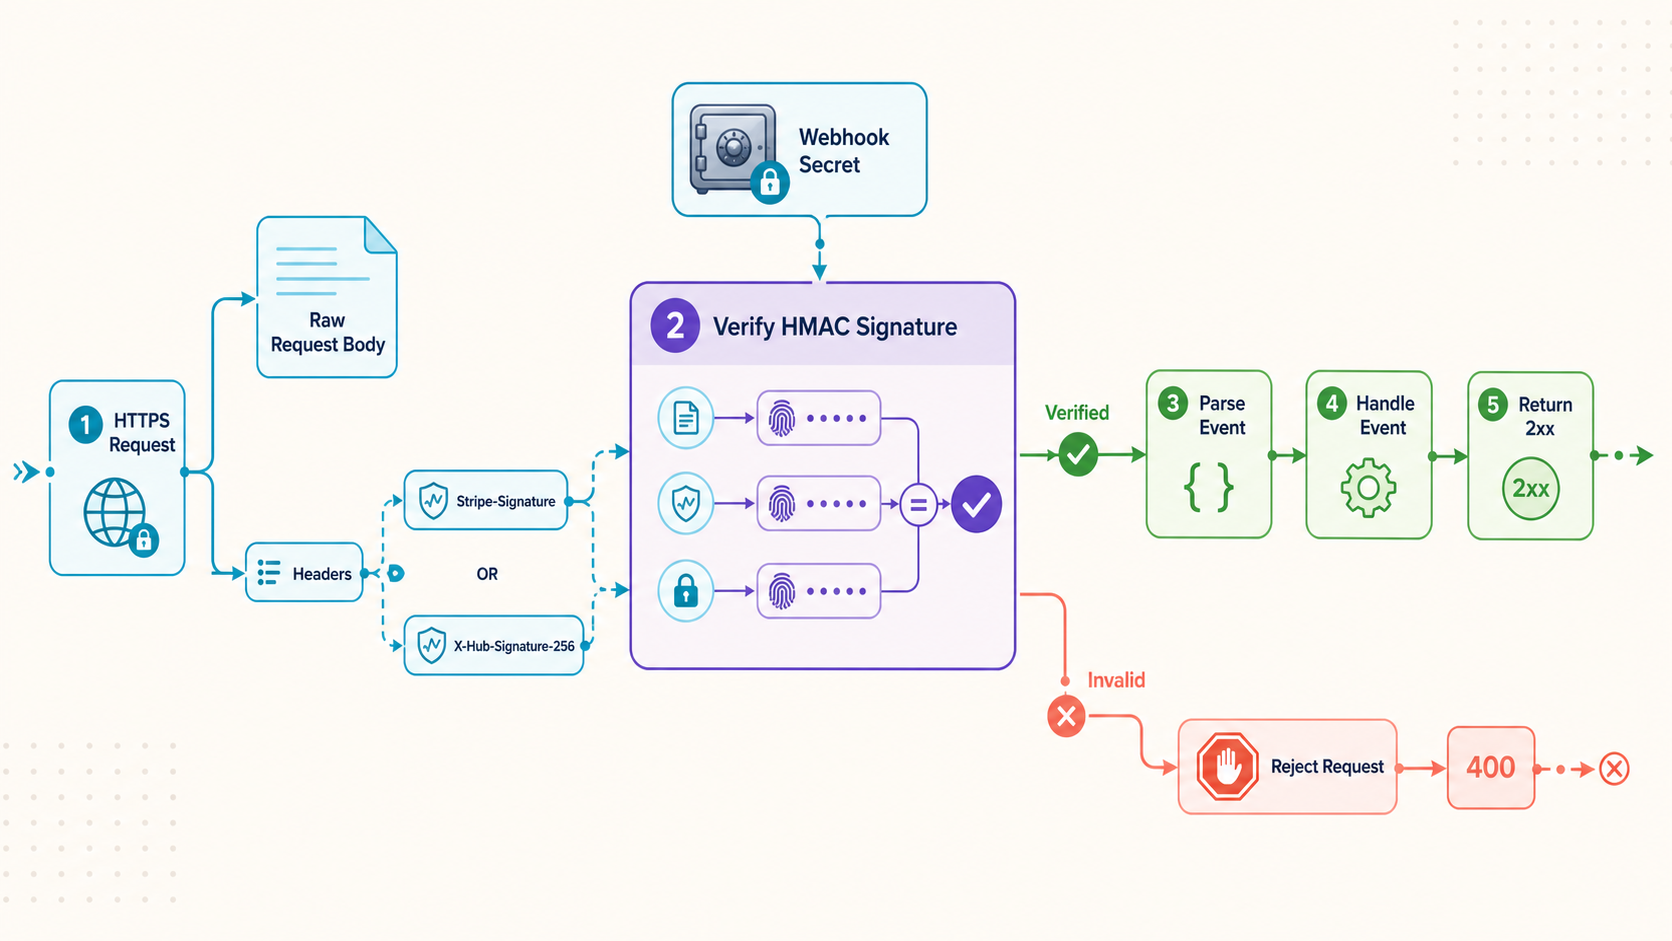
The following project verifies raw request bytes, writes accepted events into a durable SQLite inbox, acknowledges only after the write succeeds, and processes events in a separate worker. It is intentionally small, but it avoids the misleading pattern of calling an asynchronous function after sending a response without a durable handoff.
1. Initialize the project and install dependencies
mkdir local-webhook-test
cd local-webhook-test
npm init -y
npm install express stripe dotenv better-sqlite3
Add scripts to the generated package.json. Keep the dependencies created by npm and replace or extend only the scripts object:
{
  "scripts": {
    "start": "node app.js",
    "worker": "node worker.js"
  }
}
2. Create environment variables without committing secrets
Generate a high-entropy GitHub webhook secret locally:
node -e "console.log(require('crypto').randomBytes(32).toString('hex'))"Create .env and insert the generated value. Obtain the Stripe values from your Stripe test environment. The webhook secret is the endpoint-specific signing secret, not an API key and not a value you should invent.
PORT=3000
GITHUB_WEBHOOK_SECRET=replace_with_the_generated_random_value
STRIPE_SECRET_KEY=replace_with_a_test_mode_secret_key
STRIPE_WEBHOOK_SECRET=replace_with_the_test_endpoint_signing_secret
Prevent the environment file and local inbox from entering source control:
printf ".env\nwebhooks.db\nwebhooks.db-shm\nwebhooks.db-wal\n" >> .gitignore
chmod 600 .env
The chmod command applies on systems that support POSIX permissions. On other platforms, protect the file using the operating system's access controls. In a shared or production environment, use an approved secret manager instead of a plaintext environment file.
3. Create the durable inbox
Create db.js:
const Database = require('better-sqlite3');

const db = new Database('webhooks.db');
db.pragma('journal_mode = WAL');

db.exec(`
  CREATE TABLE IF NOT EXISTS webhook_inbox (
    id INTEGER PRIMARY KEY AUTOINCREMENT,
    provider TEXT NOT NULL,
    event_id TEXT NOT NULL,
    event_type TEXT NOT NULL,
    payload TEXT NOT NULL,
    status TEXT NOT NULL DEFAULT 'pending',
    attempts INTEGER NOT NULL DEFAULT 0,
    last_error TEXT,
    received_at TEXT NOT NULL DEFAULT CURRENT_TIMESTAMP,
    processed_at TEXT,
    UNIQUE(provider, event_id)
  )
`);

const enqueue = db.prepare(`
  INSERT OR IGNORE INTO webhook_inbox
    (provider, event_id, event_type, payload)
  VALUES
    (@provider, @eventId, @eventType, @payload)
`);

module.exports = { db, enqueue };
The unique constraint on provider and event_id is the idempotency boundary for this example. A repeated Stripe event ID or GitHub delivery ID is acknowledged but is not enqueued twice.
4. Create the HTTP receiver
Create app.js. Notice that the signed webhook routes appear before the general JSON middleware. Signature verification must receive the original bytes, not an object that has already been parsed and reserialized.
require('dotenv').config();

const crypto = require('crypto');
const express = require('express');
const Stripe = require('stripe');
const { enqueue } = require('./db');

const app = express();
const port = Number(process.env.PORT || 3000);

for (const name of [
  'GITHUB_WEBHOOK_SECRET',
  'STRIPE_SECRET_KEY',
  'STRIPE_WEBHOOK_SECRET'
]) {
  if (!process.env[name]) {
    throw new Error(`Missing required environment variable: ${name}`);
  }
}

const stripe = new Stripe(process.env.STRIPE_SECRET_KEY);

app.get('/health', (req, res) => {
  res.status(200).json({ ok: true });
});

app.post(
  '/webhooks/stripe',
  express.raw({ type: 'application/json', limit: '1mb' }),
  (req, res) => {
    const signature = req.get('stripe-signature');

    if (!signature) {
      return res.status(401).json({ error: 'Missing Stripe signature' });
    }

    let event;
    try {
      event = stripe.webhooks.constructEvent(
        req.body,
        signature,
        process.env.STRIPE_WEBHOOK_SECRET
      );
    } catch (error) {
      console.error('Stripe signature verification failed');
      return res.status(400).json({ error: 'Invalid signature' });
    }

    try {
      const result = enqueue.run({
        provider: 'stripe',
        eventId: event.id,
        eventType: event.type,
        payload: JSON.stringify(event)
      });

      console.log(
        result.changes === 1
          ? `Queued Stripe event ${event.id}`
          : `Ignored duplicate Stripe event ${event.id}`
      );

      return res.status(200).json({ received: true });
    } catch (error) {
      console.error('Could not persist Stripe event:', error.message);
      return res.status(503).json({ error: 'Temporary intake failure' });
    }
  }
);

app.post(
  '/webhooks/github',
  express.raw({ type: 'application/json', limit: '1mb' }),
  (req, res) => {
    const signature = req.get('x-hub-signature-256');
    const deliveryId = req.get('x-github-delivery');
    const eventType = req.get('x-github-event');

    if (!signature || !deliveryId || !eventType) {
      return res.status(401).json({ error: 'Missing GitHub headers' });
    }

    const expected = 'sha256=' + crypto
      .createHmac('sha256', process.env.GITHUB_WEBHOOK_SECRET)
      .update(req.body)
      .digest('hex');

    const suppliedBuffer = Buffer.from(signature, 'utf8');
    const expectedBuffer = Buffer.from(expected, 'utf8');

    const valid =
      suppliedBuffer.length === expectedBuffer.length &&
      crypto.timingSafeEqual(suppliedBuffer, expectedBuffer);

    if (!valid) {
      console.error('GitHub signature verification failed');
      return res.status(401).json({ error: 'Invalid signature' });
    }

    let payload;
    try {
      payload = JSON.parse(req.body.toString('utf8'));
    } catch (error) {
      return res.status(400).json({ error: 'Invalid JSON' });
    }

    try {
      const result = enqueue.run({
        provider: 'github',
        eventId: deliveryId,
        eventType,
        payload: JSON.stringify(payload)
      });

      console.log(
        result.changes === 1
          ? `Queued GitHub delivery ${deliveryId}`
          : `Ignored duplicate GitHub delivery ${deliveryId}`
      );

      return res.status(200).json({ received: true });
    } catch (error) {
      console.error('Could not persist GitHub event:', error.message);
      return res.status(503).json({ error: 'Temporary intake failure' });
    }
  }
);

app.use(express.json());

app.listen(port, '127.0.0.1', () => {
  console.log(`Webhook receiver listening at http://127.0.0.1:${port}`);
});
The body limit in this example is an application choice, not a universal provider limit. Adjust it only after reviewing the payload sizes you expect and the denial-of-service implications of accepting larger requests.
5. Create a separate worker
Create worker.js:
require('dotenv').config();

const { db } = require('./db');

const claimNext = db.prepare(`
  SELECT id, provider, event_id, event_type, payload, attempts
  FROM webhook_inbox
  WHERE status IN ('pending', 'retry')
    AND attempts < 5
  ORDER BY id
  LIMIT 1
`);

const markProcessing = db.prepare(`
  UPDATE webhook_inbox
  SET status = 'processing', attempts = attempts + 1
  WHERE id = ? AND status IN ('pending', 'retry')
`);

const markDone = db.prepare(`
  UPDATE webhook_inbox
  SET status = 'done', processed_at = CURRENT_TIMESTAMP, last_error = NULL
  WHERE id = ?
`);

const markRetry = db.prepare(`
  UPDATE webhook_inbox
  SET status = 'retry', last_error = ?
  WHERE id = ?
`);

async function performBusinessWork(job) {
  const payload = JSON.parse(job.payload);

  console.log(
    `Processing ${job.provider} ${job.event_type} with id ${job.event_id}`
  );

  if (job.provider === 'stripe') {
    if (job.event_type === 'checkout.session.completed') {
      console.log(`Verified Stripe event object: ${payload.id}`);
    }
  }

  if (job.provider === 'github') {
    if (job.event_type === 'push') {
      console.log(`Verified GitHub push for ${payload.repository?.full_name}`);
    }
  }

  // Put idempotent business operations here.
  // Use database constraints or provider object IDs to prevent repeated effects.
}

async function poll() {
  const job = claimNext.get();

  if (!job) {
    return;
  }

  const claimed = markProcessing.run(job.id);
  if (claimed.changes !== 1) {
    return;
  }

  try {
    await performBusinessWork(job);
    markDone.run(job.id);
  } catch (error) {
    console.error(`Worker failed for job ${job.id}:`, error.message);
    markRetry.run(error.message, job.id);
  }
}

console.log('Webhook worker started');

setInterval(() => {
  poll().catch((error) => console.error('Worker loop failed:', error));
}, 1000);
This worker demonstrates a durable handoff and process separation. Its retry policy is deliberately simple. A larger system should add delayed retries, exponential backoff with jitter, dead-letter handling, concurrency controls, observability, and transactional coordination with business data.
6. Start and verify the local service
Open two terminals in the project directory. Start the receiver in the first:
npm startExpected output:
Webhook receiver listening at http://127.0.0.1:3000Start the worker in the second terminal:
npm run workerExpected output:
Webhook worker startedVerify the local health route before creating any tunnel:
curl -i http://127.0.0.1:3000/healthYou should receive a 200 response containing:
{"ok":true}A copied Stripe or GitHub payload is not enough to reproduce a valid delivery. Signatures cover the exact body, and some providers also incorporate timestamps or other delivery-specific data. Old signatures may fail freshness checks. Use provider-supported test or redelivery controls, or generate a fresh signature using the provider's official local testing tools and documentation.
Configure the Localtonet HTTP tunnel
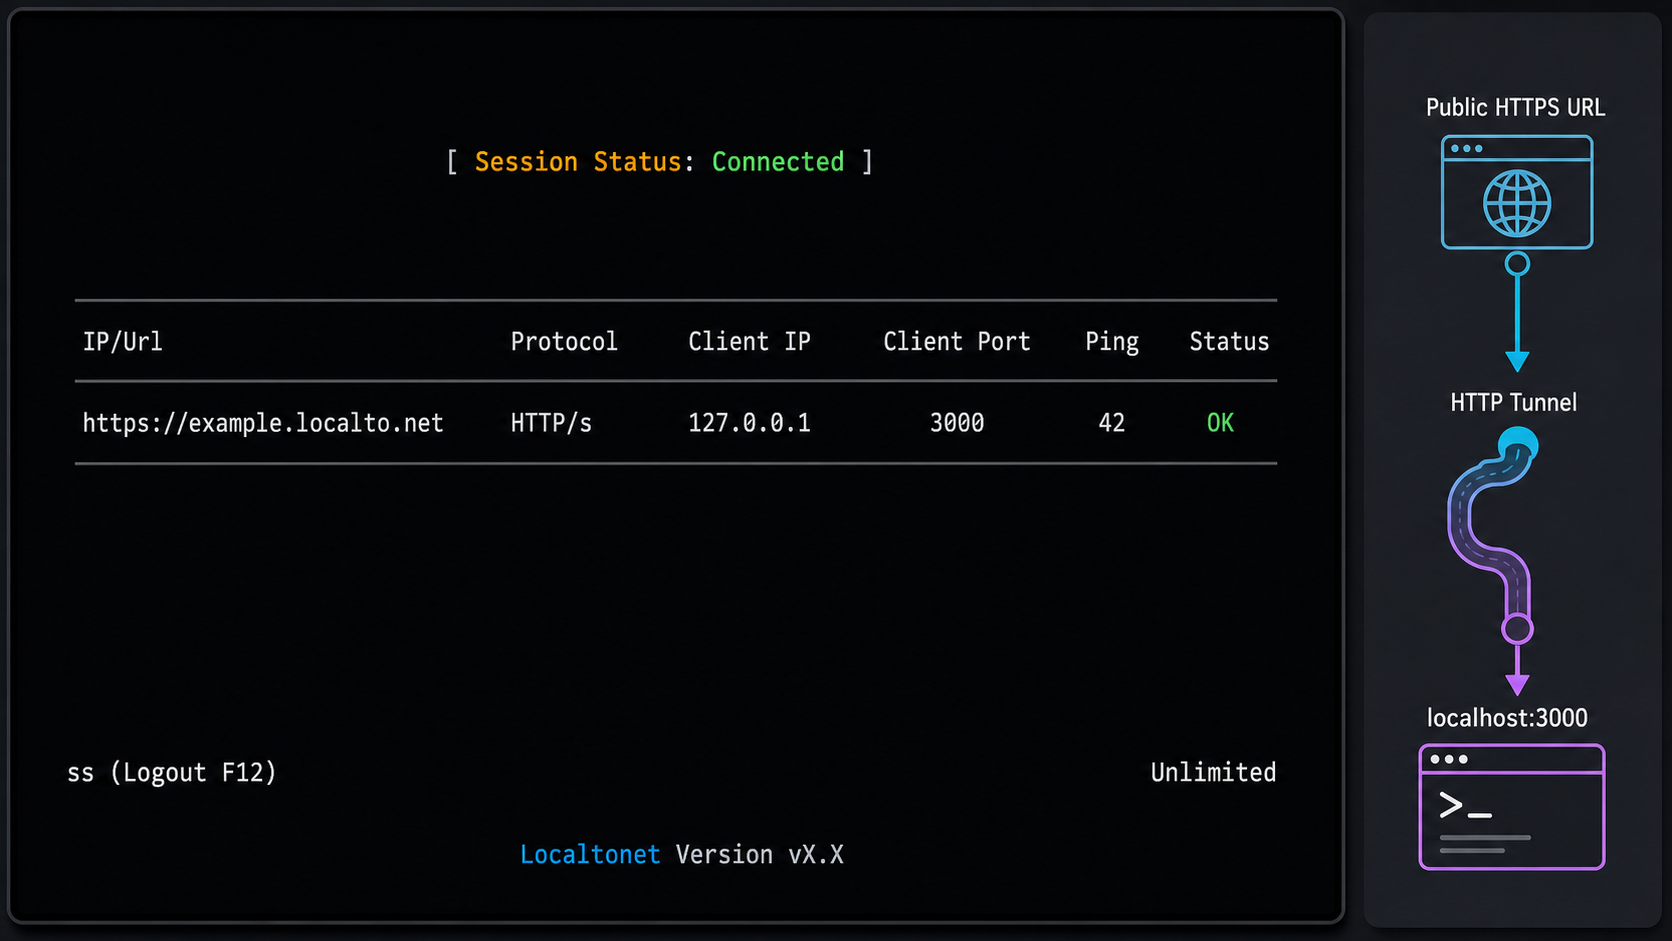
Complete these steps only after the local health check succeeds. Creating a tunnel configuration does not start it. The selected Localtonet client must be connected, and you must explicitly start the tunnel before its public endpoint becomes available.
Install and run the Localtonet client
Use the current installation path provided for your operating system by Localtonet. Run the client on the device that hosts the webhook receiver or can reach it over the local network. Do not use commands copied from an old article if they are not present in the current installation instructions.
Select the device-specific authentication token
In the HTTP tunnel configuration, select the token belonging to the development device that will run the tunnel. A device token identifies that client and must be treated as a secret. Never place it in source code, screenshots, webhook payloads, shell history, or provider settings.
Select a currently available relay server
Choose from the relay servers or regions currently offered in your dashboard. Availability can vary, so this guide does not hardcode a server code or region name.
Configure the HTTP tunnel and process type
Create an HTTP tunnel and select the appropriate Process Type. HTTP tunnels can use Random Sub Domain, Custom Sub Domain, or Custom Domain, with availability depending on the current product configuration and plan. All three process types serve the local content at a public HTTPS address. Do not assume a custom or persistent name is available until the dashboard confirms it.
Enter the local IP address and port
For this tutorial, use 127.0.0.1 and port 3000 when the client and receiver run on the same machine. If the receiver is on another reachable device, use the appropriate local address and confirm the Localtonet client device can connect to it.
Create and explicitly start the tunnel
Save the configuration, then press Start. Creating the tunnel alone does not make it active. Keep the selected client connected and the local receiver running.
Verify the assigned public HTTPS endpoint
Copy the public URL shown for the running tunnel and append /health. Test that exact address from a browser or a separate network. A successful request should return {"ok":true}. Use the actual assigned URL in later provider settings rather than an example domain.
For the current product workflow, consult the Localtonet HTTP tunnel documentation alongside the dashboard. Current documentation is the authority for client installation paths, available servers, process types, and interface details.
If the client disconnects, the computer sleeps, the local server stops, or the tunnel is stopped, the provider cannot reach the handler. Delivery behavior after a failure depends on the provider. Do not rely on the tunnel or a development laptop for production event intake.
Register and test Stripe and GitHub webhooks
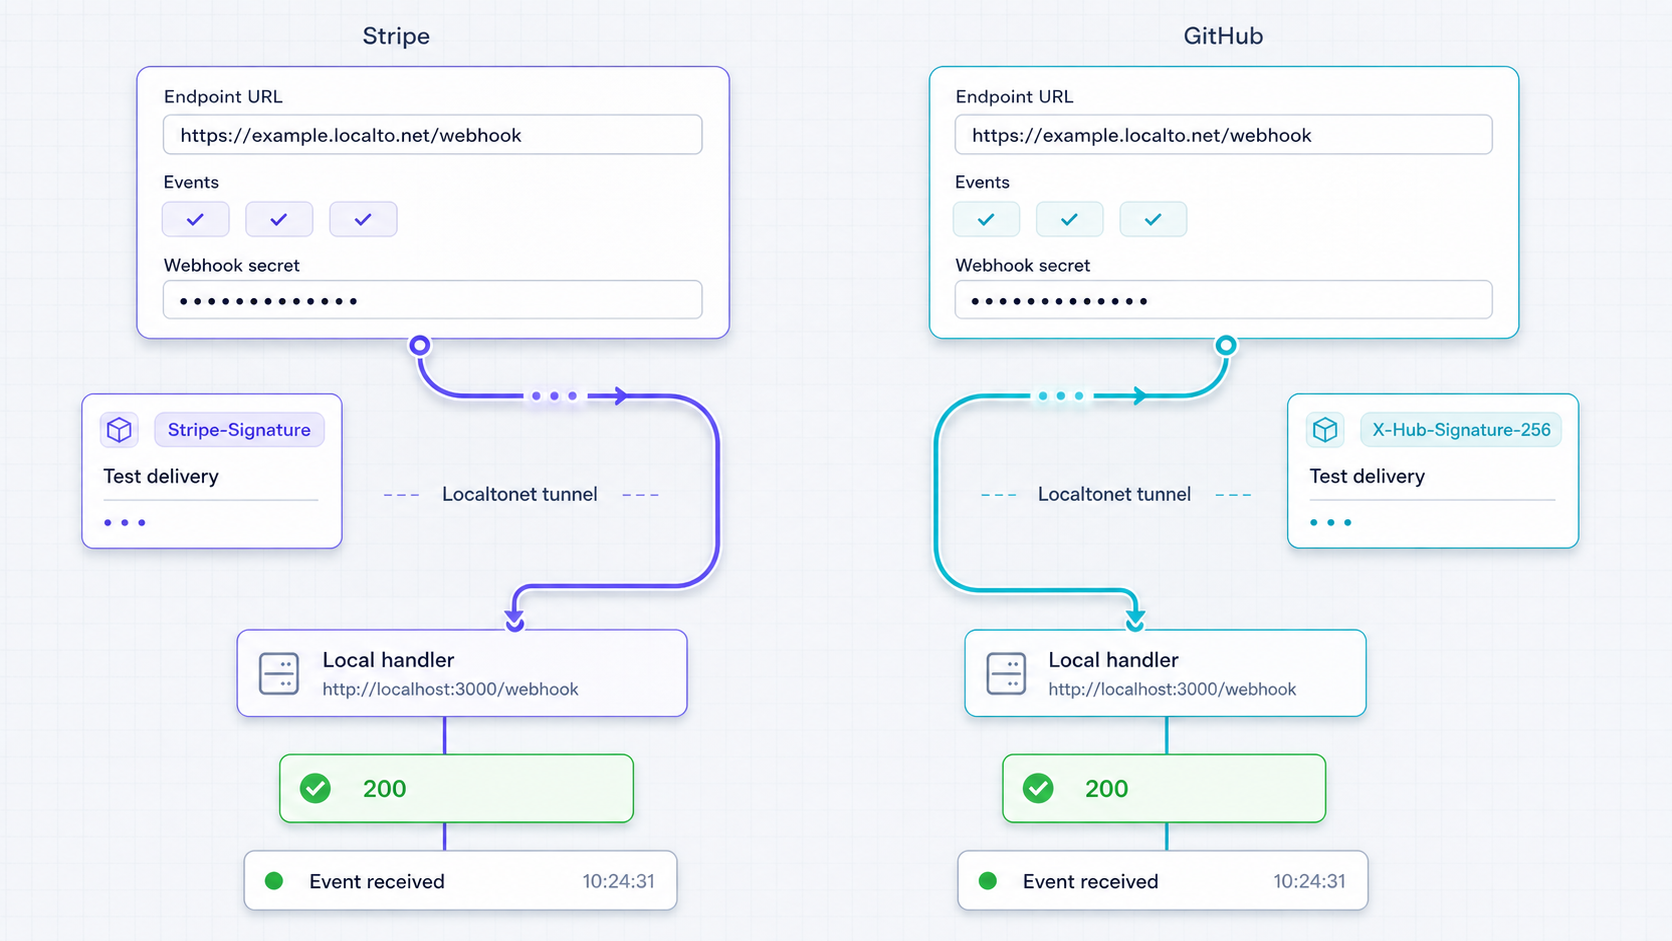
Once PUBLIC_URL/health succeeds, register provider-specific routes. Replace PUBLIC_URL below with the exact HTTPS address assigned to your running tunnel.
Stripe test deliveries
- Use Stripe's test or sandbox context rather than live payment traffic.
- Create or update a webhook endpoint whose destination is
PUBLIC_URL/webhooks/stripe. - Select only the event types required by the code you are testing.
- Copy that endpoint's test signing secret into
STRIPE_WEBHOOK_SECRET. - Restart the receiver after changing its environment.
- Use Stripe's current provider-supported test delivery workflow to send a signed event.
A valid first delivery should produce output similar to:
Queued Stripe event evt_...
Processing stripe checkout.session.completed with id evt_...
Verified Stripe event object: evt_...
Stripe recommends returning a quick successful response and moving complex work out of the request path. Retry behavior differs between live and sandbox contexts and may change, so do not build logic around a universal fixed retry duration. Your endpoint should be idempotent regardless of the provider's schedule.
If Stripe reports an invalid signature, check the raw-body middleware order and endpoint secret first. A signing secret belongs to a specific webhook endpoint or local testing session. It is not the same as the Stripe API secret key.
GitHub test deliveries
- Open webhook settings for a test repository or organization where you have permission to create hooks.
- Set the payload URL to
PUBLIC_URL/webhooks/github. - Select
application/jsonwhen GitHub asks for the content type. - Enter the same random value stored in
GITHUB_WEBHOOK_SECRET. - Select only the repository events needed by your integration.
- Create the webhook, inspect the initial delivery, and trigger a selected event such as a test push.
A valid delivery should produce output similar to:
Queued GitHub delivery 00000000-0000-0000-0000-000000000000
Processing github push with id 00000000-0000-0000-0000-000000000000
Verified GitHub push for owner/repository
GitHub includes a delivery identifier that can be used as an intake idempotency key. GitHub also provides delivery information and redelivery controls in its webhook interface. Use those provider-supported controls when reproducing a failed signed request instead of copying a body and reusing its old signature.
What the HTTP responses mean
| Response | Meaning in this tutorial | Next action |
|---|---|---|
200 |
The signature passed and the event was durably accepted, or an already accepted duplicate was recognized | Confirm the worker processes the queued item |
400 |
The body or Stripe signature could not be validated | Check raw-body handling, payload format, signing secret, and test versus live mode |
401 |
A required GitHub signature header was missing or invalid | Check the configured GitHub secret and exact request bytes |
503 |
The verified event could not be written to the durable inbox | Repair storage and use the provider's retry or redelivery mechanism |
Operate webhook testing safely
Design for duplicate and out-of-order delivery
Webhook delivery is generally at least once rather than exactly once. A provider may deliver the same event again after a timeout, connection failure, ambiguous response, or manual redelivery. Store a provider-defined event or delivery identifier under a unique database constraint. A preliminary lookup without a unique constraint is vulnerable to races when two copies arrive together.
Idempotency at intake is only the first layer. Business operations also need safeguards. For example, fulfillment should use a unique order or payment identifier, deployment creation should use a unique source event, and outbound notifications should record whether a message has already been sent.
Do not assume related events arrive in business order. Fetch authoritative current state from the provider when appropriate, compare event creation or resource version information where documented, and make state transitions conditional. An older event arriving late should not overwrite a newer confirmed state.
Acknowledge only after durable intake
Respond quickly, but not before the event has been authenticated and durably recorded. Sending a 2xx response before persistence creates a loss window: the provider believes delivery succeeded even if the process crashes before the event reaches a queue or database.
The preferred sequence is:
- Read the exact request bytes.
- Verify the provider signature and freshness rules.
- Validate required headers and basic schema.
- Insert the event into a durable inbox using a unique idempotency key.
- Return an appropriate 2xx response.
- Process the event in a separate worker.
Plan for tunnel downtime
A Localtonet tunnel is available only while its selected client is connected and the tunnel is running. The local application must also remain available at the configured IP address and port. Laptop sleep, network changes, process crashes, operating system restarts, and client disconnection can interrupt the path.
Before a testing session, verify both http://127.0.0.1:3000/health and PUBLIC_URL/health. After an interruption, verify them again before requesting a redelivery. Provider behavior varies: some retry automatically, some provide manual redelivery, and test and live environments may differ.
Rotate and isolate secrets
Use separate signing secrets for separate endpoints and environments. If a secret appears in logs, screenshots, source control, terminal recordings, or a shared support conversation, treat it as compromised and rotate it through the provider. Update the local environment, restart the receiver, and confirm new signed deliveries succeed.
Rotation can create a transition period in production when both old and new secrets must be accepted, but only implement dual-secret verification if the provider's documented rotation process requires it. Remove the old secret promptly after the transition.
Control retention and observability
The sample stores complete verified payloads in webhooks.db. That is useful for a local tutorial, but it creates a data-retention responsibility. Delete the database after the test if it contains data you no longer need. For longer-lived environments, define retention periods, encrypt storage where required, restrict database access, and avoid retaining fields that serve no operational purpose.
Log event identifiers, provider names, event types, status transitions, and sanitized error codes. Avoid logging full headers, complete payloads, signing secrets, authorization headers, or customer data. Correlation should rely on non-secret event and delivery identifiers.
Stop and clean up after testing
Disable or remove the provider's development endpoint
Prevent new deliveries from being sent to a laptop that will no longer be listening. Keep production endpoints separate.
Stop the Localtonet tunnel
Use the Stop action in Localtonet when the endpoint is no longer needed. Delete the tunnel if you do not intend to reuse its configuration.
Stop the receiver and worker
Terminate both Node.js processes so the development port and background processing loop are no longer active.
Remove sensitive local data
Delete payload databases and logs when retention is unnecessary. Rotate any secret that may have been exposed during debugging.
Troubleshooting webhook and tunnel failures
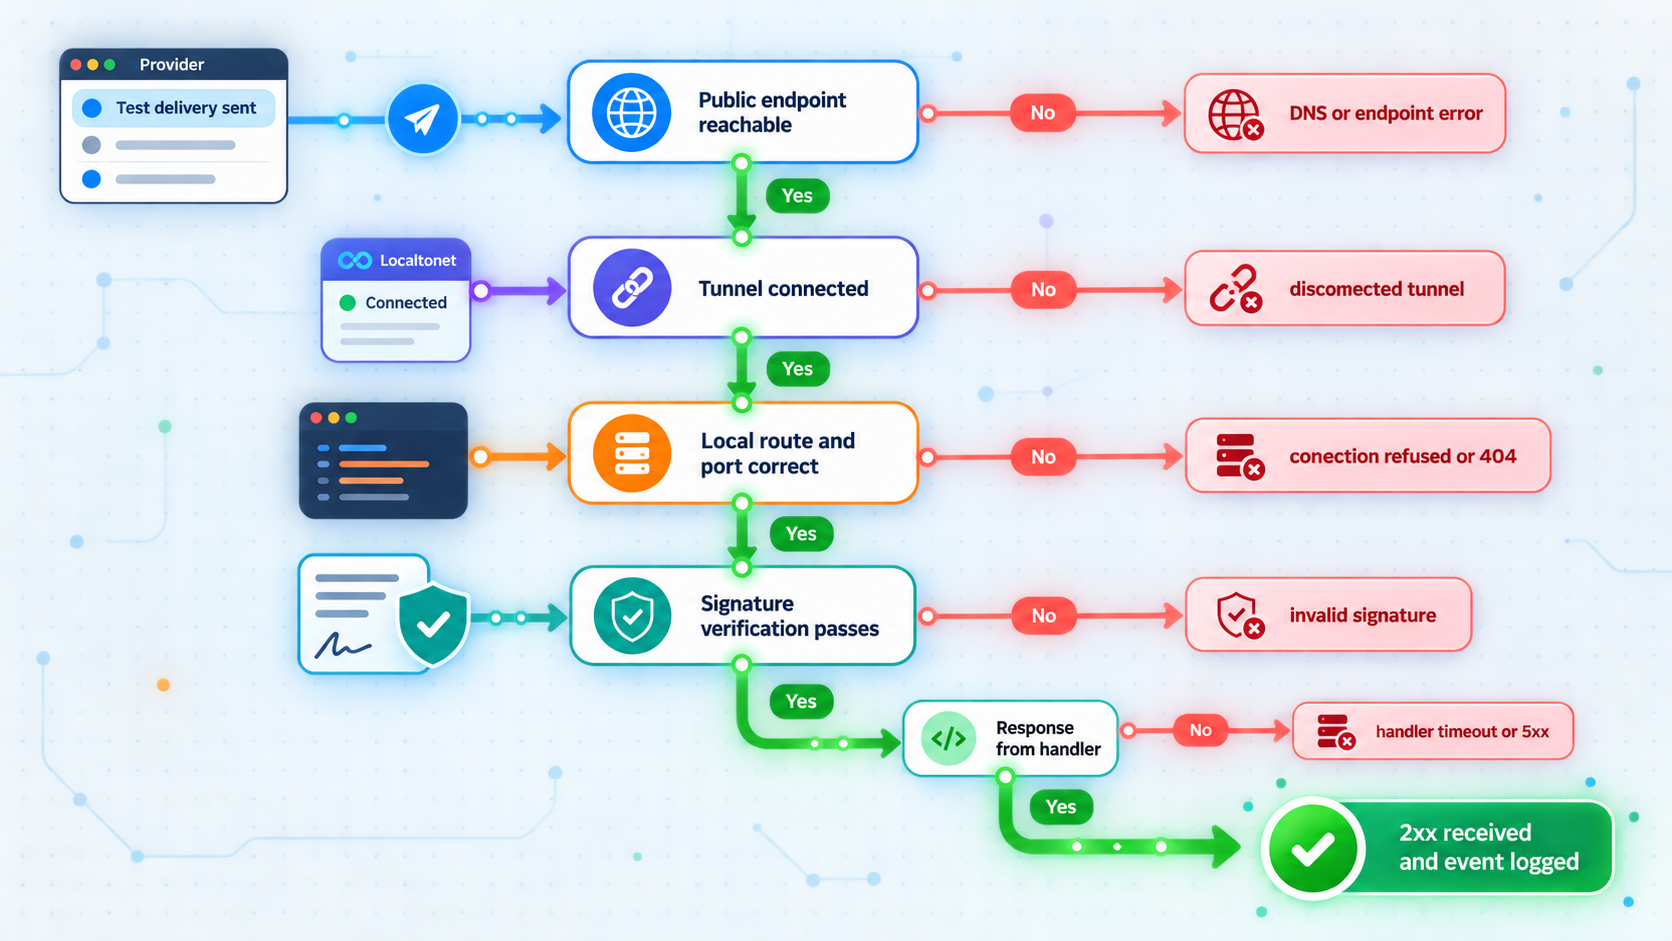
| Symptom | Likely cause | Checks and corrective action |
|---|---|---|
| Local health check fails | The receiver is stopped, using another port, or failed during startup | Read the terminal error, run npm start, confirm environment variables exist, and retry http://127.0.0.1:3000/health |
| Local health works but public health fails | The client is disconnected, the tunnel is not started, or the local target is wrong | Confirm the selected device token belongs to this machine, select an available relay, verify 127.0.0.1:3000, and press Start |
| Public health returns 404 | The route or registered path is incorrect | Test the exact /health path, then confirm provider URLs use /webhooks/stripe or /webhooks/github |
| Stripe signature verification fails | JSON middleware ran first, the wrong endpoint secret is loaded, or test and live contexts are mixed | Keep express.raw() on the Stripe route before express.json(), verify the endpoint-specific secret, restart the process, and send a fresh provider test |
| GitHub signature verification fails | The configured secrets differ or the body was modified before HMAC verification | Replace both values with the same newly generated secret and verify the route receives raw bytes |
| Provider reports a timeout | Business work is still occurring in the request handler, or the local path is unavailable | Persist and acknowledge in the receiver, move slow work to the worker, and test both health endpoints before redelivery |
| The same event runs more than once | No durable unique key exists, or the business operation itself is not idempotent | Use provider event or delivery IDs under a database unique constraint and add unique business identifiers to side effects |
| Events are accepted but never processed | The worker is not running or jobs are repeatedly failing | Start npm run worker, inspect sanitized errors, and query the inbox status without exposing payload data |
| Deliveries fail after the laptop is closed | The device slept or disconnected | Resume the device, reconnect the client, start the tunnel, verify both health routes, and use the provider's retry or redelivery workflow |
A global JSON parser placed before a signature-verifying route can alter the input expected by the provider's verification library. Mount raw-body webhook routes first, verify their signatures, and apply ordinary JSON middleware only to routes that do not require the original bytes.
Frequently asked questions
Does Localtonet need to remain connected while I test webhooks?
Yes. The selected Localtonet client must be connected, the HTTP tunnel must be running, and the local receiver must be listening at the configured IP address and port. If any part stops, the public endpoint cannot deliver requests to the handler.
Can I route production webhooks to my development laptop?
You should not. A laptop can sleep, disconnect, restart, or expose development-only code and data. Use provider test or sandbox events with the Localtonet tunnel, and send production webhooks to production infrastructure with appropriate availability, monitoring, access controls, retention, and recovery procedures.
Can I authenticate a webhook by checking its source IP?
IP information is not a replacement for cryptographic signature verification. Verify the provider's documented signature against the exact body and signing secret. An IP allowlist can be an additional control when the provider publishes and maintains suitable ranges, but it should not become the sole authenticity check.
Why does a copied payload fail when I replay it with curl?
The signature was calculated for the original raw bytes and may include time-sensitive information. Copying, reformatting, or reserializing JSON changes those bytes, and an old timestamp may no longer pass verification. Use the provider's supported test or redelivery mechanism, or create a new locally signed request according to its official testing documentation.
Should I respond before processing the event?
Verify and durably record the event first, then return a successful response and perform slower work in a separate worker. Responding before durable intake can lose the event after a crash. Processing all business work before responding can cause provider timeouts and duplicate deliveries.
Will the public URL always remain the same?
Do not assume that. HTTP and File Server tunnels can use Random Sub Domain, Custom Sub Domain, or Custom Domain process types, but availability can vary by plan and current product configuration. Use the address shown for your tunnel and confirm current naming options in the Localtonet dashboard before registering an endpoint that must be reused later.
What should I do when the tunnel was offline during a delivery?
Restore the local receiver, worker, Localtonet client, and tunnel. Verify the local and public health routes, then check the provider's current delivery history. Use its supported retry or redelivery control where available. Do not assume every provider automatically retries or follows the same schedule.
Connect a signed webhook test to your local handler
Build and verify your local endpoint first, then use a Localtonet HTTP tunnel to give the provider a public HTTPS route without inbound router port forwarding or firewall changes.
Get Started Free →