

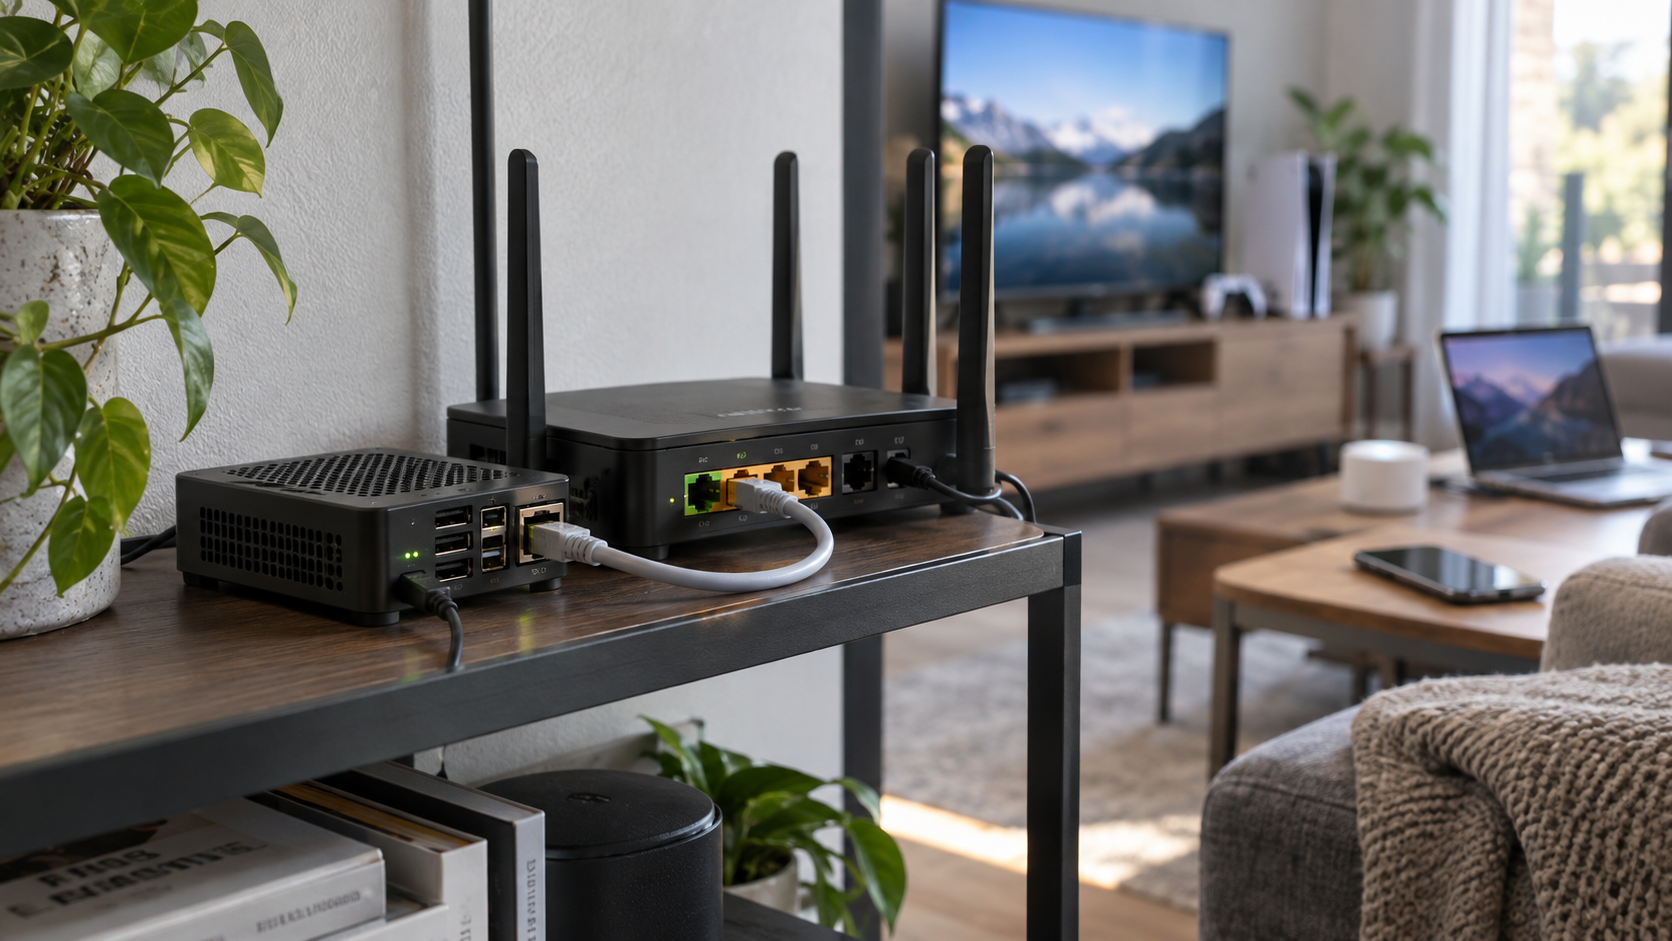
Build a reliable DNS filtering service for your home or small network
Pi-hole can filter requests to advertising, tracking, telemetry, and other unwanted domains before clients connect to them. This guide explains the DNS path, prepares a Linux host safely, covers bare-metal and Docker deployments, and shows how to roll Pi-hole out through your router without overlooking IPv6. It also covers verification, blocklist strategy, backups, updates, troubleshooting, and remote administration. DNS filtering improves coverage on devices that cannot run browser extensions, but it cannot block every advertisement or force every client to use Pi-hole.
📋 What's in this guide
How Pi-hole DNS filtering works
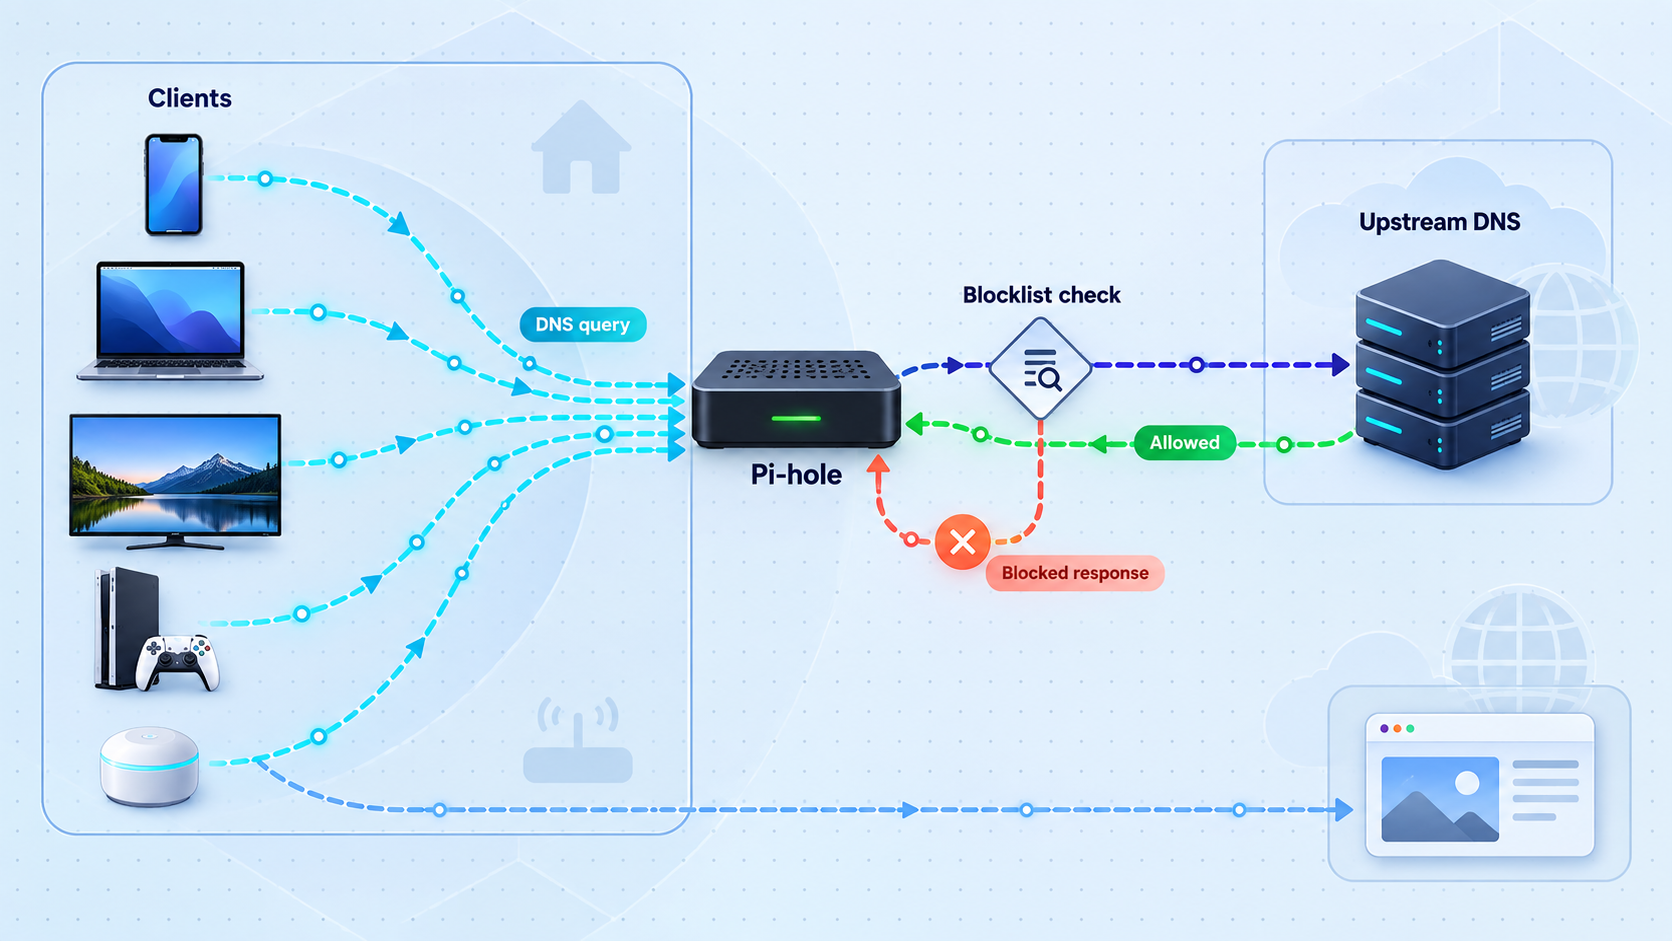
DNS translates names such as example.com into addresses that applications can contact. In a Pi-hole deployment, clients send their DNS questions to Pi-hole instead of sending them directly to an ISP or public resolver. Pi-hole evaluates each requested domain against its local rules and subscribed lists.
If a domain is allowed, Pi-hole forwards the question to the configured upstream resolver and returns the result. If it is blocked, Pi-hole answers according to its configured blocking mode. That response might be an unspecified address, an empty answer, or another policy response. It is therefore incorrect to use 0.0.0.0 as the only sign that filtering works. The Pi-hole query log and the DNS response status provide better evidence.
Normal path
Client
  |
  | DNS query
  v
Pi-hole
  |
  +-- Domain blocked? Yes --> Configured blocking response
  |
  +-- Domain blocked? No ---> Upstream resolver ---> Answer returned

Possible bypass paths
Client --> hardcoded external DNS
Client --> IPv6 DNS announced separately by the router
Application --> DNS over HTTPS or another encrypted resolver
Pi-hole works especially well for devices that cannot install a browser extension, including televisions, media players, consoles, appliances, and mobile applications. It can also provide visibility into DNS activity, subject to the logging and privacy settings you choose.
Pi-hole cannot guarantee ad blocking on every device. A client can bypass it through hardcoded resolvers, a separate IPv6 DNS configuration, a VPN, or encrypted DNS such as DNS over HTTPS. Ads served from the same domain as wanted content are also difficult or impossible to block at the DNS layer. Filtering may reduce unnecessary network requests, but faster page loading is not guaranteed.
Platform and network prerequisites
For a bare-metal installation, use a Linux distribution currently supported by Pi-hole's installer. Raspberry Pi OS, Debian, and Ubuntu are common choices, but supported releases change over time. The installer performs an operating-system check, so confirm the current support matrix before upgrading the host to a newly released distribution. Do not disable the installer check to force an unsupported operating system into service.
The Docker path requires a Linux host with a supported Docker Engine and the Docker Compose plugin. The host must be able to reserve DNS port 53 over both UDP and TCP. This tutorial keeps DHCP on the router and does not enable Pi-hole's optional DHCP server. That avoids adding DHCP port exposure, extra container capabilities, and a network migration that varies significantly between routers.
| Requirement | Why it matters | Preparation |
|---|---|---|
| Stable IPv4 address | Clients must always be able to find the DNS server. | Create a router DHCP reservation or configure a static address outside the router's dynamic pool. |
| Intentional IPv6 plan | A router can advertise IPv6 resolvers independently of its IPv4 DHCP settings. | Use a stable Pi-hole IPv6 address and advertise it correctly, or avoid advertising another IPv6 resolver that bypasses Pi-hole. |
| Always-on host | DNS resolution may fail while Pi-hole is unavailable. | Use a reliable host that does not sleep and has stable storage and power. |
| Free TCP and UDP port 53 | Pi-hole must listen for both ordinary UDP queries and DNS operations that use TCP. | Inspect current listeners before installation and resolve conflicts deliberately. |
| Router administration | Network-wide adoption normally depends on DHCP and IPv6 router advertisements. | Locate the LAN DHCP and IPv6 DNS settings before changing clients. |
| Recovery plan | A DNS mistake can make the internet appear unavailable. | Record the old router settings and keep a direct administrative path to the router and Pi-hole host. |
Choose the address before installation
For IPv4, a DHCP reservation is usually the least disruptive option because the router continues managing the address while guaranteeing that the Pi-hole host receives the same lease. If you configure the address directly on Linux, make sure it does not overlap the router's dynamic allocation range.
IPv6 needs separate attention. A privacy or temporary IPv6 address is unsuitable as the network's permanent DNS destination. Use an address intended to remain stable on the LAN. If your ISP delegates a changing IPv6 prefix, consider how a prefix change affects the address advertised to clients. Router behavior differs, so verify the actual resolver received by clients rather than assuming the IPv4 setting also controls IPv6.
Check port conflicts and current host resolution
sudo ss -lntup | grep ':53 '
readlink -f /etc/resolv.conf
getent hosts example.com
The first command identifies any process already listening on port 53. The second shows how the host's resolver file is managed. The third confirms that name resolution works before changes are made. Save this output with your deployment notes.
Install and verify Pi-hole first, configure one test client second, and change router-advertised DNS only after the test succeeds. This sequence keeps a Pi-hole configuration issue from affecting the entire network at once.
Install Pi-hole directly on Raspberry Pi OS, Debian, or Ubuntu
A direct installation is appropriate when the machine is dedicated to Pi-hole or when you prefer system services over containers. Begin with an updated, currently supported operating-system release and a stable network address.
Inspect port 53 and systemd-resolved
Do not assume that every Debian-family system has a conflict. Run sudo ss -lntup | grep ':53 '. If systemd-resolved owns the port through its local stub listener, use the complete procedure below. If another service owns it, investigate that service rather than applying unrelated changes.
Disable only the systemd-resolved stub listener when required
Create a drop-in configuration, point /etc/resolv.conf at systemd-resolved's non-stub resolver file, restart the service, and test resolution. Changing DNSStubListener without fixing a resolver file that still points to 127.0.0.53 can break name resolution on the host.
sudo mkdir -p /etc/systemd/resolved.conf.d

printf '[Resolve]\nDNSStubListener=no\n' |
  sudo tee /etc/systemd/resolved.conf.d/pihole-port-53.conf

sudo ln -sf /run/systemd/resolve/resolv.conf /etc/resolv.conf
sudo systemctl restart systemd-resolved

readlink -f /etc/resolv.conf
getent hosts example.com
sudo ss -lntup | grep ':53 ' || true
Continue only if host resolution still works and the conflicting stub listener has released port 53. Keep a root shell open while testing so you can reverse the change if necessary.
Run the official interactive installer
The commonly documented installer command downloads and runs Pi-hole's installation script. If your change-control policy does not permit piping a download directly to a shell, download and inspect the script before running it.
curl -sSL https://install.pi-hole.net | bashUse the planned stable interface and address. Select an upstream resolver that fits your privacy and security policy. Record the choices you make so the deployment can be reproduced.
Set a strong administration password
Follow the installer's current password instructions or use the password-management command shown by the installed Pi-hole version. Use a unique password stored in a password manager. Do not operate the administration interface without authentication.
Open the local administration interface
From a trusted LAN client, open http://PIHOLE_LAN_IP/admin/, replacing the placeholder with the assigned address. Confirm that the dashboard loads and that the host address matches your network plan.
Test DNS before changing the router
Run a direct query against Pi-hole from the server and then from another LAN client. Do not proceed to network-wide rollout until both tests succeed.
dig @127.0.0.1 example.com A
dig @PIHOLE_LAN_IP example.com AIf the Pi-hole host uses itself as its only DNS resolver before installation and startup are reliable, a service failure can prevent the host from resolving the names needed for diagnosis or updates. Decide deliberately whether the host should use Pi-hole, an independent resolver, or a locally resilient arrangement.
Deploy Pi-hole with Docker Compose
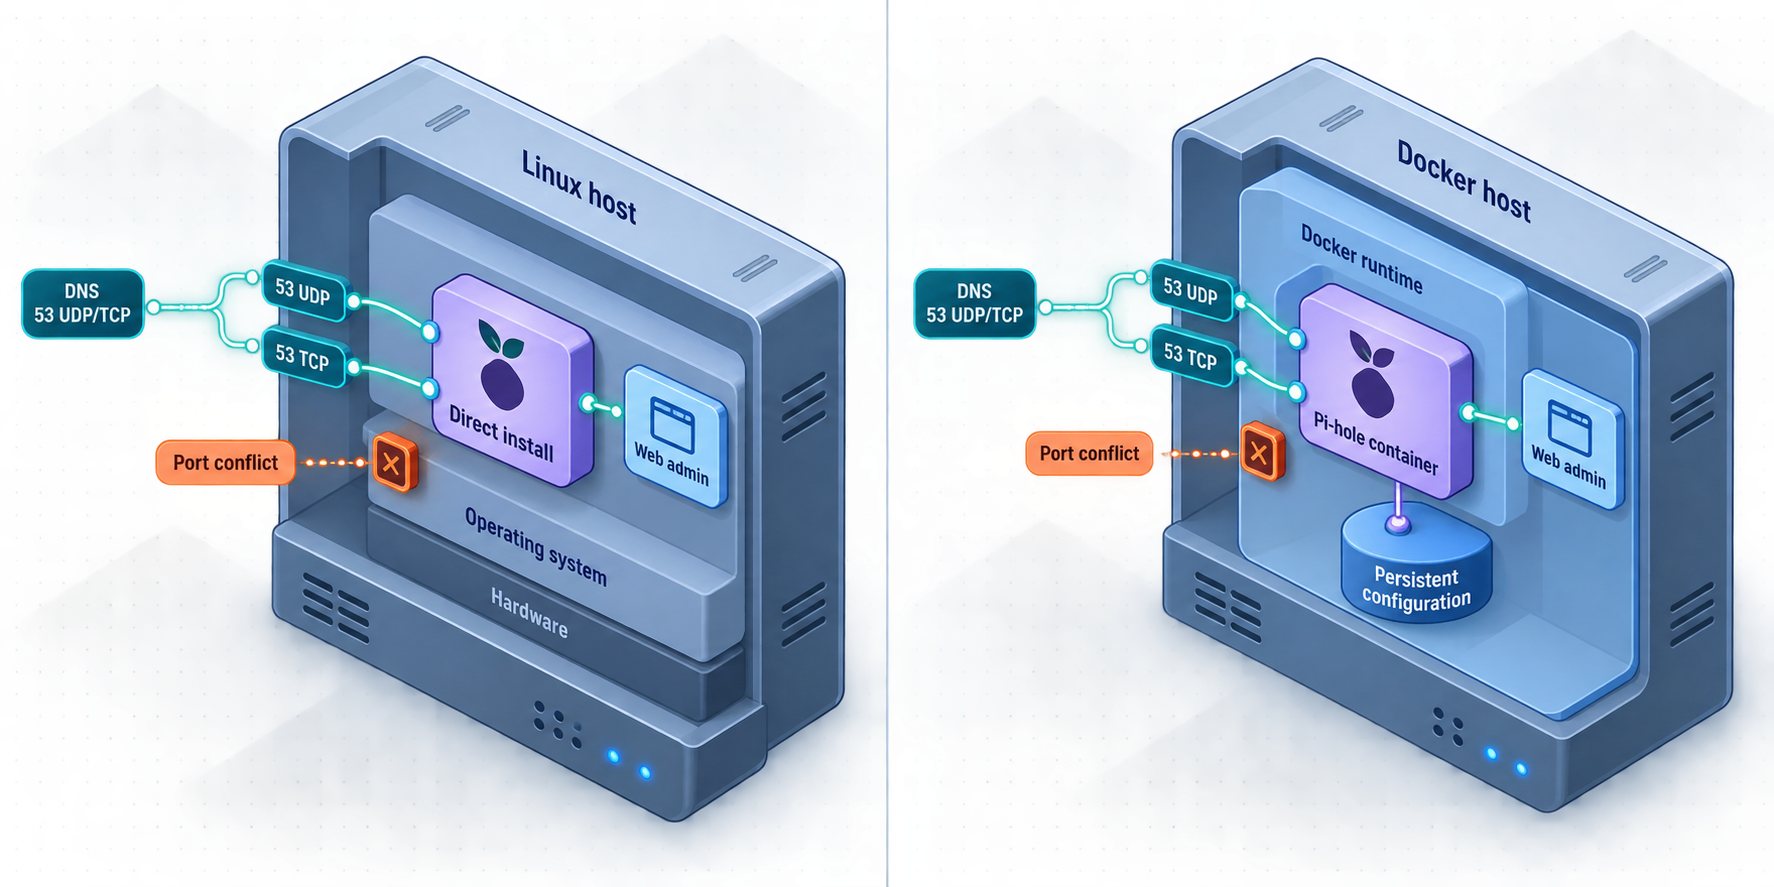
Docker provides a reproducible deployment and keeps Pi-hole's files in an explicit persistent mount. It does not remove the need for a stable host address, port-conflict checks, backups, or careful DNS rollout.
The official image publishes versioned tags and a mutable latest tag. A mutable tag can change the software delivered by a future pull. For repeatable production deployment, set PIHOLE_IMAGE to a release tag or immutable digest that you have checked against the current official Pi-hole Docker documentation. An exact current release is intentionally not hardcoded here because release tags change after publication.
Create a dedicated project directory
sudo mkdir -p /opt/pihole
sudo chown "$USER":"$USER" /opt/pihole
cd /opt/pihole
mkdir -p etc-piholeCreate a protected environment file
Replace the example values. The image reference must be a verified release tag or digest, not the literal placeholder. The host address must be the stable IPv4 address assigned to this server.
cat > .env <<'EOF'
PIHOLE_IMAGE=pihole/pihole:REPLACE_WITH_VERIFIED_RELEASE_TAG
PIHOLE_HOST_IP=192.168.1.10
PIHOLE_WEB_PASSWORD=REPLACE_WITH_A_LONG_UNIQUE_PASSWORD
TZ=Etc/UTC
EOF

chmod 600 .env
Environment variables are visible to users with sufficient Docker or host privileges. Restrict access to the host and project files. Do not commit this file to source control.
Create the Compose configuration
services:
  pihole:
    container_name: pihole
    image: ${PIHOLE_IMAGE}
    restart: unless-stopped
    ports:
      - "${PIHOLE_HOST_IP}:53:53/tcp"
      - "${PIHOLE_HOST_IP}:53:53/udp"
      - "${PIHOLE_HOST_IP}:8080:80/tcp"
    environment:
      TZ: "${TZ}"
      FTLCONF_webserver_api_password: "${PIHOLE_WEB_PASSWORD}"
      FTLCONF_dns_listeningMode: "ALL"
    volumes:
      - "./etc-pihole:/etc/pihole"
This configuration publishes DNS only on the chosen LAN address and maps the web interface to host port 8080. It does not grant extra Linux capabilities because this tutorial leaves DHCP on the router. Do not add NET_ADMIN, DHCP port 67, or other privileges unless you have a documented requirement for them.
Check conflicts and validate the configuration
sudo ss -lntup | grep ':53 ' || true
sudo ss -lntup | grep ':8080 ' || true
docker compose config
Resolve any port conflict before starting the container. The same complete systemd-resolved procedure from the bare-metal section applies if its stub listener owns port 53.
Pull and start the pinned image
docker compose pull
docker compose up -d
docker compose ps
docker compose logs --tail=100 pihole
These are host commands. They are run from the Compose project directory, not inside the Pi-hole container. Review the logs for startup failures instead of relying on a guessed success message.
Verify the web and DNS services
Open http://PIHOLE_HOST_IP:8080/admin/ from a trusted LAN client. Then send a DNS query directly to the host address.
dig @PIHOLE_HOST_IP example.com AOnly one service can own a specific address and port combination. Choose one installation method. Also confirm that no local DNS cache, resolver stub, or other container is already bound to TCP or UDP port 53.
Point your network to Pi-hole safely
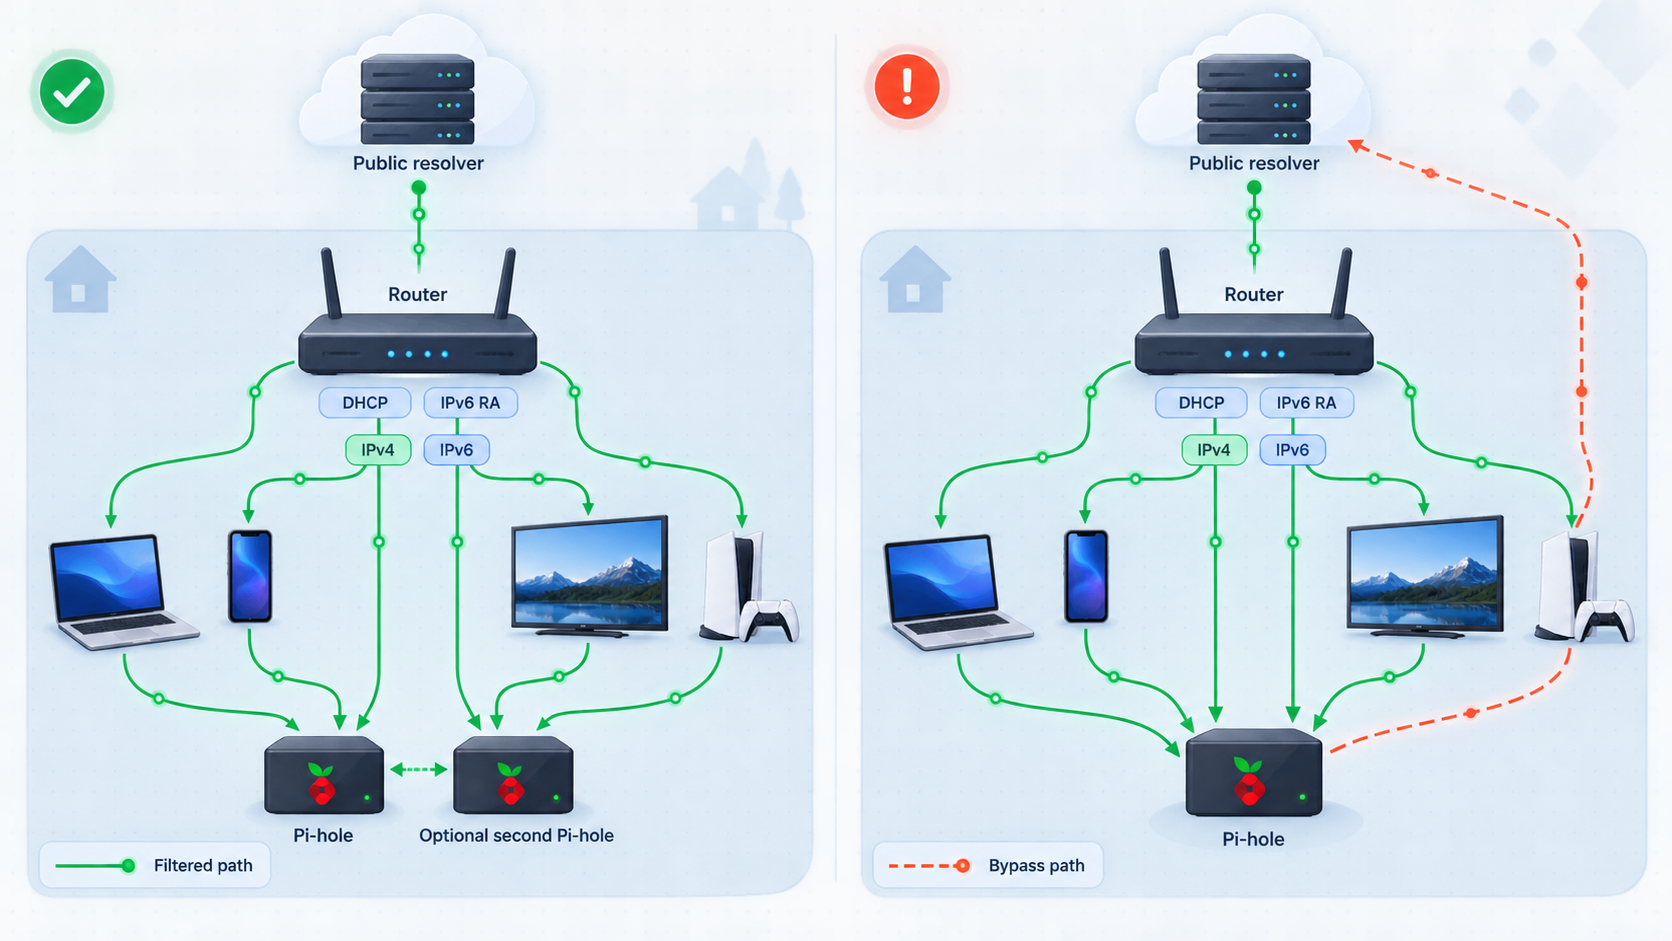
The router normally remains the DHCP server in this tutorial. Its job is to give clients an address, gateway, lease duration, and DNS configuration. Router interfaces differ, so look for LAN DHCP, local network, DNS server, and IPv6 router-advertisement settings rather than relying on a universal menu path.
Start with one test client
Before changing DHCP, manually set one computer's DNS server to Pi-hole's stable IPv4 address. If the network uses IPv6, configure the Pi-hole IPv6 address as well. Disconnect and reconnect the test client, clear its DNS cache if necessary, and complete the verification steps in the next section.
Advertise Pi-hole through router DHCP
After the test client succeeds, enter Pi-hole's IPv4 address as the LAN DNS server distributed by DHCP. Save the change, then renew leases or reconnect clients. Existing devices may keep the old DNS information until their leases are renewed, so a router change does not necessarily affect every device immediately.
A secondary DNS field is not consistently treated as standby-only. Many operating systems can query either resolver based on timing and internal selection logic. If you enter a public resolver as secondary DNS, some traffic can bypass Pi-hole even while Pi-hole is healthy.
For redundancy, the better design is usually a second independently hosted Pi-hole with the same policy. Advertise both Pi-hole addresses and monitor both systems. Two addresses on the same physical host do not protect against host failure.
Configure IPv6 separately
Inspect the router's IPv6 DNS and router-advertisement settings. If the router continues advertising an ISP or public IPv6 resolver, capable clients can use it instead of the IPv4 Pi-hole address. Advertise Pi-hole's stable IPv6 address where the router supports it, then verify the resolver on an IPv6-enabled client.
Some routers advertise themselves as the DNS server and forward queries internally. In that design, Pi-hole may see the router as the client instead of seeing individual devices. This can still filter traffic, but per-device reporting may be less useful. Whether the router can advertise Pi-hole directly depends on its firmware.
Handle guest networks and VLANs deliberately
Guest Wi-Fi and VLANs often use separate DHCP scopes and firewall rules. Configure DNS independently for each segment that should use Pi-hole. Permit DNS from those clients to Pi-hole over TCP and UDP port 53, but do not open unrelated access to the Pi-hole host. If a segment should remain isolated, keep its firewall policy intact and add only the required DNS path.
Redirecting all port 53 traffic can create loops, interfere with router services, or violate network policy. Blocking encrypted DNS can also disrupt legitimate applications and managed-device configurations. If your organization requires DNS enforcement, design it for the specific router or firewall, include exceptions and loop prevention, document the policy, and test it on an isolated segment first.
Verify server-side, client-side, IPv4, and IPv6 DNS
A dashboard showing queries is useful, but deployment verification should prove each part of the path. Test ordinary resolution first, then a controlled blocking rule, and finally inspect what resolver each client actually uses.
1. Test Pi-hole directly over IPv4
dig @PIHOLE_IPV4_ADDRESS example.com A
dig @PIHOLE_IPV4_ADDRESS example.com AAAA
In the output, confirm that the responding server is the Pi-hole IPv4 address. A valid answer proves that Pi-hole can receive the query and reach its upstream resolver. It does not yet prove that the client uses Pi-hole by default.
2. Create a controlled blocking test
In the Pi-hole administration interface, add an exact deny rule for a deliberately unused test name such as pihole-test.invalid. Query it directly:
dig @PIHOLE_IPV4_ADDRESS pihole-test.invalid AConfirm in Pi-hole's query log that the request was blocked by the exact local rule. Do not require a specific returned address because the answer depends on the configured blocking mode. Remove the temporary rule after the test.
3. Test the client's default resolver
nslookup example.com
nslookup pihole-test.invalid
The resolver displayed by nslookup should be Pi-hole or, in a router-forwarding design, the expected router address. Confirm the requests appear in Pi-hole's query log. If direct queries work but default client queries do not appear, the problem is DHCP, router advertisement, manual client settings, a VPN, or application-specific DNS.
4. Test IPv6 explicitly
dig -6 @PIHOLE_IPV6_ADDRESS example.com AAAA
dig -6 @PIHOLE_IPV6_ADDRESS pihole-test.invalid A
Then inspect the client's active network configuration for every assigned DNS server. The command is operating-system specific, but the goal is the same: make sure an unexpected ISP or public IPv6 resolver is not present.
5. Test after lease renewal and reconnection
Renew the client's DHCP lease or disconnect and reconnect it. Repeat the default-resolver test. Also test a phone, television, or other device class important to your network. A result from one computer does not prove that every VLAN, wireless network, and device follows the same path.
Record the Pi-hole addresses, upstream resolver choice, router DHCP values, IPv6 behavior, test date, and expected query-log result. Repeat these checks after router upgrades, operating-system upgrades, container recreation, and major network changes.
Choose blocklists and allow rules conservatively
A larger blocked-domain count is not a useful goal by itself. Overlapping lists increase processing and troubleshooting work while aggressive lists can break authentication, payments, media playback, referral links, and application APIs. Begin with one general-purpose list, observe the network, and add a specialized list only for a defined need.
| List family | Current guidance | Operational note |
|---|---|---|
| HaGeZi Multi | Choose exactly one tier. Current project guidance recommends Multi PRO for new users. | Do not stack Light, Normal, Pro, Pro++, and Ultimate because the tiers build on one another. |
| HaGeZi Threat Intelligence Feeds | Optional threat-focused add-on that can accompany one Multi tier. | It is separate from the tier progression. Threat-domain blocking still does not replace endpoint security. |
| StevenBlack hosts | A consolidated hosts file with optional category variants such as social, gambling, adult, and misinformation-related domains. | Select the intended variant rather than stacking multiple overlapping variants. |
| OISD | Evaluate its current published Pi-hole-compatible format and policy before adding it. | Do not add it automatically on top of another broad aggregate without checking overlap and false-positive behavior. |
| URLHaus | Useful when a dedicated malware-domain feed is required. | Check whether it is already included by an aggregate you use. StevenBlack identifies URLHaus as one of its contributed sources. |
HaGeZi publishes several output formats. Use the format identified for Pi-hole or ad-blocking applications, not an RPZ, wildcard, or DNSMasq-specific variant chosen at random. The project currently directs new users to one Multi PRO list plus the optional Threat Intelligence Feeds list. Entry counts change frequently and should not be treated as fixed product specifications.
StevenBlack's project consolidates multiple curated sources and removes duplicates. Its category variants are alternatives built for different policies. A household content policy and a malware-domain policy are different requirements, so document why each category is enabled.
OISD, URLHaus, and similar projects can change formats, mirrors, and inclusion policies. Obtain their current Pi-hole-compatible URLs from the primary project at configuration time. This avoids publishing a stale mirror or adding an incompatible list.
Diagnose false positives before allowing a domain
Reproduce one specific failure
Record the affected client, application, action, and time. Avoid broadly disabling filtering before you know which request is involved.
Filter the query log by client and time
Look for blocked domains requested while the feature failed. A blocked domain near the same time is a lead, not automatic proof that it caused the problem.
Add the narrowest allow rule
Prefer an exact domain over a broad wildcard. Retry the failed action and confirm that the rule fixes it without allowing unrelated domains.
Document and review the exception
Record why the domain was allowed and which list blocked it. Remove obsolete exceptions after applications or lists change.
Updates, backups, restores, and routine operation
Update a bare-metal installation
Create a Teleporter export and read the release notes before updating. On a supported bare-metal installation, Pi-hole's own update command is:
pihole -upRun it on the Pi-hole host with appropriate privileges. Afterward, repeat direct IPv4, direct IPv6, client-default, and controlled-blocking tests.
Update a Docker deployment
Do not run pihole -up inside the container. Container updates are performed by selecting a newer image, pulling it, and recreating the container while retaining the persistent /etc/pihole mount.
cd /opt/pihole

# First update PIHOLE_IMAGE in .env to the reviewed release tag or digest.
docker compose pull
docker compose up -d

docker compose ps
docker compose logs --tail=100 pihole
Keep the previous image reference in your change record so rollback is possible if the new release and migrated data remain compatible with the documented rollback procedure. Never assume that changing a tag backward is a safe database rollback.
Understand Pi-hole's databases
gravity.db is the filtering and list database. It is not the query-history database. Query history is managed separately by Pi-hole FTL. Treat all SQLite databases as live application data and avoid copying them while writes are in progress unless the application provides a consistent export mechanism.
Preferred backup: Teleporter
Use the Teleporter function in the Pi-hole administration interface to export supported configuration data. Store the resulting archive outside the Pi-hole host, protect it according to the sensitivity of your local DNS and policy information, and record the Pi-hole version that produced it.
A Teleporter archive is not equivalent to copying /etc/pihole. Teleporter is an application-aware configuration export. A raw directory backup can include live databases, runtime files, permissions, and version-specific state.
Consistent Docker volume backup
If you need a filesystem-level Docker backup, stop the container before archiving its bind mount:
cd /opt/pihole
docker compose stop pihole

sudo tar --numeric-owner -czf \
  "/secure-backup-location/pihole-files-$(date +%Y%m%d).tar.gz" \
  etc-pihole .env compose.yaml

docker compose start pihole
Protect this archive because it can contain configuration and sensitive operational data. Use the actual Compose filename if it differs from compose.yaml.
Restore and test
For a normal migration, install a compatible Pi-hole version, open its Teleporter function, import the archive, restart as instructed by that version, and verify upstream DNS, local rules, subscribed lists, privacy settings, and client resolution.
For a filesystem-level Docker restore, stop the container, preserve the failed directory separately, extract the archive to the original path, verify ownership and permissions, and start the same reviewed image version. Do not overlay a raw backup on a running container.
A backup is not proven until it has been restored. Test restoration on an isolated host or isolated Docker project that does not bind the production address or port 53. Confirm that the administration interface loads, expected lists and local rules exist, and direct DNS tests succeed. Record the result and the date.
Routine maintenance checklist
- Confirm that the host address and router-advertised DNS values have not changed.
- Monitor storage health, container or service status, and failed list downloads.
- Review unusual query volume without assuming every busy client is malicious.
- Remove unused blocklists and stale allow rules.
- Check that backups exist outside the host and periodically test a restore.
- Review release notes before host, Pi-hole, Docker, or router upgrades.
- Repeat IPv4 and IPv6 verification after network changes.
Access the Pi-hole administration interface remotely
DNS service and web administration are separate traffic paths. LAN clients should continue sending DNS to Pi-hole locally on TCP and UDP port 53. If remote administration is required, expose only the web interface through an HTTP tunnel. Do not publish the DNS service through an HTTP tunnel.
LAN DNS path
LAN clients -- TCP/UDP 53 --> Pi-hole --> Upstream resolver

Remote administration path
Remote browser -- HTTPS --> Localtonet relay
                                  ^
                                  |
                         outbound tunnel connection
                                  |
                       Localtonet client on host
                                  |
                       Pi-hole web administration

Port 53 remains on the private LAN.
With Localtonet, the client on your device establishes an outbound connection to one of our relay servers. This avoids inbound router port forwarding, firewall changes, VPN setup, and the need for a public IP address. The tunnel is available only while the selected client is connected and the tunnel is running.
Install and run the Localtonet client
Install the Localtonet application for the operating system on the Pi-hole host, or on another trusted device that can reach the Pi-hole web interface. Do not copy an authentication token into an article, shell history, or shared configuration file.
Create an HTTP tunnel
In the Localtonet dashboard, create an HTTP tunnel. HTTP is for the web administration service only. It does not transport Pi-hole's DNS service.
Select the device token and relay server
Select the token belonging to the device running the Localtonet client, then select a currently available relay server or region from the dashboard. Available values vary and should not be hardcoded.
Set the local HTTP target
For the bare-metal installation, use the local address and port where Pi-hole's web interface is reachable. For the Compose example in this guide, target PIHOLE_HOST_IP on port 8080. If Localtonet runs in another container, remember that 127.0.0.1 refers to that container itself, not to the Pi-hole container or Docker host.
Choose the HTTP process type and create the tunnel
Select the appropriate generated subdomain, supported custom subdomain, or custom-domain process type. Domain availability and DNS requirements depend on the current dashboard and configuration. Use the public HTTPS address assigned by Localtonet rather than assuming a hostname pattern.
Start and verify the tunnel
Creating a tunnel does not start it. Press Start, open the assigned HTTPS URL, add /admin/ if required by the Pi-hole interface, and confirm that authentication is enforced. The Localtonet HTTP tunnel documentation provides the current dashboard workflow.
Stop or delete access when it is no longer needed
Use the dashboard to stop the tunnel after the maintenance session. Delete it if the remote administration path is no longer required. A stopped tunnel no longer provides the public route.
Use a strong unique Pi-hole password, keep Pi-hole updated, expose only the web port, and apply least-privilege access controls or IP restrictions where your selected configuration supports them. Do not expose host management services, Docker APIs, volumes, or DNS port 53 through the same route. Stop the tunnel when it is not needed and review Pi-hole logs for unexpected activity.
If public administration is unnecessary, private network access is safer. A private mesh can restrict the interface to authenticated devices without publishing it as a public website. Localtonet VPN Manager provides a private mesh VPN with granular firewall rules and can bridge local LANs. Standard HTTP, TCP, UDP, and File Server tunnels are not VPN functionality, so choose VPN Manager specifically when private network access is the goal.
Evidence-based troubleshooting
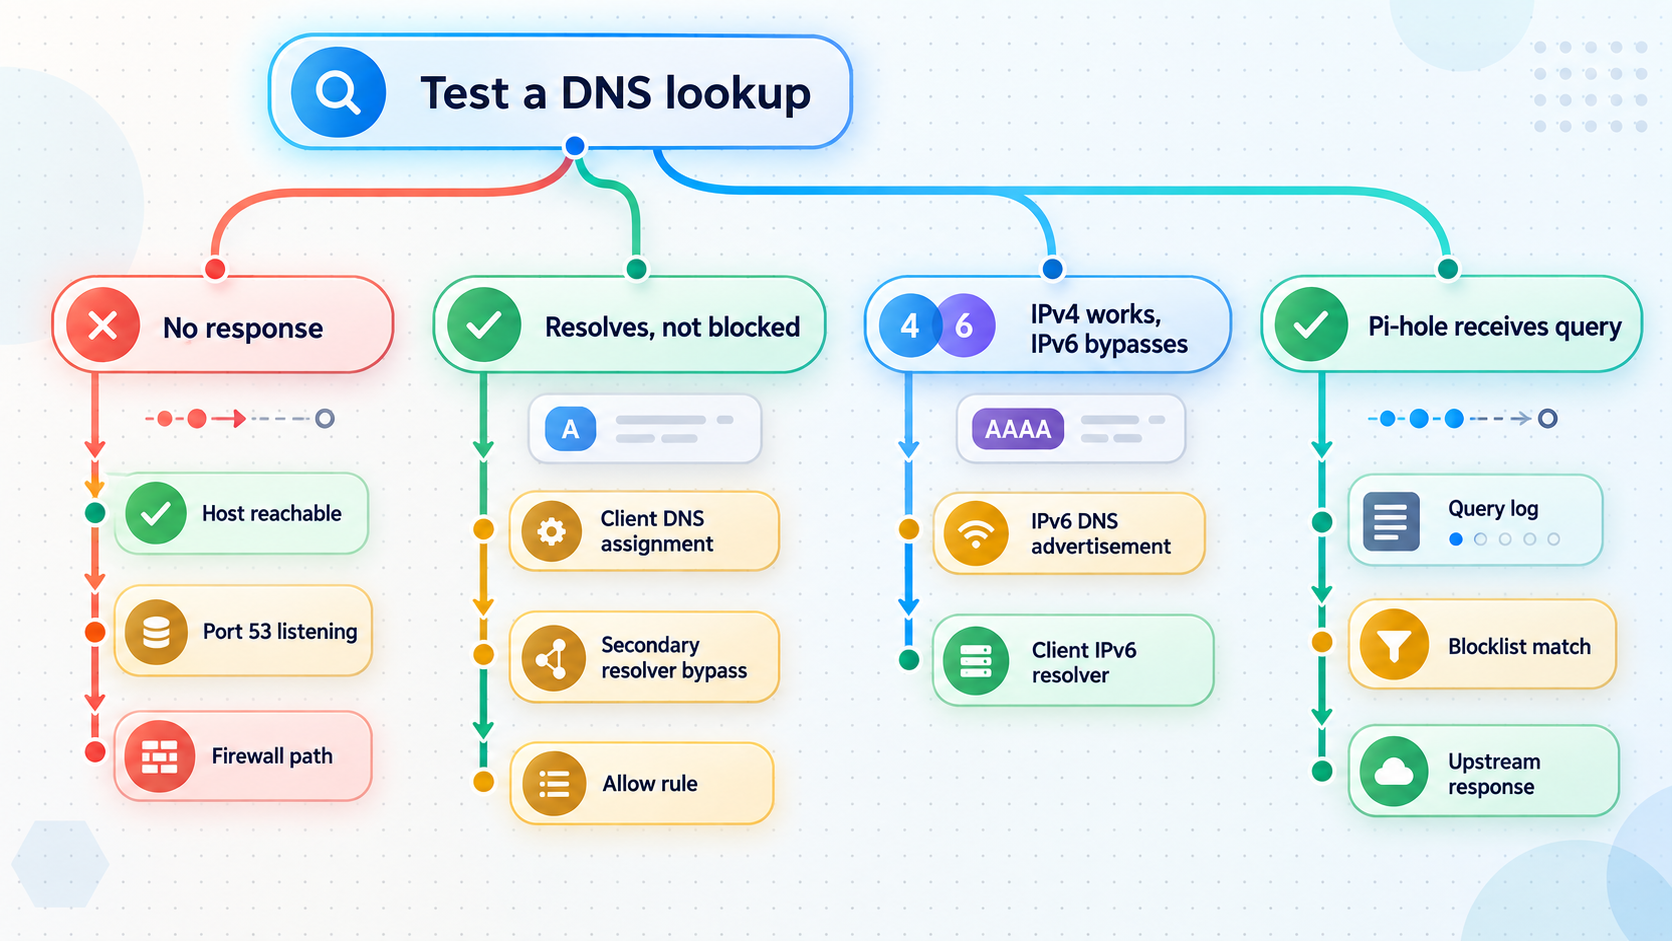
| Symptom | What to verify | Corrective direction |
|---|---|---|
| Pi-hole cannot bind port 53 | Run sudo ss -lntup | grep ':53 ' and identify the actual owner. |
Resolve that specific conflict. If it is the systemd-resolved stub, use the complete stub and /etc/resolv.conf procedure in this guide. |
| Direct DNS queries work, but clients show no filtering | Inspect the resolver received by the client over both IPv4 and IPv6. | Correct DHCP, router-advertisement, VPN, or manual DNS settings and renew the client's lease. |
| Only some applications bypass Pi-hole | Check for application-level encrypted DNS, a VPN, or hardcoded resolvers. | Use application or managed-device policy where appropriate. Do not deploy generic firewall redirects without a router-specific design. |
| The Docker container repeatedly restarts | Run docker compose ps and docker compose logs --tail=200 pihole. |
Correct the reported image, environment, port, mount, or permission error instead of adding capabilities speculatively. |
| The web interface is unavailable on port 8080 | Confirm the container is running, the mapping exists, and the host firewall permits access from the trusted LAN. | Use docker compose config and sudo ss -lntup | grep ':8080 ' to verify the effective configuration. |
| A website or application breaks | Filter the query log by the affected client and reproduction time. | Add a narrow exact allow rule only after confirming the responsible blocked domain, or select a less aggressive list. |
| Clients intermittently bypass filtering | Look for a public secondary DNS server or an unexpected IPv6 resolver. | Advertise only intended Pi-hole instances. Do not assume secondary DNS is used only during failure. |
| The Localtonet URL does not work | Confirm the selected client is connected, the tunnel is running, and the local target works from the client device. | Correct the local IP and port, account for Docker network boundaries, then press Start and test the assigned URL again. |
Recover from a DNS outage
If a network-wide change prevents name resolution, use an IP address to reach the router and Pi-hole host. Restore the router's previous DHCP DNS values, renew a test client's lease, and confirm ordinary resolution. Then diagnose Pi-hole through direct IP access. Avoid making several unrelated changes at once because doing so hides the original cause.
Distinguish DNS failure from internet failure
If a client can reach a known local IP address but cannot resolve a hostname, investigate DNS. If it cannot reach the gateway or other local addresses, the problem is broader than Pi-hole. A direct query to Pi-hole separates server reachability from the client's default resolver selection:
dig @PIHOLE_IPV4_ADDRESS example.com AIf this direct query succeeds while an ordinary nslookup example.com fails or uses another resolver, focus on DHCP, IPv6 advertisement, VPN, or client configuration rather than changing Pi-hole's filtering settings.
Frequently asked questions
Does Pi-hole block every advertisement on every device?
No. Pi-hole blocks domains, so it cannot reliably remove advertising delivered from the same domain as wanted content. Clients can also bypass it through hardcoded DNS, unexpected IPv6 resolvers, VPNs, or encrypted DNS. Browser content blockers remain useful because they can filter individual requests and page elements.
Should I enter a public resolver as secondary DNS?
Not if you expect all eligible DNS traffic to pass through Pi-hole. Clients do not consistently treat the second address as failover-only and may send queries to either resolver. For resilience, use a second Pi-hole instance with matching policy rather than advertising an unfiltered public resolver.
What happens when the Pi-hole server is offline?
Clients using only that Pi-hole may be unable to resolve names, which often looks like a complete internet outage. Use an always-on host and consider two independent Pi-hole instances if DNS availability is important. Test failure behavior before relying on the design.
Can Pi-hole protect a phone while it is using mobile data?
Not automatically. Once the phone leaves the LAN, it normally uses the mobile carrier, a VPN, or another configured DNS service. Extending Pi-hole filtering off-site requires a private network path that routes the phone's DNS traffic back to the network. An HTTP tunnel to the administration interface does not provide that DNS path.
Is Pi-hole a replacement for antivirus or endpoint protection?
No. A threat-domain list can prevent some connections to known malicious domains, but it cannot inspect files, detect local behavior, patch vulnerable software, or recover encrypted data. Use it as one network control alongside software updates, endpoint security, least privilege, and tested backups.
Should I use bare metal or Docker for Pi-hole?
Bare metal is straightforward on a dedicated Raspberry Pi or Linux machine. Docker is useful when you already operate containers and want explicit persistent storage and image-based upgrades. Both require a stable address, free TCP and UDP port 53, router configuration, backups, and IPv4 and IPv6 verification.
Can I expose Pi-hole DNS through a Localtonet HTTP tunnel?
No. The HTTP tunnel described here is only for Pi-hole's web administration interface. LAN clients continue using the private Pi-hole address on TCP and UDP port 53. If you need remote devices to use home DNS, use an appropriately secured private VPN design rather than publishing an open DNS resolver.
Manage your Pi-hole web interface with Localtonet
Create an HTTP tunnel for the administration service without opening an inbound router port. Keep DNS private, select the correct device and relay, start the tunnel only when needed, and stop it after maintenance.
Get Started Free →