

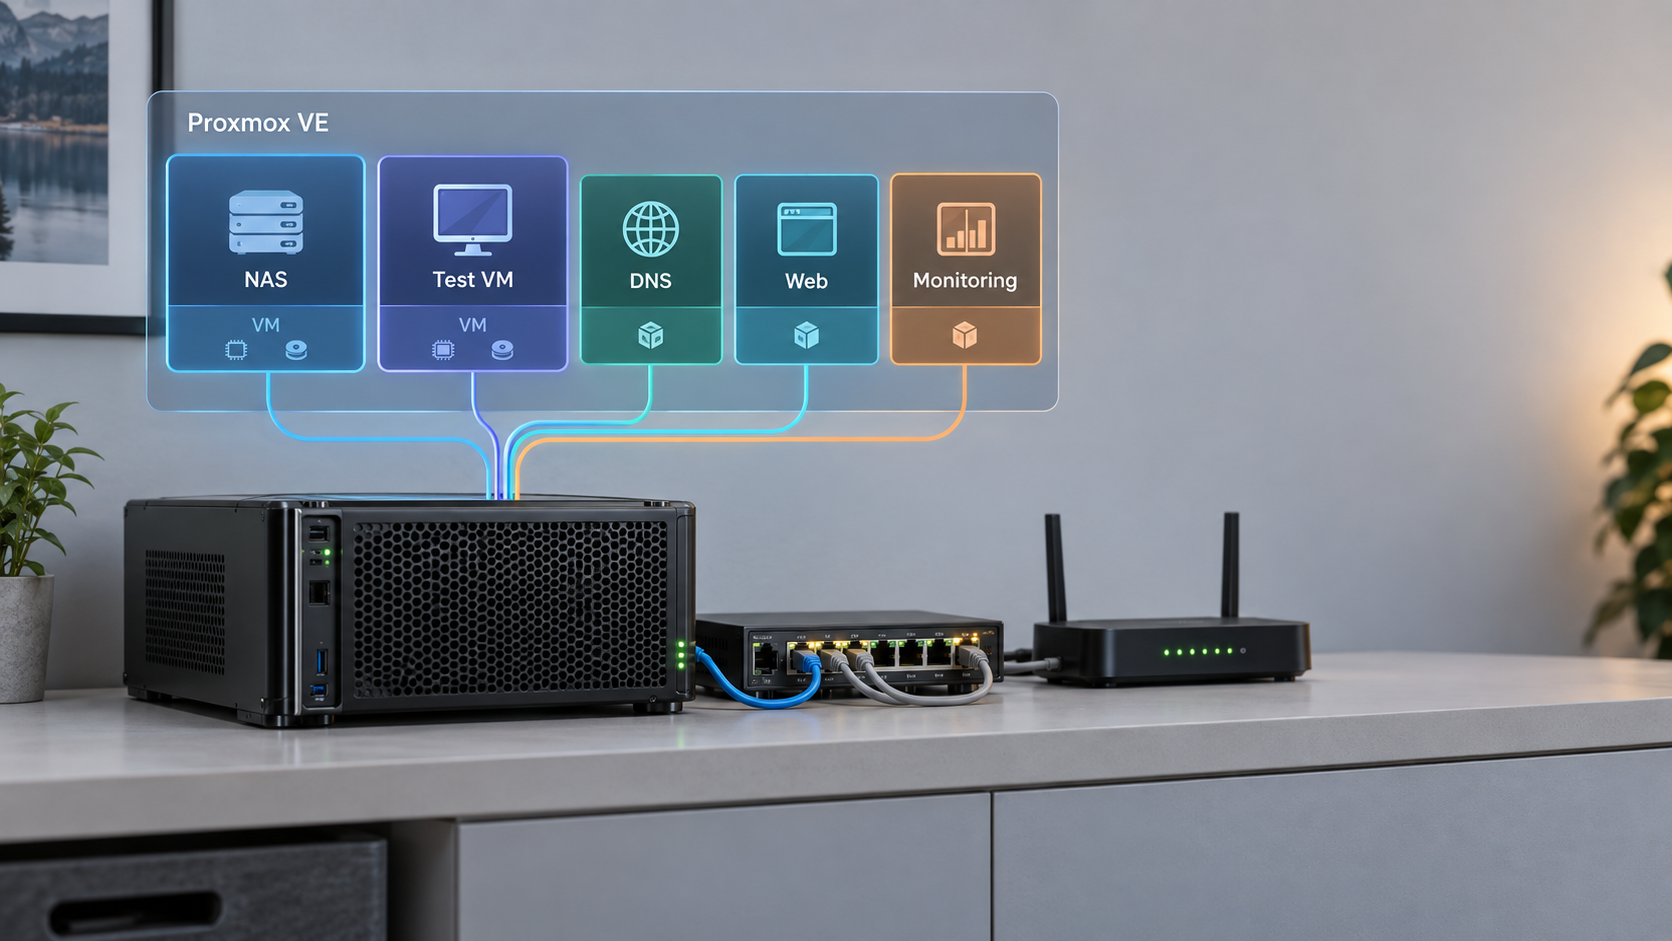
Turn one physical host into a manageable platform for isolated home services
Proxmox VE lets you operate virtual machines, Linux containers, storage, networking, snapshots, and scheduled backups from one management interface. This tutorial builds a practical single-node homelab with Proxmox VE 9.2, explains the decisions that matter, and includes verification and recovery checkpoints. It also shows how to reach the management interface through Localtonet without configuring inbound router port forwarding. Remote administration carries significant risk, so the access workflow includes least-privilege, multifactor authentication, and tunnel lifecycle guidance.
📋 What's in this guide
What Proxmox VE does in a homelab
Proxmox Virtual Environment is a Debian-based virtualization platform normally installed directly on a physical server. It is commonly described as a Type-1 hypervisor platform because guest workloads run on the host through kernel virtualization and container facilities rather than through a desktop hypervisor application. That description does not mean there is no host operating system. A Proxmox VE installation includes a Debian host layer, the Linux kernel, KVM/QEMU, LXC, storage services, networking components, and the Proxmox management stack.
KVM virtual machines and LXC system containers solve different problems. A KVM VM emulates or paravirtualizes hardware and boots its own operating-system kernel. An LXC container uses the Proxmox host's Linux kernel while isolating processes, filesystems, users, and networking with Linux container mechanisms. Containers can be efficient, but they do not have the same isolation boundary or operating-system flexibility as VMs.
vmbr0 connects guests to a physical interface, allowing them to appear as separate systems on the LAN.
Plan the failure boundaries before installing
Consolidation makes administration easier, but it also concentrates risk. If the physical host loses power, every guest on it stops. If the only disk fails, the host and its guests may be lost together. If backups are stored only on that host, the same hardware failure, filesystem problem, or administrative mistake can affect both production data and its supposed protection.
Before installation, decide which services are essential, where guest data will live, where backups will be copied, and how the host will be shut down during a power event. Document the management address, bridge layout, storage names, guest IDs, and recovery credentials somewhere that remains available when the server is offline.
Physical and logical traffic flow
A typical single-node design has one physical Proxmox host, a Debian-based host layer, multiple KVM and LXC guests, and a Linux bridge connected to the home LAN. Guest disks reside on local storage, while backups should be written or copied to a separate failure domain. If Localtonet is used, its client runs on a suitable device that can reach the Proxmox management service and establishes an outbound connection to a Localtonet relay. That outbound path does not remove the need to secure the Proxmox login itself.
Proxmox VE can run inside another virtualization environment when the outer hypervisor exposes the required hardware virtualization extensions. Nested virtualization is useful for learning and testing, but bare-metal installation remains the normal homelab path when predictable device access and performance are important.
Hardware, firmware, and network requirements
Do not size a host from an arbitrary promise such as a fixed number of VMs. Capacity depends on each workload's peak CPU demand, active memory, storage latency, network traffic, and availability requirements. Start with an inventory of the services you intend to run, then preserve headroom for the Proxmox host, filesystem cache, backups, updates, and temporary workload spikes.
| Component | What to check | Planning guidance |
|---|---|---|
| Processor | 64-bit CPU and enabled Intel VT-x or AMD-V | Count sustained workload demand rather than assigning every guest all available cores. Enable IOMMU support only when required for device passthrough. |
| Memory | Enough RAM for the host and the active working sets of all guests | Avoid allocating the full physical total to guests. ZFS uses available memory for caching, but simplistic memory-per-terabyte formulas are not reliable sizing rules. |
| System storage | A reliable SSD or other supported persistent disk | Use storage intended for sustained operating-system writes. A second device or pool can simplify separation between the host and guest data. |
| Guest storage | Capacity, latency, endurance, and failure behavior | Databases and busy VMs may need low-latency storage. Media and archival data may prioritize capacity. Keep free space for snapshots and backup staging. |
| Networking | A Linux-supported network interface and stable LAN connection | One NIC is enough for a basic bridge. Additional interfaces or VLANs can separate management, servers, storage, and untrusted devices. |
| Backup destination | Storage outside the host's primary failure domain | Use another machine, NAS, removable media that is disconnected when appropriate, or another properly protected destination. |
Address planning
Assign the Proxmox management interface a stable address. This can be a static address configured during installation or a carefully managed reservation, depending on the network design. Avoid choosing an address already inside a DHCP pool unless the router reserves it for the host. Record the address, prefix length, gateway, DNS server, and hostname before beginning.
Plan guest addressing separately. Guests attached to the main bridge can normally obtain addresses from the LAN's DHCP server, use DHCP reservations, or use static addresses that do not conflict with the pool. Infrastructure services such as DNS resolvers should have predictable addresses, while disposable development guests can usually remain dynamic.
Firmware checklist
- Enable Intel VT-x or AMD-V for KVM virtualization.
- Enable Intel VT-d or AMD IOMMU only if PCIe passthrough is planned.
- Use a boot mode supported by the hardware and selected installer configuration.
- Confirm the intended installation disk is visible and distinguish it from every data disk.
- Review boot order so the installer media starts once and the installed disk starts afterward.
- Configure predictable behavior after power loss if unattended recovery is important.
Disconnect disks that are not needed during installation when practical, and maintain a verified backup of anything important. Match the target by model, capacity, and persistent identity rather than assuming the first displayed disk is safe.
Install Proxmox VE 9.2
The current Proxmox download page lists Proxmox VE 9.2 ISO Installer version 9.2-1. The x86-64 ISO is 1.71 GB, was last updated May 21, 2026, and has the SHA-256 checksum shown below. An ARM64 installer is also listed separately, so download the image matching your architecture.
Download the current installer and checksum information
Get Proxmox VE 9.2-1 from the official Proxmox downloads page. Save the published checksum next to the image rather than relying only on the filename.
Proxmox VE 9.2 ISO Installer 9.2-1
SHA-256:
4e88fe416df9b527624a175f24c9aa07c714d3332afb1ee3dbf3879573ef2c6cVerify the downloaded ISO
Calculate the checksum locally and compare every character with the value published for the selected image. On Linux, use:
sha256sum proxmox-ve_9.2-1.isoIf the value differs, do not boot or install from that file. Download it again from the official page.
Create bootable installation media
Use a trusted imaging utility that writes the ISO as a disk image. Verify the selected removable device before writing because imaging erases it. Eject the media cleanly when the write finishes.
Configure firmware and boot the installer
Enable the virtualization extensions described earlier, boot from the prepared media, and select the graphical installation option. Review the license and installer prompts before continuing.
Choose the target disk and filesystem
Confirm the target disk by model and capacity. The installer supports multiple storage layouts. A common single-disk ext4 installation uses LVM and LVM-thin, with the thin pool used for guest disks. ZFS is useful when its integrity, snapshot, replication, and pooling features match the hardware and recovery plan. Select redundancy intentionally when using multiple disks. Never assume a single-disk ZFS pool protects against disk failure.
Set regional and administrative details
Choose the correct country, time zone, and keyboard layout. Set a strong installation password and an email address you actively monitor. The initial administrative identity is highly privileged, so protect its credentials and plan to create named administrative users after first login.
Configure the management network
Select the physical management interface, enter the planned fully qualified hostname, assign the stable management address and prefix, and provide the correct gateway and DNS server. Review each value carefully because an incorrect gateway, prefix, or interface can leave the web interface unreachable.
Review, install, and perform the first login
Read the installation summary, verify the target disk again, and start installation. After rebooting, remove the installer media and open https://PROXMOX-IP:8006 from a machine on the same trusted LAN. The initial certificate may not be trusted by the browser until you configure a certificate trusted by your environment. Confirm the displayed certificate details before making an exception. Sign in using the credentials and realm configured by the installation.
Post-install verification checkpoint
Do not create important guests until the basic host is healthy. In the web interface, confirm that the node is online, the expected processor and memory are visible, the configured storage is active, and the management bridge has the planned address. From the node shell, collect the installed package versions and network state:
pveversion -v
ip address show
ip route show
lsblk
From another LAN device, confirm that the management address responds as expected and that the web interface remains reachable after a controlled reboot. If a second storage disk is intended for later use, verify its identity with lsblk and persistent links under /dev/disk/by-id/, but do not initialize it yet.
Configure Proxmox VE 9 updates correctly
Proxmox VE 9 is based on Debian 13, code-named Trixie. Do not add a Debian 12 Bookworm Proxmox repository to a Proxmox VE 9 host. Mixing release suites can create conflicting dependencies and leave the host in an unsupported package state.
A subscription provides access to the enterprise repository. A non-subscribed homelab can use the no-subscription repository. The subscription notice is expected when no valid subscription is installed. Do not patch Proxmox JavaScript files to suppress it. Such modifications are unsupported, are replaced by package updates, and can make troubleshooting harder.
Preferred repository workflow
Use the repository management interface for the installed Proxmox version when possible. Select the node, open its update repository view, disable enterprise entries for which the host has no subscription, and add the no-subscription Proxmox VE repository. Review the resulting suite before updating. If a Ceph repository has been configured, manage it separately and select only a repository appropriate for that Ceph deployment.
Deb822 configuration for Proxmox VE 9
Current installations may use Deb822 .sources files rather than legacy one-line .list entries. The Proxmox VE 9 no-subscription definition uses the Trixie suite:
Types: deb
URIs: http://download.proxmox.com/debian/pve
Suites: trixie
Components: pve-no-subscription
Signed-By: /usr/share/keyrings/proxmox-archive-keyring.gpg
If you manage repositories manually, place that definition in an appropriately named file such as /etc/apt/sources.list.d/proxmox.sources. Disable the enterprise Proxmox entry rather than leaving both channels active without understanding the intended package policy. Do not overwrite the Debian base repository definitions, and do not change their suite to a different Debian release.
Repository filenames and enabled entries can differ after upgrades or customized installations. Inspect /etc/apt/sources.list and /etc/apt/sources.list.d/ first. If the system already contains mixed Bookworm and Trixie Proxmox entries, stop and correct the repository state before installing packages.
After confirming the repository configuration, refresh metadata, review the proposed changes, and perform the upgrade:
apt update
apt full-upgrade
Read the package plan before approving it. Investigate held packages, removal of core Proxmox packages, release-suite conflicts, or repository signature errors rather than forcing the upgrade. When a new kernel is installed, schedule a controlled reboot after guests have been shut down or migrated as appropriate. Then verify the running version again with pveversion -v.
Choose between KVM VMs and LXC containers
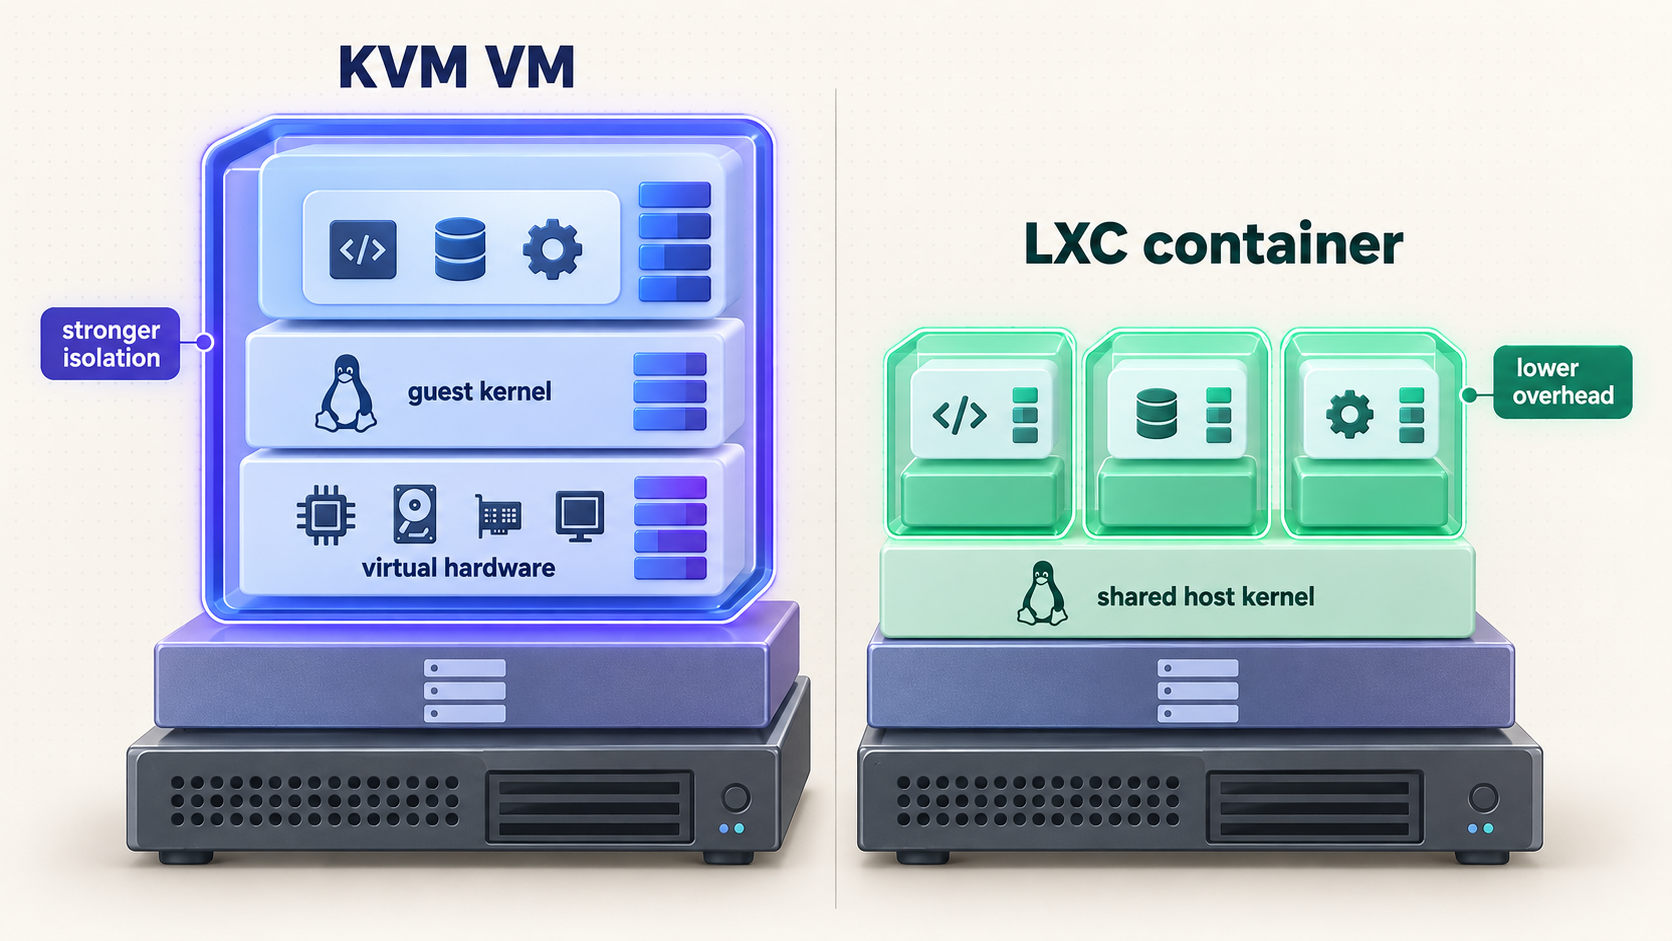
| Decision point | KVM virtual machine | LXC system container |
|---|---|---|
| Kernel | Boots its own guest kernel | Shares the Proxmox host's Linux kernel |
| Operating systems | Suitable for Linux, Windows, BSD, and compatible appliances | Linux userspace only, subject to host-kernel compatibility |
| Isolation | Hardware virtualization provides a stronger guest boundary | Linux namespaces, capabilities, cgroups, and user mapping provide container isolation, not VM-equivalent isolation |
| Resource overhead | Includes a complete guest operating system | Avoids a separate guest kernel, but actual savings depend on the workload |
| Snapshots | Availability depends on storage backend, disk format, and guest configuration | Availability depends on the backing storage and container configuration |
| Device access | Supports virtual devices and, with suitable hardware and configuration, PCIe passthrough | Device exposure uses host-level mappings and permissions, with different security implications |
| Docker and application containers | Strong compatibility because Docker runs inside a conventional Linux VM | Possible in selected configurations, but nesting, permissions, filesystems, and security can complicate support |
| Migration | Requirements depend on storage, CPU compatibility, devices, cluster configuration, and guest state | Requirements depend on storage, container configuration, mounts, and cluster setup |
Running Docker inside LXC can work, but it should not be treated as universally interchangeable with a VM. A Linux VM is the safer default when an application-container stack requires broad kernel feature compatibility, has complex device requirements, or should be separated from the Proxmox host by a stronger virtualization boundary.
Create a first virtual machine
Upload a trusted installation ISO
Select storage that permits ISO image content, open its ISO Images view, and upload a verified operating-system image. Preserve its checksum information for later validation.
Create the VM and choose settings for the workload
Select the ISO, allocate a unique VM ID and descriptive name, then choose firmware, machine type, CPU, memory, disk, and network options based on guest requirements. Do not treat q35, OVMF, EFI storage, TPM, CPU type host, or the QEMU Guest Agent as universal requirements.
Install the guest operating system
Start the VM, open its console, and follow the guest installer. VirtIO storage and network devices are commonly appropriate for supported modern guests, but some operating systems need drivers supplied during installation. Use emulated hardware only when compatibility requires it.
Add guest integration when useful
The QEMU Guest Agent can report guest information and help Proxmox coordinate supported guest operations such as clean shutdown and filesystem freeze or thaw behavior. Install and enable it only when supported by the guest, then enable the matching VM option. It is not a universal prerequisite for live migration.
Verify the VM
Confirm that the guest boots after a restart, receives the expected network configuration, reaches required services, and shuts down cleanly from Proxmox. Record any attached installation media, passthrough devices, or special boot dependencies.
Workload-dependent VM options
| Option | When it may be appropriate | Important caveat |
|---|---|---|
| q35 machine type | Guests that need a modern PCIe-oriented virtual platform | Legacy appliances may expect a different machine type. |
| OVMF and EFI disk | UEFI guests and operating systems that require UEFI features | Modern Linux can also operate with supported non-UEFI configurations. OVMF is not mandatory for every Linux VM. |
| Virtual TPM | Guests whose operating-system policy or security design requires TPM functionality | It adds state that must be considered during backup, restore, and migration. |
| CPU type host | A single host where exposing host CPU features is desirable | It can reduce migration compatibility between hosts with different processors. |
| VirtIO devices | Guests with suitable paravirtualized drivers | Attach or install required drivers before changing a working guest's controller. |
| PCIe passthrough | Dedicated access to a compatible GPU, NIC, HBA, or other device | Requires IOMMU support, correct grouping, careful host configuration, and a recovery path. |
Create an LXC system container
Download a supported system template
Open storage that permits container templates, refresh the available template list, and download an appropriate Linux system template. Do not assume an arbitrary application image from a container registry is a suitable drop-in LXC system template.
Create an unprivileged container where possible
Assign an ID, hostname, credentials, root filesystem, CPU limit, memory limit, DNS configuration, and network interface. Unprivileged containers map container identities to non-root host identities and are generally preferable unless a documented requirement prevents their use.
Add only required features and devices
Nesting, bind mounts, device mappings, and elevated privileges expand compatibility but also change the security model. Enable them only for a specific documented need and record why they were added.
Start and verify the container
Start it, open the console, install updates from the guest distribution, verify networking, and confirm the service survives a container restart. Test host shutdown behavior before relying on the service.
Understand bridges, guest addressing, and segmentation
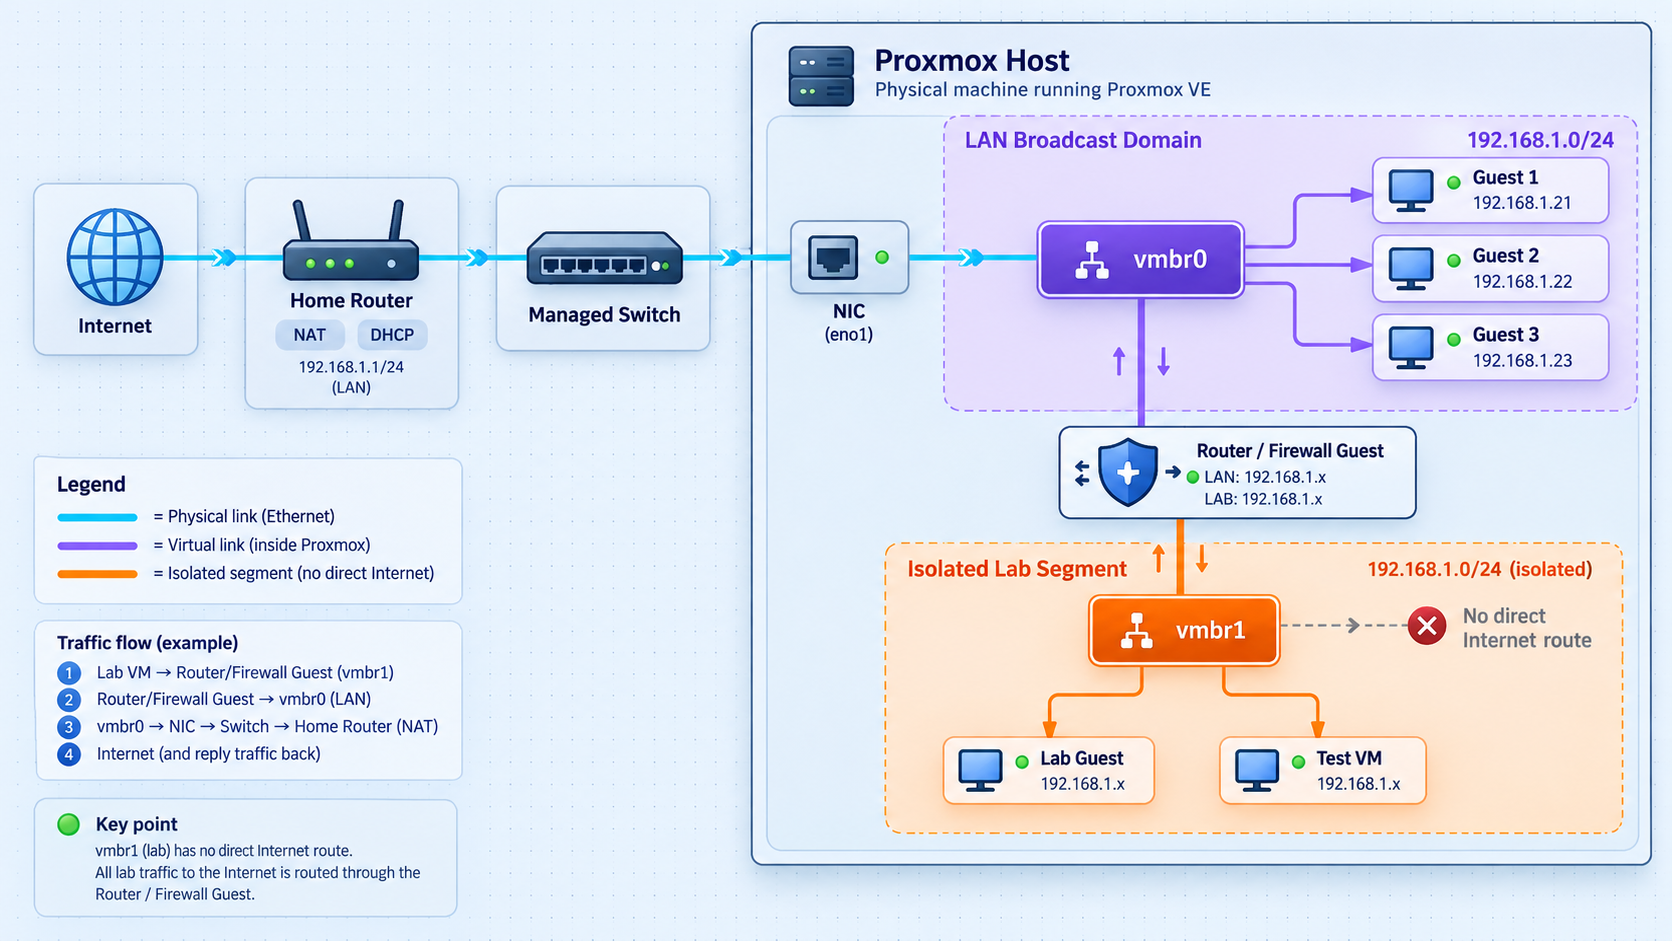
A standard installation commonly creates a Linux bridge such as vmbr0 and associates it with a physical network interface. The host management address is configured on the bridge, while VM and container interfaces attach to it as virtual ports. This design lets the host and guests communicate through the physical LAN without giving each guest a physical NIC.
Do not move the management address casually from the bridge to its underlying physical interface. A bridge configuration must preserve the correct physical port, address, prefix, gateway, and VLAN behavior. Network changes can immediately disconnect the browser session, so make them from a local console or with an independent recovery path.
Network verification checklist
- Confirm the Proxmox host has only the intended management addresses.
- Confirm the default route points to the correct router.
- Confirm DNS resolution from the host and each guest.
- Confirm guests attached to the bridge receive addresses from the expected subnet.
- Test traffic between segments against the intended firewall policy.
- Verify that management port 8006 is not exposed by an unintended router port-forwarding rule.
Choose storage by capability and failure behavior
Proxmox separates the physical or logical storage backend from the content placed on it. One storage entry may hold ISO images and backups, while another holds VM disk images and container root filesystems. Snapshot support is not limited to ZFS. It depends on the backend, disk format, and guest configuration.
| Backend or layout | Typical guest storage behavior | Snapshot considerations | Best fit |
|---|---|---|---|
| LVM-thin | Thin-provisioned block volumes for VM disks and container root filesystems | Supports snapshots, subject to available thin-pool space and configuration | Common local guest storage, including many ext4 installer layouts |
| Directory storage | Files on a mounted filesystem; VM images can use formats such as raw or qcow2 | Snapshot behavior depends on image format and configuration. Directory-backed qcow2 can support snapshots | ISO images, templates, backups, snippets, and file-backed guest disks |
| ZFS | Copy-on-write datasets and volumes with checksums and optional compression | Supports ZFS snapshots and Proxmox integration | Local storage where ZFS features and operational requirements fit the design |
| Traditional LVM | Block volumes without the same thin-pool behavior as LVM-thin | Capabilities differ from LVM-thin and should be checked before relying on snapshots | Existing block-storage layouts and specific administrative requirements |
| Ceph RBD | Distributed block storage across a properly designed Ceph cluster | Supports snapshot and shared-storage workflows | Multi-node environments with enough independent hardware, networking, and operational capacity |
Thin provisioning improves allocation flexibility but does not create physical capacity. Monitor both guest-visible filesystems and the underlying thin pool or ZFS pool. A snapshot also consumes storage as changed blocks accumulate. Long-lived snapshots can therefore cause unexpected capacity pressure.
A snapshot usually remains in the same storage system and failure domain as the source. It is useful for short rollback windows, but it does not protect against pool loss, host theft, destructive administrative mistakes, or every form of corruption. Delete temporary snapshots after their purpose is complete.
Create a ZFS pool only after designing redundancy
Use the Proxmox storage interface or an official ZFS workflow, and identify disks through persistent paths under /dev/disk/by-id/. Device names such as /dev/sdb can change across boots or hardware changes.
Creating a pool erases existing partitioning and data. Confirm every persistent disk identifier against the physical device, serial number, capacity, and backup records. A single-disk pool has no disk redundancy. If that disk fails, the pool may be lost. A mirror can survive an individual member failure when operated correctly, but it is still not a backup and does not protect against every shared failure.
First inspect the available devices and persistent identifiers:
lsblk -o NAME,SIZE,MODEL,SERIAL,FSTYPE,MOUNTPOINTS
ls -l /dev/disk/by-id/
A two-disk mirror has the following command shape. Replace both placeholders with the complete, verified persistent identifiers for the intended disks:
zpool create -f vmdata mirror \
  /dev/disk/by-id/REPLACE_WITH_FIRST_DISK_ID \
  /dev/disk/by-id/REPLACE_WITH_SECOND_DISK_ID

zpool status vmdata
zpool list vmdata
Do not copy that command until the disk identities and desired redundancy are confirmed. After the pool reports healthy, add it through Datacenter → Storage → Add → ZFS, choose the pool, and select only the content types it should hold. Test a disposable guest before moving important workloads.
Do not enable ZFS deduplication as a routine homelab optimization. It adds substantial operational and memory considerations and should be used only after workload-specific evaluation. Compression is a separate feature and should not be confused with deduplication.
Use community helper scripts cautiously
The Proxmox VE Helper-Scripts community project provides one-command installation workflows for services, containers, and VMs. Its current requirements list Proxmox VE 8.4, 9.0, 9.1, and 9.2, root shell access on the Proxmox host, and internet connectivity during installation.
Because individual script paths and commands can change, use the current community script catalog instead of copying a stale raw script URL from an old article. Search for the service, open its current page, confirm that Proxmox VE 9.2 is supported, read the documented default resources and post-install notes, and inspect the command before running it.
Find the current script page
Search the catalog for the application rather than guessing a repository path.
Check compatibility and prerequisites
Confirm Proxmox VE 9.2 support, required storage, networking, privilege level, and whether the workflow creates a VM or an LXC container.
Review the fetched content
A command executed as root can change the entire host. Review the script, repository history, security policy, and open issues before execution.
Use advanced settings when defaults do not fit
Choose storage, networking, resource limits, and privileges deliberately. A convenient default is not automatically correct for every host.
Verify and document the result
Confirm the new guest's network exposure, update method, credentials, backup coverage, startup behavior, and removal procedure.
Executing a downloaded script as root grants it control of the host and every guest. Convenience does not replace code review, backups, change tracking, and a recovery plan.
Build a backup and restoration workflow
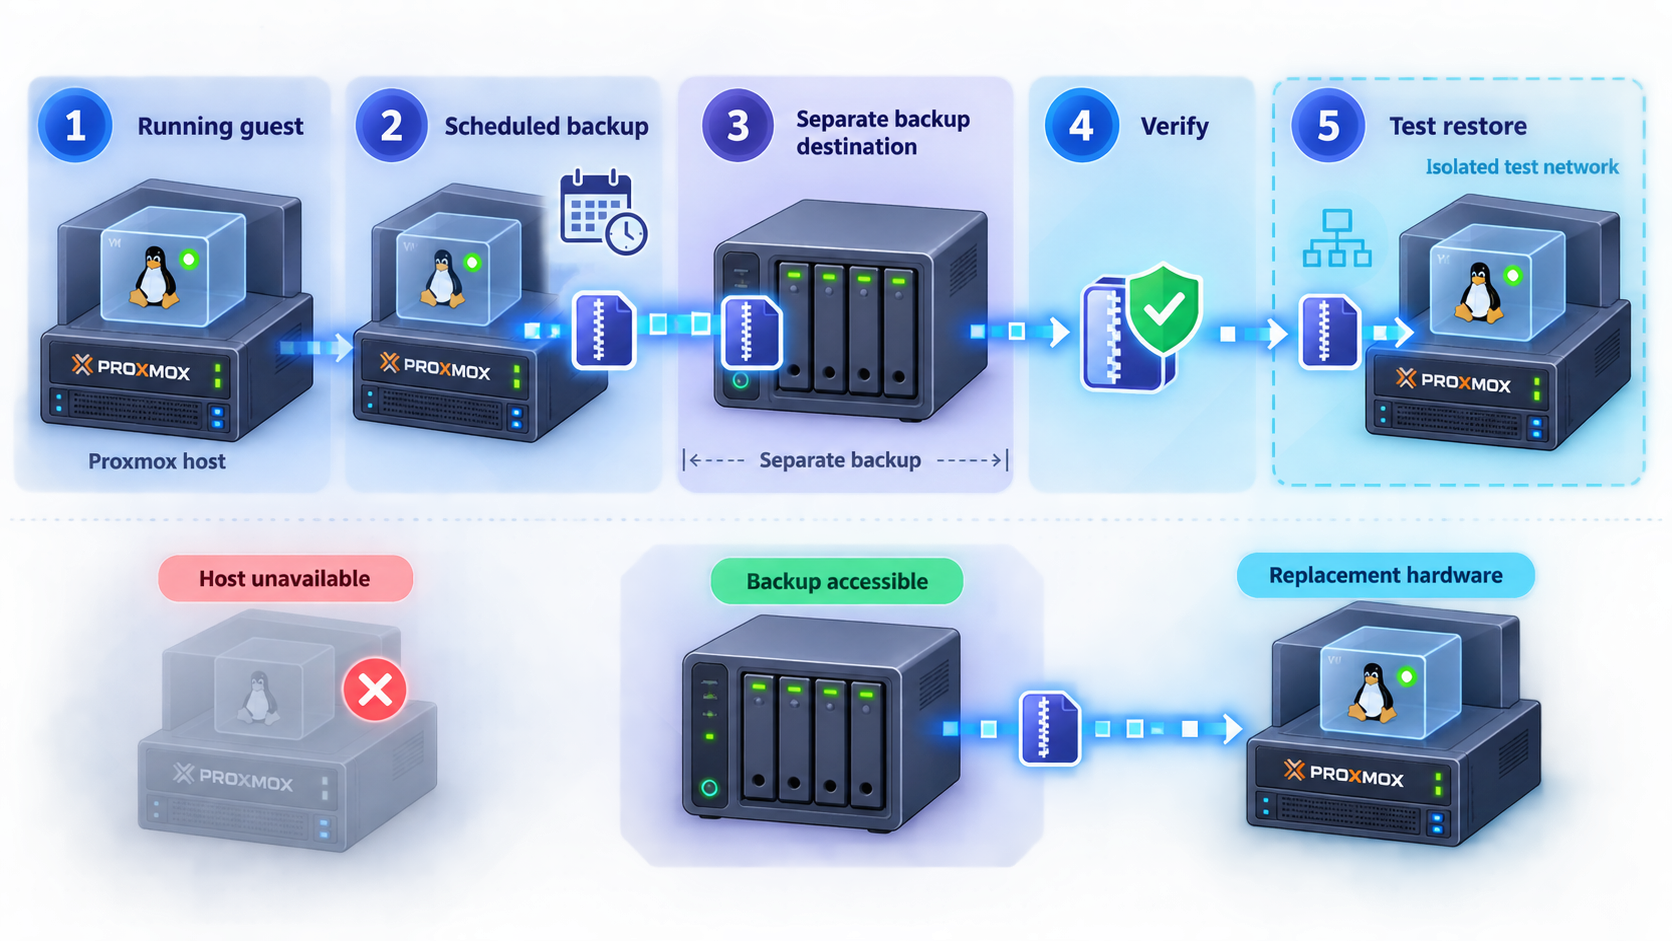
Proxmox snapshots, built-in backup jobs, and Proxmox Backup Server serve related but different purposes. A snapshot is primarily a short-term rollback point on compatible storage. A backup is a separate recovery artifact. A useful backup plan must account for where the artifact is stored, how long it is retained, how integrity is checked, and whether anyone has successfully restored it.
Place backups in a separate failure domain
A backup stored on the same physical disk as the source does not protect against disk failure. A backup stored on another disk in the same host improves some recovery scenarios but remains vulnerable to host-level failure, theft, power events, and administrative mistakes. Prefer a destination on another system or otherwise separated storage. Proxmox Backup Server can be deployed as a dedicated backup platform, but deploying it as a VM on the only protected host does not create a separate hardware failure domain by itself.
Create and test the backup job
- Add a backup destination with enough capacity and an appropriate separation from primary storage.
- Create a scheduled backup job under the datacenter backup configuration.
- Select the intended guests explicitly or use a controlled selection policy.
- Set a retention policy that matches available capacity and recovery requirements.
- Run an initial job manually and read the complete task log.
- Confirm that the backup is present on the intended destination.
- Restore a non-production copy using a new guest ID and an isolated bridge or disconnected network interface.
- Boot the restored guest and validate files, databases, application logins, and service startup.
- Delete or securely retain the test restoration according to the data policy.
Record where backup credentials and encryption material are kept, how the destination is reached, which network settings a restored guest needs, and who can authorize a restore. If required keys or credentials are lost, a healthy backup file may still be unusable.
Access the Proxmox interface remotely with Localtonet
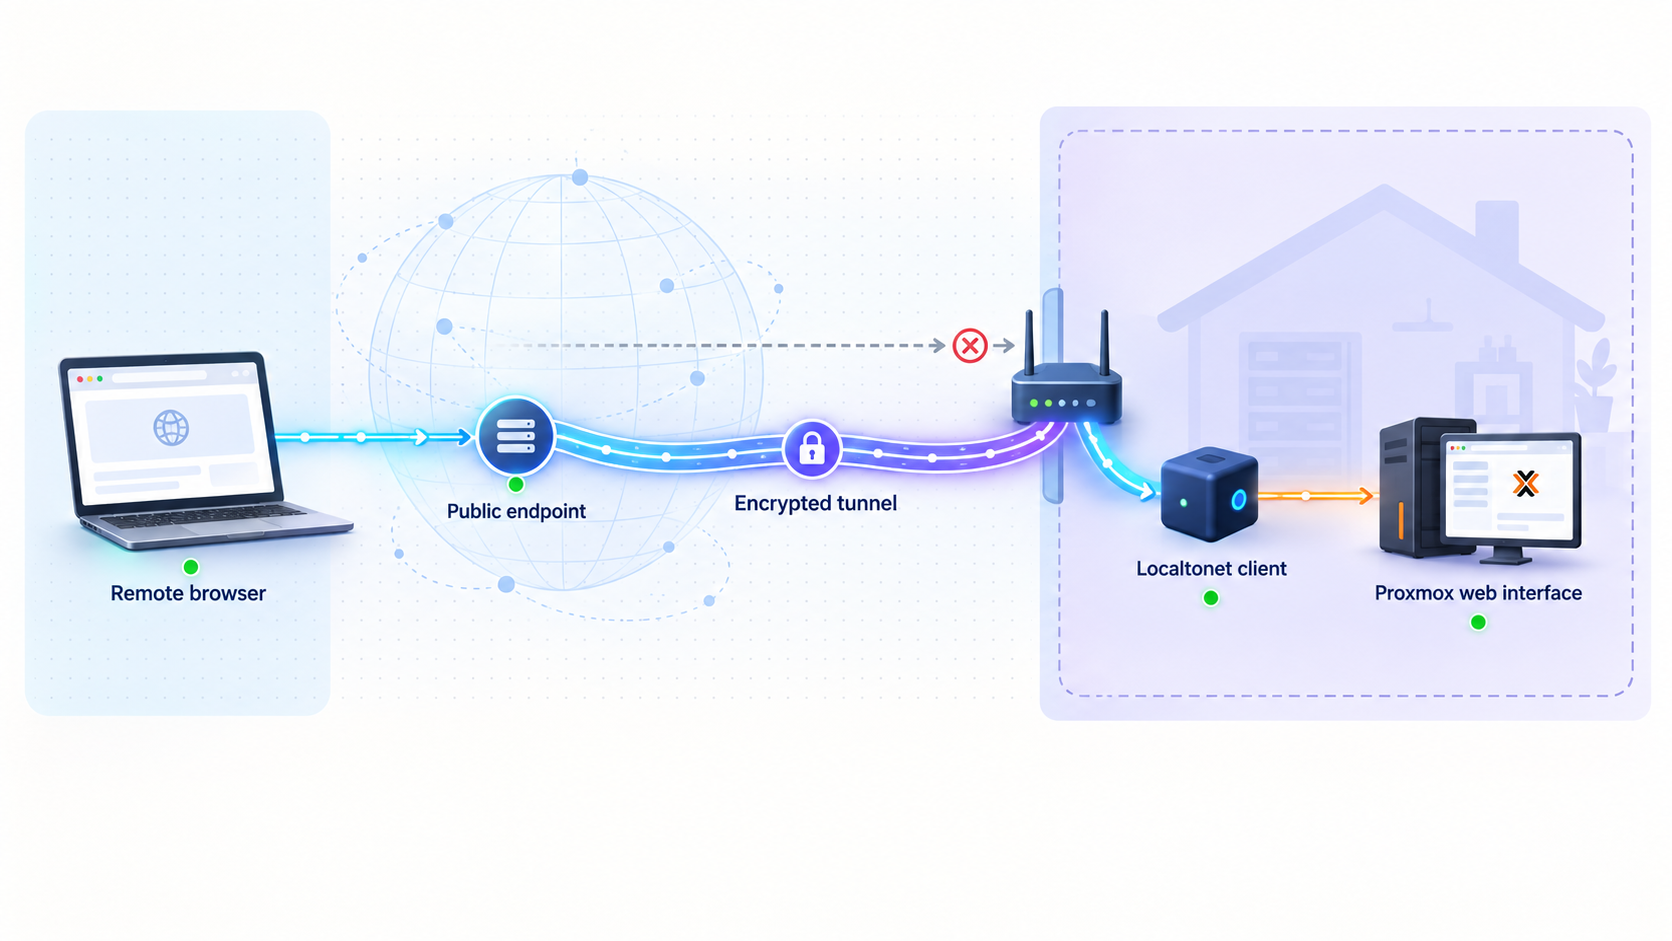
The safest default is to keep the Proxmox management interface available only on a trusted management network. When remote browser access is genuinely required, Localtonet can expose a service reachable by a connected device without inbound router port forwarding, firewall changes, VPN setup, or a public IP address. The Localtonet client establishes an outbound connection to one of our relay servers, and the tunnel is available only while the selected client is connected and the tunnel is running.
A Proxmox management interface controls guests, storage, networking, and potentially the entire host. Before remote exposure, create a dedicated named administrator, apply least privilege, enable multifactor authentication where supported, and use available access restrictions. Keep the initial root-equivalent account for controlled recovery rather than routine public login. Stop the tunnel when remote administration is not required.
Prepare Proxmox before creating the tunnel
- Install all reviewed security and platform updates.
- Create a named administrator with only the permissions needed for remote tasks.
- Enable multifactor authentication for the remote administrative identity.
- Remove or disable stale accounts and API tokens.
- Confirm the management interface is not already exposed through router port forwarding.
- Review Proxmox firewall and other available access restrictions.
- Verify that the chosen Localtonet client device can reach the Proxmox HTTPS service locally.
The Localtonet client does not have to run directly on the Proxmox host. It can run on a separate, maintained device that has network reachability to the management address. This separation can reduce changes to the hypervisor host and makes the access path easier to disable independently.
Install the current Localtonet client
Install and run the current Localtonet application for the operating system on a suitable device that can reach Proxmox at its LAN address and port 8006. Use the current installation method presented by Localtonet rather than copying an old binary command or unverified service flag.
Authenticate the client device
Authenticate the client with its device-specific AuthToken. Treat the token as a credential. Do not paste it into documentation, screenshots, shell history shared with others, or public repositories.
Select the authenticated device and relay server
In the Localtonet dashboard, select the AuthToken for the connected device and choose a currently available relay server or region. Available server codes and regions can vary, so use the values shown in the current dashboard rather than a hardcoded example.
Configure the HTTP/s tunnel target
Create an HTTP/s tunnel that points to the Proxmox management service using the correct local target scheme, IP address, and port. Proxmox serves its management interface over HTTPS on port 8006, so the local target must be configured as an HTTPS service rather than incorrectly treating it as plain HTTP. Use the LAN address reachable from the Localtonet client device.
Choose the public addressing option
For an HTTP/s tunnel, select the currently available process type that fits the requirement: Random Sub Domain, Custom Sub Domain, or Custom Domain. These options serve the target through a public HTTPS address. Availability can vary by plan and current product configuration, so use only options offered in the dashboard.
Create and start the tunnel
Save the tunnel configuration, then press Start. Creating a tunnel does not start it automatically. Confirm that the selected Localtonet device remains connected and that the tunnel status changes to running.
Verify from outside the home network
Use a separate connection, such as mobile data, to open the assigned public URL. Confirm that the Proxmox login page loads, multifactor authentication is required, and the dedicated account has only the intended permissions. Do not assume certificate behavior without testing the complete path in the current configuration.
Stop or delete access when finished
Use the Localtonet dashboard to stop the tunnel after the administrative session. Delete it if the access path is no longer needed. Stopping the tunnel removes public reachability through that tunnel without changing the local Proxmox service.
Remote verification checklist
- The public address is reachable only while the intended client and tunnel are running.
- The target resolves to the correct Proxmox host rather than another service on port 8006.
- The dedicated account can perform approved tasks but cannot perform unnecessary operations.
- Multifactor authentication is enforced for remote administration.
- No token, local address, hostname, or session information is exposed in shared screenshots.
- Stopping the tunnel makes the public address unavailable.
- Local access remains available after the tunnel stops.
Operate the homelab safely
Update and reboot deliberately
Check repository health before every update. Read release notes for significant upgrades, verify that current backups have completed, and avoid updating the host immediately before it must perform an important task. Use apt update and review apt full-upgrade output rather than applying package changes blindly.
When an update installs a new kernel or otherwise requires a reboot, shut down guests cleanly or schedule the reboot during a maintenance window. Afterward, verify the running kernel, node health, storage status, networking, and each critical service. A package installation finishing successfully does not prove that every guest application recovered.
Monitor resources and storage capacity
Watch host CPU load, memory pressure, swap activity, storage latency, network errors, and task logs. Also monitor the capacity of LVM-thin pools, ZFS pools, directory filesystems, and backup destinations. Thin provisioning and snapshots can allow logical allocations to exceed currently used physical space, so a host can run normally until changed blocks consume the remaining capacity.
Set practical warning thresholds in whatever monitoring system you operate, but keep enough free space to complete maintenance, snapshots, migrations, and backup operations. Investigate unexpected growth rather than only deleting files after storage is already full.
Define guest startup and shutdown order
Guest dependencies should control startup order. A DNS or directory service may need to start before applications that rely on it. A database should be available before its frontend. On shutdown, dependent applications should stop before the database or storage service they use.
Configure only important guests for automatic startup, assign deliberate startup order and delay values, and test a full host reboot. Confirm that guests shut down cleanly before the host powers off. Forced shutdown can damage application data even when the virtual disk remains intact.
Useful inspection commands
| Command | Purpose |
|---|---|
pveversion -v |
Display installed Proxmox package versions. |
qm list |
List configured KVM virtual machines and their current state. |
pct list |
List configured LXC containers and their current state. |
pvesm status |
Show configured Proxmox storage and current status. |
lvs |
Inspect LVM logical volumes and thin-pool information where LVM is used. |
zpool status |
Inspect ZFS pool health where ZFS is used. |
ip address show |
Inspect host interfaces, bridges, and assigned addresses. |
ip route show |
Inspect routing and the default gateway. |
journalctl -b -p warning |
Review warnings and more severe messages from the current boot. |
Commands that change guest state should be used only after confirming the guest ID and understanding application shutdown requirements. Prefer graceful shutdown through the guest operating system or Proxmox controls before considering forced stops.
Focused troubleshooting
| Problem | Checks | Safe next action |
|---|---|---|
| Web interface is unreachable | Check physical link, bridge address, route, local console access, and pveproxy status. |
Compare ip address show and ip route show with the documented network plan. Avoid rewriting the network configuration from memory. |
| KVM virtualization is unavailable | Check firmware virtualization settings and whether an outer hypervisor exposes virtualization extensions. | Enable VT-x or AMD-V on bare metal. For nested testing, enable nested virtualization in the outer platform rather than assuming Proxmox cannot run nested. |
| Updates report dependency conflicts | Inspect all APT source files for mixed Bookworm and Trixie entries or simultaneously enabled incompatible channels. | Correct repository suites and channels before installing packages. Do not force-remove Proxmox packages. |
| Snapshot action is unavailable | Check the storage backend, VM disk format, container storage, passthrough devices, and guest configuration. | Move a tested copy to snapshot-capable storage or use a backup. Do not assume that only ZFS supports snapshots. |
| Thin pool or filesystem is nearly full | Inspect guest disks, snapshots, backup files, ISO images, and actual underlying pool usage. | Stop nonessential writes, remove only verified obsolete data, extend storage through a supported process, and confirm backups before risky changes. |
| ZFS pool is degraded | Run zpool status and identify the affected member by its persistent identifier. |
Preserve logs and replace the correct device according to the pool topology. Do not detach the only healthy member of a mirror. |
| Guest has no network access | Check virtual NIC attachment, bridge selection, VLAN tag, guest address, gateway, DNS, and firewall rules. | Test one layer at a time, beginning with the guest interface and local gateway, before changing the host bridge. |
| Localtonet tunnel does not reach Proxmox | Confirm the client is connected, the tunnel is started, the selected target uses HTTPS, and the client device can reach the LAN address on port 8006. | Test the local target from the client device first. Then verify the AuthToken selection, current relay selection, tunnel status, and public URL. |
| Host does not shut guests down cleanly | Check guest tools, ACPI behavior, container service state, shutdown timeout, and guest ordering. | Correct the individual guest's shutdown process and retest during a controlled maintenance window. |
Rollback can discard newer application data and may reintroduce old credentials or cluster state. Record the current condition, preserve logs, understand the snapshot's age and scope, and confirm that a separate backup exists before rolling back an important guest.
Frequently asked questions
Is Proxmox VE an operating system or only a hypervisor?
Proxmox VE is a Debian-based virtualization platform that includes the host operating-system layer, Linux kernel, KVM/QEMU, LXC, storage and networking components, and Proxmox management services. It is normally installed directly on server hardware, but it is inaccurate to say that no host operating system exists underneath the management interface.
Can Proxmox VE run inside another virtual machine?
Yes, when the outer virtualization platform exposes the required virtualization extensions. This nested arrangement is useful for testing and training. Bare metal remains the usual choice for a working homelab because device passthrough, storage behavior, networking, and performance are more direct.
Do snapshots require ZFS?
No. ZFS supports snapshots, but LVM-thin and other backends can also provide snapshot capabilities. Directory-backed VM storage may support snapshots when a suitable image format such as qcow2 is used. Always check the backend, image format, guest type, and current configuration.
Should Docker run in an LXC container or a VM?
Docker can operate in selected LXC configurations, but nesting, filesystem behavior, device access, kernel features, and security requirements can create compatibility concerns. Use a Linux VM when strong isolation, broad compatibility, or straightforward application-container support is more important than minimizing virtualization overhead.
Does the QEMU Guest Agent enable live migration?
The agent can improve guest coordination and reporting, but it is not a universal prerequisite for live migration. Migration depends on cluster configuration, storage accessibility, CPU compatibility, virtual hardware, passthrough devices, guest state, and the selected migration method.
Can I build a useful Proxmox homelab with one disk?
Yes. A common ext4 installation uses LVM and LVM-thin so the remaining capacity can hold guest disks with thin provisioning and snapshot support. The limitation is failure concentration: one disk failure can affect the host and every locally stored guest. Keep tested backups on a separate destination.
Is the no-subscription repository safe to configure on Proxmox VE 9?
Proxmox provides a no-subscription repository for systems without enterprise repository access. On Proxmox VE 9, use the Trixie suite and the current Deb822 format where applicable. Never reuse a Bookworm Proxmox repository definition from an older guide, and review package changes before upgrading.
Is a Localtonet tunnel a replacement for Proxmox account security?
No. Localtonet provides the connectivity path through an outbound client connection, but the Proxmox management application must still be secured. Use a dedicated administrator, least privilege, multifactor authentication, available access restrictions, regular updates, and a short tunnel lifetime. Stop or delete the tunnel when remote administration is not needed.
How often should I test a Proxmox backup restore?
Test often enough to catch changes in credentials, storage, networking, guest configuration, and application data before an emergency. At minimum, test after building the backup workflow and after significant storage or application changes. A completed backup task is not proof that the restored application will work.
Create a controlled remote path to your homelab
After securing Proxmox with a dedicated administrator, multifactor authentication, current updates, and tested backups, use Localtonet to create an outbound tunnel from a device that can reach the HTTPS management service. Start it only when required and stop it when the administrative session is complete.
Get Started Free →