

Build the MST5 connection demo locally, prove the socket works, and then make it reachable by remote clients
Master Server Toolkit 5 provides modular backend infrastructure for Unity multiplayer projects, but a reliable remote test begins with a verified local build. This guide installs the official source repository, records the exact revision, builds the Basic Connection demo with its documented Unity version, and verifies the generated master and client locally. It then configures a Localtonet TCP tunnel, updates the evidenced MST client endpoint settings, and verifies the connection from a genuinely remote network. The demonstrated raw TCP path is a connectivity test, not a production transport-security configuration, so the guide also explains when WSS or externally terminated TLS is required.
📋 What's in this guide
What Master Server Toolkit does in a multiplayer architecture
Master Server Toolkit 5, commonly shortened to MST5, is a modular Unity framework for building and operating multiplayer backend services. Its master-server layer can own shared concerns such as accounts, sessions, profiles, service discovery, rooms, lobbies, matchmaking, permissions, and other registered backend modules. The project also includes infrastructure for room processes, process spawners, persistent profiles, chat, analytics, leaderboards, platform-service bridges, and administration tools.
MST is infrastructure rather than a complete game server. It does not implement the unique movement, combat, economy, game rules, or moment-to-moment networking of your game. Those responsibilities remain in the integrating Unity project and its selected game-networking framework. The current official Master Server Toolkit repository lists Mirror and FishNet integrations, while the MST networking API can also be used independently for backend messages.
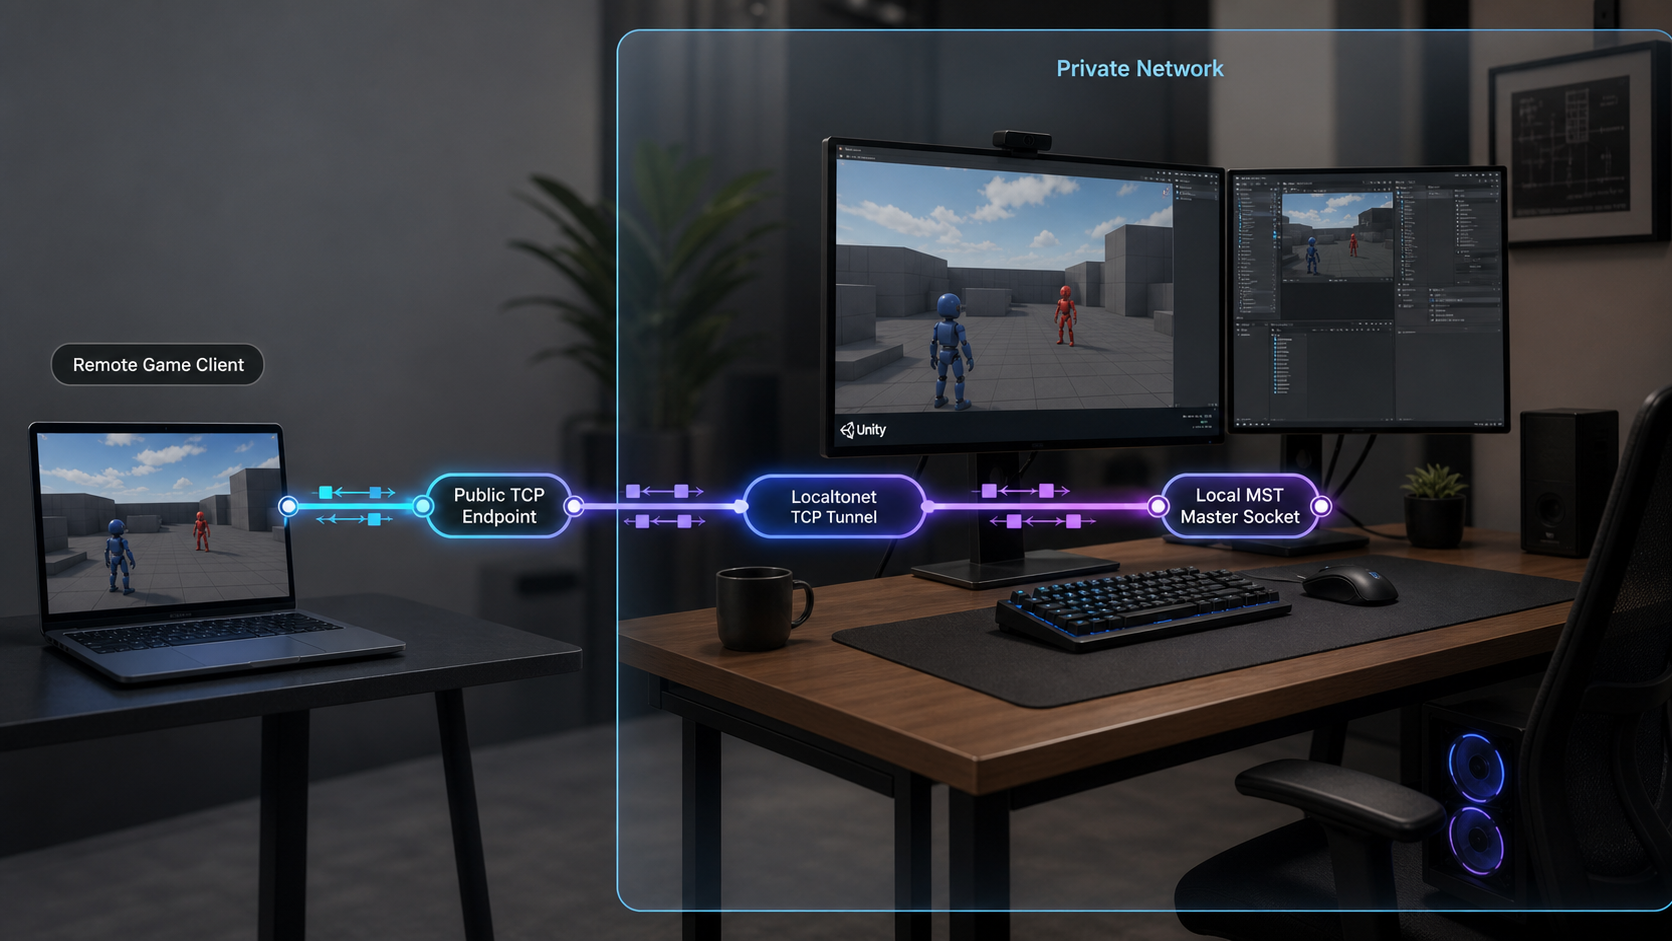
The distinction between backend and gameplay traffic matters when planning remote access. A client can use the MST WebSocket API to communicate with the master server for backend operations while a separate game-networking connection communicates with a room server for live gameplay. Exposing the master-server endpoint does not automatically expose room servers, spawners, databases, dashboards, or every port required by a complete multiplayer deployment.
This tutorial deliberately starts with the Basic Connection demo. It is the smallest documented example for proving that a matching master and client can establish the underlying connection. Authentication, profiles, chat, rooms, worlds, process allocation, and production persistence introduce additional components. A successful Basic Connection test is therefore a foundation, not proof that a full multiplayer deployment is secure or production-ready.
MST identifies its client-facing API as WebSocket-based, and its documented configuration identifies a master address and port. A Localtonet TCP tunnel forwards that configured socket as a raw TCP stream without requiring assumptions about MST HTTP routing. MST also contains a built-in HTTP server and dashboard controllers, but the repository evidence used for this guide does not establish a universal listening port for them. This tutorial therefore exposes only the Basic Connection master socket.
Prerequisites, verification date, and revision boundaries
The MST instructions and version-sensitive details in this guide were verified against the public MST5 repository on August 20, 2026. At that time, the repository targeted Unity 2022.3.62f3, used the menu path shown below, generated the documented Windows output paths, and applied the configuration priority described in this tutorial. MST5 is under active development, so inspect the repository before repeating the workflow later.
Do not rely only on a branch name such as master. Record the exact Git commit used for the build and use that same checked-out revision for both the master and client. A branch can move between two build operations, even when both directories appear to come from the same branch.
Prepare the following before opening Unity:
- Git installed and available from a terminal.
- Git LFS installed and initialized before cloning the repository.
- Unity Editor
2022.3.62f3, as verified on August 20, 2026. - A supported desktop build target for the master, room, and spawner processes.
- Enough local storage for the Unity project, imported assets, and generated builds.
- A second device or network for the final remote test.
- A Localtonet client installation on the machine that will run, or can reach, the MST master process.
- A Localtonet device/auth token associated with that client installation.
Treat the Localtonet auth token as a device-specific secret. Never place it in Unity source files, application.cfg, build artifacts, screenshots, terminal transcripts, issue reports, or source control. Use the current Localtonet documentation to select the installation instructions for the operating system on the tunnel device. Installation packaging can change by operating system and client version, so this guide does not provide an unverified installer name or command.
| Requirement | Verified value or role | Why it matters |
|---|---|---|
| Unity Editor | 2022.3.62f3 |
Using the repository's targeted version reduces avoidable import, serialization, and build differences. |
| Git LFS | Install and initialize before cloning | The repository expects its LFS-managed content to be retrieved correctly. |
| MST source | Clone the standalone repository | MST5 was not distributed as a Unity Package Manager package when verified. |
| Build target | Supported desktop target for server processes | The master server needs a runnable desktop build. |
| Repository revision | One exact commit for both builds | Network and persistence contracts may differ between revisions. |
| Localtonet client | Run where the local MST endpoint is reachable | The client establishes the outbound connection to our relay server. |
WebGL is supported for MST clients, but server-only database assemblies are excluded from WebGL. That distinction does not change this first test. The master server must run on a supported desktop target, and the client must use the endpoint exposed by that master.
This workflow was verified for Unity 2022.3.62f3. Another editor version might upgrade project files, reimport assets differently, or introduce incompatibilities. If your project must migrate to a different Unity release, perform that migration in a separate branch and validate it independently instead of changing the version during the baseline connection test.
Install MST5 and build the Basic Connection demo
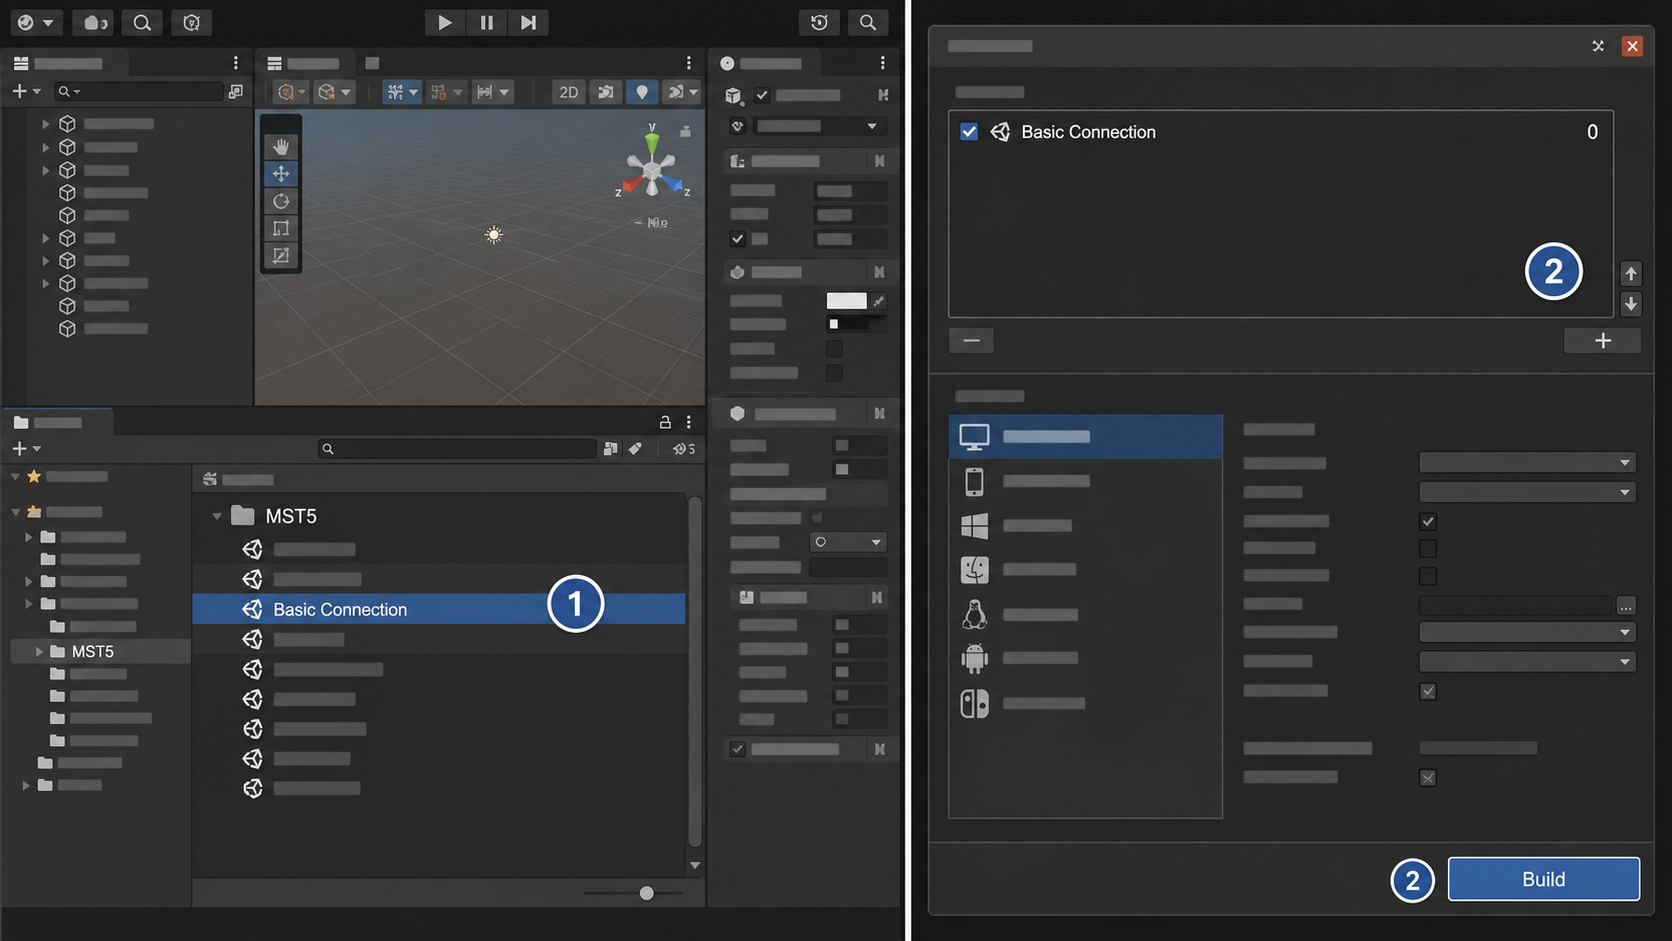
The verified MST5 installation path is source-based. The standalone repository contains the framework, demos, bridge code, and Unity project settings used for development. Review the repository status and requirements before building because its target Unity version and project layout can change.
Install and initialize Git LFS
Install Git LFS for your operating system and initialize it for your user account before cloning MST5. The documented initialization command is:
git lfs installConfirm that the command completes successfully. Cloning before Git LFS is ready can leave expected assets as pointer files instead of usable project content.
Clone the official MST5 repository
Clone the official source into a working directory:
git clone https://github.com/aevien/master-server-toolkit.git
cd master-server-toolkit
Use the official MST5 GitHub repository rather than an unidentified archive or copied project directory.
Record and pin the checked-out revision
Record the exact commit before producing either build:
git rev-parse HEADSave the resulting commit identifier in your private build notes. Build the master and client from that same checkout. If you update the repository later, rebuild both components together and record the new commit.
Open the cloned folder in Unity 2022.3.62f3
Add or open the cloned project folder with Unity Editor 2022.3.62f3. Allow the initial import to finish before using the project menus or starting a build. Review the Unity Console if the import reports compilation or package errors.
Build the Basic Connection demo
Select Tools > Master Server Toolkit > Build > Demos > Basic Connection > All. This menu path was verified on August 20, 2026. Let the build finish and review the Unity Console for errors rather than assuming that the presence of an output directory means every target succeeded.
Locate the generated master and client builds
The verified Windows outputs are Builds/BasicConnection/MasterServer/MasterServer.exe and Builds/BasicConnection/Client/Client.exe. The builder also writes matching application.cfg files. Exact executable names for every supported desktop platform were not established by the available evidence, so use the corresponding artifacts generated for your selected target.
Preserve each complete generated build directory. Unity standalone builds generally rely on files adjacent to the launcher, and MST reads application.cfg from the build root by default. Moving only the executable can separate it from required data and configuration.
Keep a small build record containing the repository URL, full commit identifier, Unity version, build target, build date, and whether the Unity Console completed without errors. This record makes a later failure reproducible and prevents an unnoticed repository update from creating mismatched master and client executables.
Understand the generated MST configuration and overrides
MST reads application.cfg from the project or build root by default. A different main configuration file can be selected with the -mstConfigFile argument. The Basic Connection builder writes matching files, so the initial local test should use the generated configuration before introducing remote endpoint changes.
The repository documents this representative syntax:
@import "Configs/common.cfg"
@import "Configs/security.cfg"

-mstStartMaster=true
-mstMasterIp=127.0.0.1
-mstMasterPort=25200
In this example, -mstStartMaster=true enables the master role. The value 127.0.0.1 is the IPv4 loopback address, and the example port is 25200. Inspect the actual generated files before configuring Localtonet. The tunnel target must match the address and port used by the running master, not merely the values shown in a tutorial.
Configuration resolution order
The following priority was documented by MST5 when this guide was verified, from highest to lowest:
- Environment variable
- Command-line argument
- Main configuration file
- Imported configuration defaults
Within configuration files, the main file wins over imported values. Repeated imports are ignored to prevent cycles, missing imports produce a warning, and the first imported duplicate wins. Canonical names and examples are defined in the repository's MstArgNames.cs; use the file from the exact revision you built instead of inventing similar-looking option names.
| Configuration source | Priority | How to check it |
|---|---|---|
| Environment variable | Highest | Inspect variables supplied by the shell, service manager, launcher, CI job, or hosting environment. |
| Command-line argument | Second | Inspect the complete executable launch command, shortcut target, script, and service definition. |
Main application.cfg |
Third | Confirm that you edited the file beside the running build and did not select another file with -mstConfigFile. |
| Imported defaults | Lowest | Check that imported files exist and remember that main-file values override them. |
Confirm that the expected values are effective
Before local or remote testing, inspect how each executable is launched. Start it directly from the generated build directory for the baseline test rather than through an old shortcut or service definition. If you use a script, shortcut, process manager, or development launcher, review its complete arguments for -mstConfigFile, -mstMasterIp, or -mstMasterPort. Also inspect the process environment for MST values defined according to the canonical names in your checked-out revision.
A file edit is not a successful configuration change until the running process demonstrates the expected behavior. Keep the master and client logs visible, and compare the address and port they report with the values you intended. If the logs and file disagree, investigate higher-priority environment or command-line sources.
MST warns against committing a generated production key ring and deploying the same private keys to unrelated projects. For each production environment, configure a stable -mstSecurityKeyRingFile path and protect the resulting files with appropriate host permissions and backup controls. Do not place private keys or Localtonet device tokens in a public repository.
Start and verify the Basic Connection demo locally
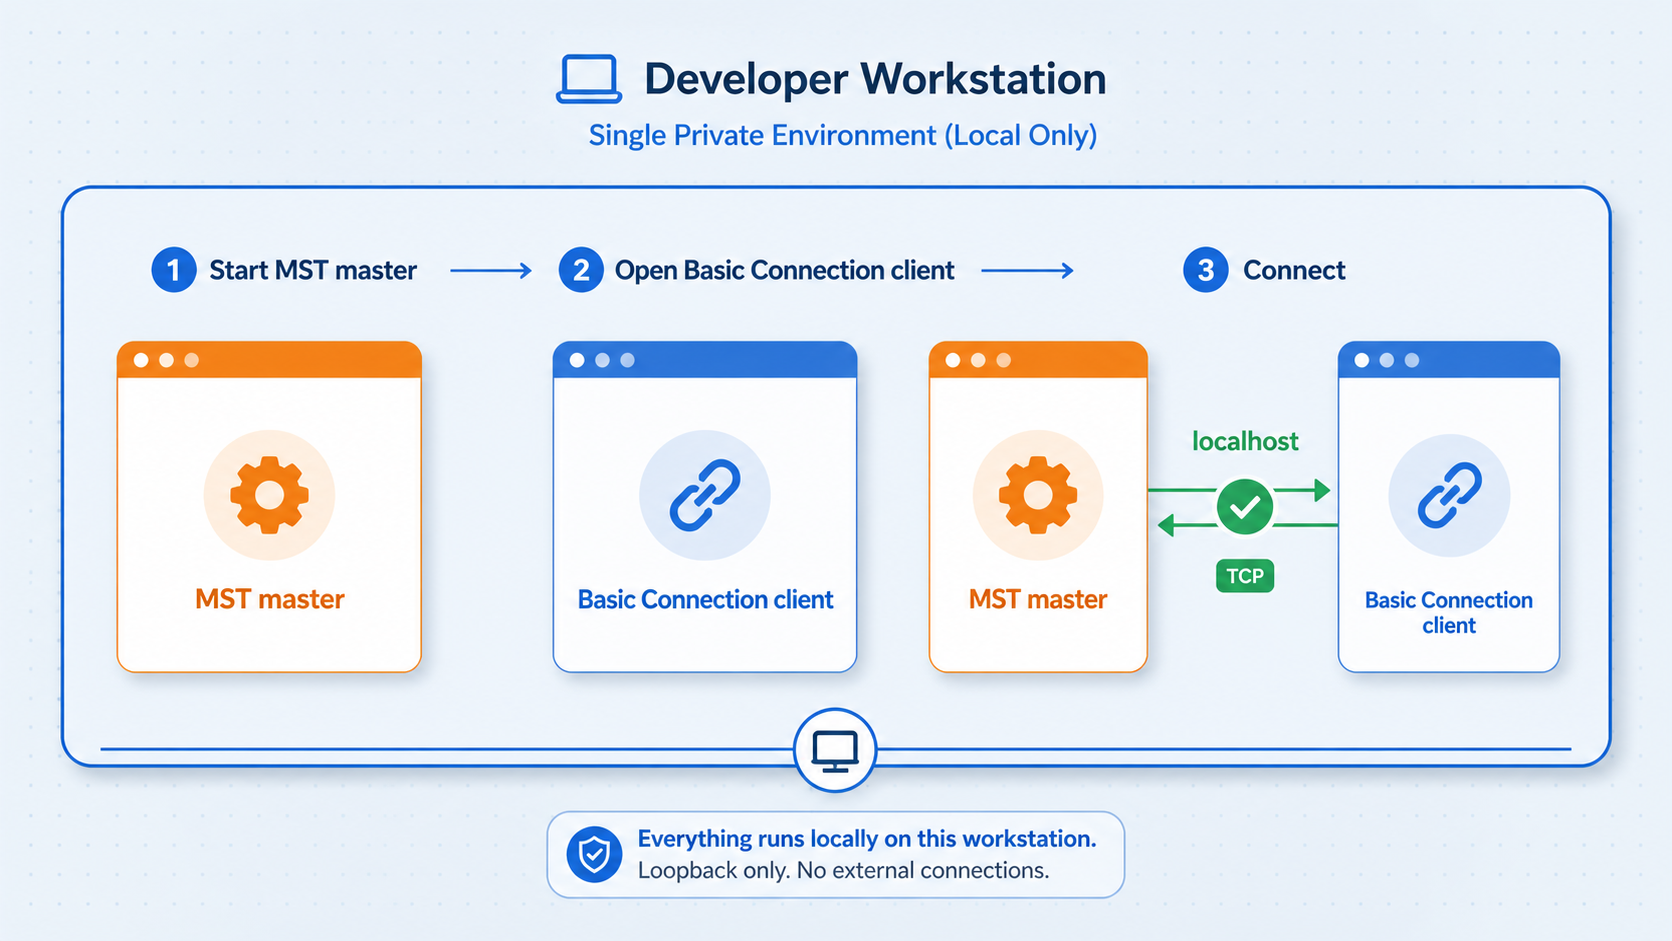
Local verification separates build and application problems from relay connectivity. If the generated client cannot communicate with the master on the same machine, a public tunnel will not repair the build, effective configuration, or application protocol.
Start the master-server build
On Windows, launch Builds/BasicConnection/MasterServer/MasterServer.exe. On another supported desktop target, launch the corresponding server artifact produced by Unity. Keep the process running and preserve its visible log or terminal output.
Confirm successful master startup
Review the earliest messages for missing imports, invalid paths, startup failures, or address-binding errors. Confirm that the expected configuration file was loaded and that no other process occupies the configured master port.
Start the matching local client
On Windows, launch Builds/BasicConnection/Client/Client.exe. Use the client generated during the same build operation as the running master, not an older executable from another directory or repository revision.
Confirm the application-level result
A successful local result means the client reaches the master, the master records the accepted client connection, the Basic Connection flow remains established instead of immediately disconnecting, and neither side reports a protocol or revision error. A listening port alone is not sufficient.
An operating-system port check can provide supporting evidence that the process is listening, but the exact command differs by platform and is not part of the verified MST build sequence. The matching Basic Connection client is the more meaningful test because it exercises the MST application protocol rather than only the TCP bind.
If the local test fails, compare the generated master and client configurations, inspect the configuration priority, verify the Git commit used for both builds, and review the first relevant error on each side. Do not proceed to Localtonet until this baseline works repeatedly.
Expose the MST master socket with a Localtonet TCP tunnel
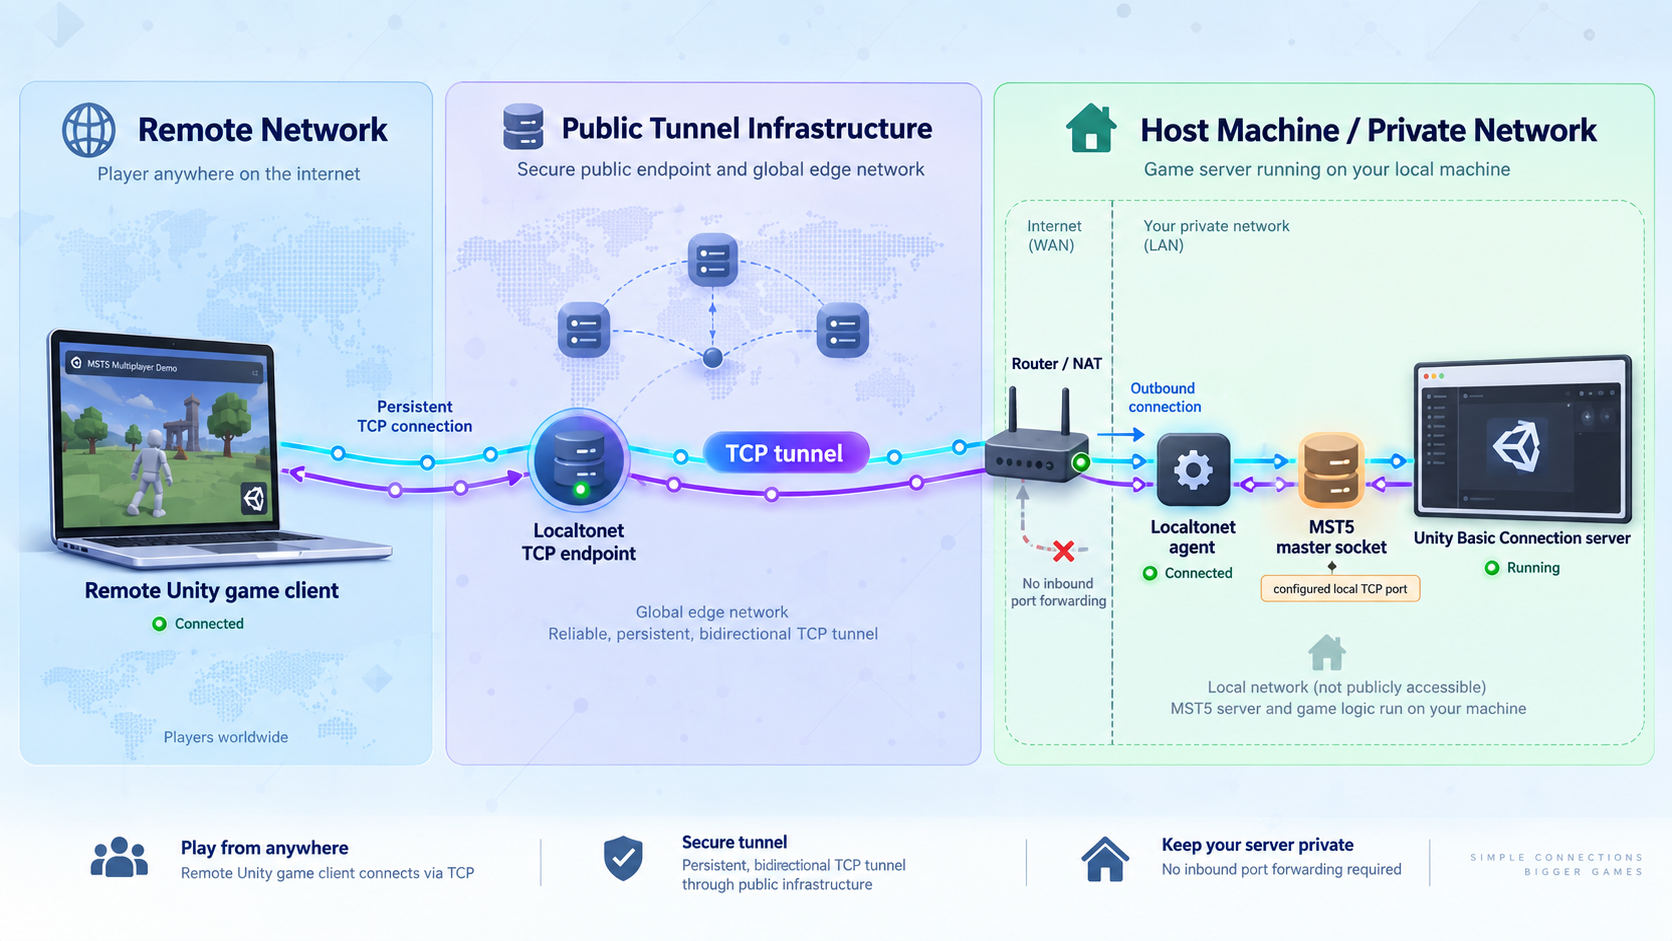
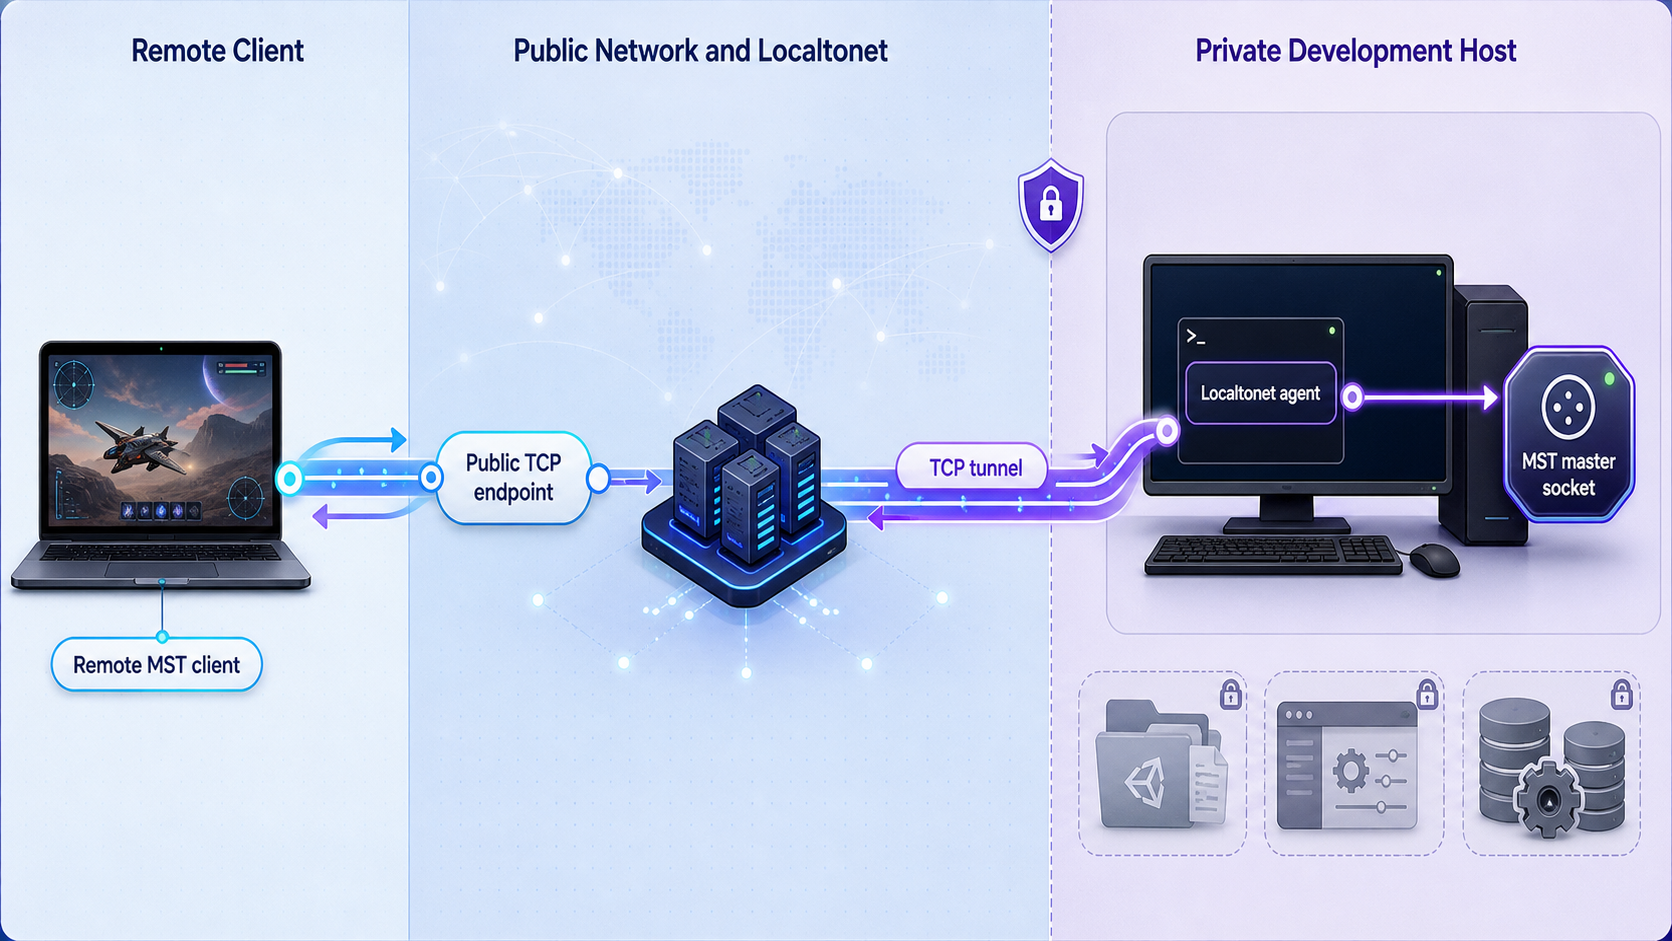
Once the Basic Connection demo works locally, Localtonet can provide a public host and port for the master socket. Our client application establishes an outbound connection to a Localtonet relay server. This avoids inbound router port forwarding, firewall changes, VPN setup, and the requirement for a public IP address.
The Basic Connection path below demonstrates TCP reachability. A raw Localtonet TCP tunnel must not be treated as proof that MST application traffic is protected by TLS. Use this connectivity-only test with non-sensitive test data in an isolated environment. Before exposing a production service, configure and verify MST WSS support or an appropriate externally terminated TLS design.
Install the Localtonet client on the machine hosting MST or on another device that can reach the configured MST address and port. If the master listens only on 127.0.0.1, the Localtonet client must run on the same host because another machine cannot reach that loopback address.
Consult the current Localtonet installation documentation for the package or installer appropriate to your operating system, and review the current Localtonet TCP tunnel documentation alongside the sequence below. Available clients, dashboard labels, relay choices, and plan availability can change, so use the options displayed in your current account.
Install and run the Localtonet client
From the Localtonet documentation, choose the current installation path for the operating system on the tunnel device. Complete the installation and start the client application. The client must remain running for the public endpoint to work.
Authenticate and select the connected device
Associate the client with its device-specific auth token, then confirm in the dashboard that the intended device is connected. Select that connected device for the tunnel. Never embed the token in the Unity project or expose it in a screenshot.
Select an available relay server
Choose an available relay server or region from the current dashboard. Available values can vary by account, plan, client version, deployment, or region, so obtain the current value from the product rather than hardcoding a server code from an article.
Create a TCP tunnel to the MST target
Select the TCP tunnel type. Enter the local IP address and port used by the running MST master. For an unchanged configuration matching the documented example, the target may be 127.0.0.1 with port 25200. Inspect the effective master configuration first and use its actual values.
Start the tunnel
Creating the configuration does not make it active. Use the Start button, confirm that the tunnel reports its running or connected state, and verify that the selected Localtonet device remains connected.
Record the assigned public host and port
Copy the public host and port assigned to the running TCP tunnel. Remote MST clients must use that exact pair. Do not substitute the relay label, dashboard address, local loopback address, or an HTTP URL.
Verify the tunnel state before changing the client
The Localtonet dashboard should show the selected device as connected and the specific TCP tunnel as started. The tunnel configuration should target the same local IP and port confirmed during local MST testing. These checks establish the relay state, but they do not yet prove that an MST client can complete the application flow. That final proof comes from the remote client test.
Remote access depends on the MST master process, the Localtonet client, and the TCP tunnel. Stopping any one of them interrupts the connection. The tunnel can be stopped or deleted from the dashboard when testing is complete.
Configure and verify a remote MST client
Keep one unmodified local client build as a control and create a separate copy for remote testing. The server continues listening on its private target. Only the remote client's master endpoint changes to the Localtonet public host and port.
The evidenced MST settings are -mstMasterIp and -mstMasterPort. In the remote client's effective configuration, set -mstMasterIp to the assigned Localtonet public host and set -mstMasterPort to the assigned public port. Do not include a URL scheme unless your exact MST security configuration explicitly requires one and documents it. For the raw TCP connectivity test described here, use the assigned host value and numeric port.
Never leave 127.0.0.1 as the remote client address. Loopback always refers to the machine running that client. On a player's computer, it points to the player's computer rather than the development machine.
Copy the matching client build
Copy the entire client build generated from the same recorded Git commit as the running master. Keep the original local client unchanged so it remains a known-good control.
Edit the remote client endpoint
In the remote copy's active application.cfg, set -mstMasterIp to the Localtonet public host and -mstMasterPort to the Localtonet public port. Preserve unrelated generated settings unless the exact MST revision documents another required change.
Rule out higher-priority overrides
Launch the client directly for the baseline test. Inspect any shortcut, script, service, or process manager for command-line values that replace -mstMasterIp, -mstMasterPort, or the main file through -mstConfigFile. Check the launch environment for MST variables defined by your revision. Remove unintended overrides or update them deliberately.
Move the client to a genuinely remote network
Run the test client on another device or network so that it must use the public endpoint. A mobile hotspot or another external network can be useful when permitted by your environment. Keep the master logs and Localtonet dashboard visible on the host side.
Launch the client and correlate all three states
Confirm that the MST master remains running, the Localtonet device and tunnel remain connected, and the remote client reaches the master. Compare timestamps in the client and master logs to distinguish a transport failure from an application-level rejection.
Apply the application-level success criterion
The remote test succeeds only when the master records the incoming connection, the remote Basic Connection client reports its expected connected state, the connection remains established rather than closing immediately, and neither side reports a protocol, revision, or security-mode mismatch. A dashboard showing a running tunnel is not enough.
Retest the local control if remote access fails
If the untouched local client now fails, investigate the master or MST configuration first. If local communication still succeeds while the remote copy fails, focus on tunnel state, the assigned endpoint, client overrides, revision consistency, and transport-security compatibility.
This procedure exposes only the Basic Connection master socket. A larger game may require room servers and other client-facing services. Each service needs its own documented address, port, protocol, authentication model, and exposure decision. Forwarding the master port does not automatically make spawned rooms reachable.
Security boundaries for a public multiplayer endpoint
A TCP tunnel provides reachability. It does not replace authentication, authorization, application-layer encryption, abuse controls, process isolation, secure key handling, or game-specific validation. Once a public endpoint is distributed, untrusted internet clients can attempt to connect.
MST documents WSS support, a permission challenge and proof flow, authenticated request envelopes, persistent key rings, password hashing, and replay protection. Which controls are active depends on the scene and configuration you deploy. The Basic Connection demo should be treated as a connectivity exercise, not as a hardened public service.
WebSocket describes application communication over a TCP connection, while WSS adds TLS protection to WebSocket traffic. A Localtonet TCP tunnel forwards the stream to MST, but a compatible security design must still protect the application protocol. Follow MST's guidance to use WSS or external TLS termination for public connections. Do not label a plaintext Basic Connection test as secure merely because it is reachable through a tunnel.
A production WSS or externally terminated TLS deployment is a separate security configuration from the raw connectivity test. Verify certificate handling, client expectations, termination placement, and the protected path for the exact MST revision and deployment architecture. The available evidence does not define one universal certificate or TLS-termination procedure, so this tutorial does not invent one.
Use least privilege on the host running the master server and Localtonet client. Run only the modules required by the test, keep development terminals and dashboards private unless they have a separately reviewed exposure plan, and restrict access to configuration and key files. Adding registration, password reset, email confirmation, platform bindings, profile persistence, database bridges, or administration tools requires a new threat review.
Routine operation and deployment planning
A repeatable startup order makes failures easier to interpret. Start the MST master process first and confirm its successful local startup. Start the Localtonet client second and verify that the intended device is connected. Start the configured TCP tunnel third and confirm its active state. Only then launch remote clients.
Before each testing session, compare the current master and client build records. They should contain the same full MST commit identifier and Unity version. Confirm that the active tunnel still targets the intended local address and port, especially after rebuilding or changing application.cfg.
For shutdown, stop accepting new tests, close remote clients, stop the TCP tunnel, and then stop the MST master. Stopping a tunnel preserves its configuration for later use, while deleting it removes the tunnel. Delete temporary configurations when they are no longer required.
| Operational state | Local client result | Remote client result |
|---|---|---|
| MST master stopped | Cannot complete the MST connection | The tunnel has no working local service to forward to |
| Localtonet client disconnected | Can still work locally if MST is running | The public tunnel is unavailable |
| TCP tunnel stopped | Can still work locally | The assigned public endpoint is not active |
| Wrong public host or port | Unaffected | The client reaches the wrong destination or fails |
| Client and master revisions differ | May fail or behave incompatibly | May fail even when the TCP path is reachable |
| Security modes differ | May disconnect after reaching the server | May open TCP and then fail the application protocol |
Full MST deployment can include a server build containing the master server and spawner, room builds containing game scenes, and a client build containing the client scene and required room scenes. The spawner must know the correct room executable location on the deployed server. Every scene that connects to the master must use consistent master connection information.
These concerns go beyond the Basic Connection demo. Room servers may need independent public reachability for gameplay depending on the selected networking framework and architecture. Determine those ports from the actual room and networking configuration. The evidence used here does not establish universal room ports, dashboard ports, or production process paths, so none should be guessed.
Troubleshooting the build, local connection, and tunnel
Git LFS assets were not downloaded correctly
Confirm that Git LFS is installed and that git lfs install completed before cloning. If files contain LFS pointer text instead of expected content, repair the checkout with the Git LFS tooling appropriate to your installation or create a clean clone after initialization. Do not diagnose Unity import errors until the source checkout is complete.
Unity reports import or compilation errors
Confirm that the project is open in Unity 2022.3.62f3 and that the initial import has finished. Verify that you cloned the repository root rather than a partial directory. Review the first meaningful Unity Console error because later messages can be consequences of that initial failure. If another Unity release upgraded the checkout, return to a clean clone for the baseline test.
The Basic Connection build is missing
Verify that you used Tools > Master Server Toolkit > Build > Demos > Basic Connection > All. Review the Console for build errors and confirm that the selected desktop target is supported. The verified Windows paths end in MasterServer.exe and Client.exe, but the evidence does not establish exact artifact names for every desktop platform.
The master process starts and exits immediately
Run it in a way that preserves its output and inspect the earliest warning or fatal message. Check for missing configuration imports, invalid paths, a port collision, or a role setting overridden by a higher-priority source. Confirm that application.cfg remains in the build root unless another file was intentionally selected with -mstConfigFile.
The local client cannot connect
Confirm that the master starts before the client. Compare the effective address and port on both sides. If the documented example remains active, the endpoint is 127.0.0.1:25200, but generated or edited files may differ. Inspect environment variables and launch arguments before trusting the visible configuration file. Verify that the master and client build records contain the same Git commit.
The Localtonet device does not appear connected
Confirm that the Localtonet client application is running on the intended device and authenticated with that device's token. Make sure the dashboard selection refers to that device rather than an old installation. Do not create or guess a replacement token from an article. Use the current dashboard and documentation for token management.
The tunnel was created but the endpoint is unavailable
Creation and startup are separate states. Use the Start button and verify that the TCP tunnel is running. Confirm that the selected Localtonet device remains connected. If the tunnel is stopped or its device disconnects, the assigned public endpoint is unavailable even when its saved configuration remains visible.
The tunnel runs but no remote MST client connects
Retest the local control client first. Then compare the Localtonet local IP and port with the master server's effective configuration. If MST listens on 127.0.0.1, our client must run on that same host. Copy the assigned public host and port exactly into the remote client's effective -mstMasterIp and -mstMasterPort settings.
The remote client still uses loopback or an old endpoint
Check the application.cfg located in the remote client's actual build directory. Then inspect its full launch command and environment. A command-line argument or environment variable takes priority over the main file, and -mstConfigFile may select a different file entirely.
A TCP connection opens and then closes
Transport reachability does not guarantee protocol compatibility. Compare the recorded repository revisions, inspect both application logs, and check whether the security mode expected by the client matches the master. An immediate disconnect can result from incompatible application configuration even when the Localtonet TCP path works.
The dashboard is not reachable through the master tunnel
The tunnel in this guide targets the MST master socket used by Basic Connection. MST contains a built-in HTTP server and dashboard controllers, but the available evidence does not establish their listening port or a universal dashboard deployment configuration. Do not assume that the dashboard shares the master socket. Identify and secure its actual configuration before considering separate exposure.
Basic Connection works, but rooms do not
The master connection and live room networking are separate paths. A complete deployment can include master, spawner, room, and client builds, with room executable paths configured for the deployment host. Room networking may require separate endpoints. Derive those requirements from the selected room build and game-networking integration rather than automatically reusing the master port.
Keep one known-good local client and one remote client. If both fail against the same running master, investigate MST startup, revision, and configuration. If only the remote client fails, investigate the Localtonet device state, tunnel lifecycle, target address, assigned endpoint, client overrides, and transport-security compatibility.
Frequently asked questions
Is Master Server Toolkit a complete multiplayer game server?
No. MST provides modular multiplayer backend infrastructure, including master-server functions, profiles, rooms, lobbies, matchmaking, chat, spawners, administration tools, and integrations. Your project remains responsible for game rules, movement, combat, economy policy, and live gameplay networking.
Can I install MST5 with Unity Package Manager?
Not through the path verified on August 20, 2026. MST5 was provided as a standalone repository containing the framework, demos, bridge code, and Unity project settings. Install Git LFS, clone the repository, record the commit, and open the project in its documented Unity version.
Why should I record the MST Git commit?
MST5 is under active development, and a branch can move between build operations. Recording the full commit identifier proves which source produced each executable and helps ensure that the master and client use matching network and persistence contracts.
Why does this guide use a Localtonet TCP tunnel?
MST identifies its client-facing API as WebSocket-based and provides a configured master IP address and port. TCP forwarding carries that socket stream without requiring assumptions about separate HTTP routing. The Localtonet target must match the effective MST master address and port.
Does a Localtonet TCP tunnel automatically make MST traffic secure?
Do not assume that raw TCP forwarding encrypts the MST application payload. The Basic Connection procedure is a connectivity test. MST recommends WSS or external TLS termination for public connections, together with appropriate authentication, authorization, key protection, and application validation.
Which MST settings change on the remote client?
Set the remote client's effective -mstMasterIp to the Localtonet public host and -mstMasterPort to the assigned public port. Then verify that no environment variable, command-line argument, or alternate file selected through -mstConfigFile overrides those values.
Must the Localtonet client run on the MST server?
It must run on a device that can reach the configured MST target. If MST listens on 127.0.0.1, the Localtonet client must run on the same host. A different device can be used only when the master is deliberately reachable from it and the surrounding local-network access has been reviewed.
Does creating a Localtonet tunnel make it active immediately?
No. Creating and running are separate lifecycle states. Start the tunnel with the Start button and keep the selected Localtonet client connected. The endpoint is available only while the tunnel is running and its device remains connected.
What proves that the remote test succeeded?
Success requires more than a running tunnel. The master must record the incoming connection, the remote Basic Connection client must report its connected state, the connection must remain established, and neither side should report a protocol, revision, or security-mode mismatch.
Can the same tunnel expose room servers and the MST dashboard?
Not by assumption. This tutorial forwards one configured master-server TCP endpoint. Room servers can use separate game-networking endpoints, and the available evidence does not establish a universal dashboard port. Inventory and secure each service independently.
Connect your verified MST5 demo with Localtonet
Build the master and client from one recorded MST5 revision, prove the Basic Connection flow locally, and then create a Localtonet TCP tunnel to the confirmed master address and port. Use the raw path only for controlled connectivity testing until WSS or an appropriate TLS design has been configured and verified.
Get Started Free →